🧢 Beautiful ✨ Detailed πŸ’ Adorable

Bunny Amigurumi Pattern

Bunny Amigurumi Pattern
4.7β˜… Rating
5-7 Hours Time Needed
2.0K Made This
βœ‚οΈ

Beginner Friendly Level

Perfect for those just starting their crochet journey, with clear instructions and simple techniques

⏱️

Weekend Treat

Takes 5-7 hours, making it an enjoyable project to finish over a couple of days.

🧸

Cute Companion

An adorable friend to cherish, handcrafted with love to bring comfort and joy for years to come.

About This Bunny Amigurumi Pattern

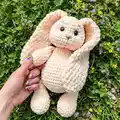
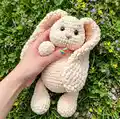
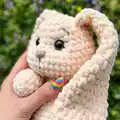
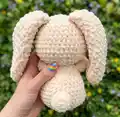
This pattern creates a plush velvet bunny with long ears and soft paws, made using plush/velvet yarn. You will work mostly in continuous rounds and simple stitches to shape the paws, ears, body and more. The pattern includes stitch counts each round and helpful photo aids so you can follow along easily.

Bunny Amigurumi Pattern crochet pattern - detailed view of completed project

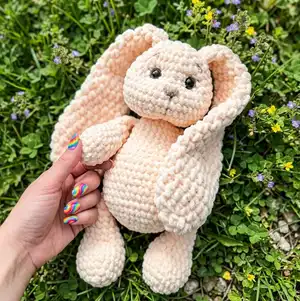
Designed for beginners, the pattern uses basic stitches (SC, HDC) and clear shaping instructions. Youll finish with a 12-inch bunny (approx.) that's perfect for cuddling or gifting.

Why You'll Love This Bunny Amigurumi Pattern

I absolutely love this pattern because it transforms cozy plush yarn into the softest cuddly bunny with simple techniques. I designed it to be approachable for beginners while still producing a polished, professional-looking toy. The long ears and rounded paws give so much personality with very little effort. It is relaxing to make and rewarding to see the piece come together as you stuff and shape each part.

Bunny Amigurumi Pattern step 1 - construction progress Bunny Amigurumi Pattern step 2 - assembly progress Bunny Amigurumi Pattern step 3 - details and accessories Bunny Amigurumi Pattern step 4 - final assembly and finishing

Switch Things Up

I love changing yarn colors to make a family of bunniesβ€”try pastel combinations or contrasting ear linings for variety.

You can make a mini version by using a thinner plush yarn and a smaller hook, or go bigger with bulkier plush yarn and a larger hook for a super cuddly toy.

I often swap the safety eyes for embroidered eyes on toys for babies to make them completely soft and safe for little ones.

Try adding little accessories like a crocheted scarf, bow, or tiny felt heart stitched to the chest for a personalized gift.

Vary the ear length and shape: shorter round ears give a different character than long floppy ones, and you can stuff the ear tips lightly for extra shape.

I sometimes embroider eyelashes, a smile or blush the cheeks with a tiny dab of fabric-safe paint to change the expression.

For a textured body, experiment with different loop stitch tensions on the ears or body to get a bumpy or flat finish.

I recommend using different hook sizes for the ears vs body to get delicate ear shapingβ€”6mm for ears and 4mm for body in this pattern works well.

Want posable limbs? Add thin craft wire inside the arms and legs before stuffing to gently pose your bunny for photos.

Make a themed bunny by changing color paletteβ€”holiday colors, gender-neutral pastels, or bold primary colors turn this pattern into a seasonal collectible.

Common Mistakes & How to Fix Them

βœ— Skipping stitch markers during increases and rounds leads to losing the beginning of the round; place and move a marker at the first stitch of every round to keep your place. βœ— Not pulling the working loop to the level of the hook when crocheting SC causes visible holes in plush yarn; gently pull the working loop up to the hook level for a tight, hole-free canvas. βœ— Overstuffing the paws or body creates lumps and distorts shaping; stuff gradually and evenly, checking shape as you go to maintain smooth curves. βœ— Forgetting to count stitches at the end of increases or decreases results in incorrect stitch counts; count after each shaping round and correct immediately if the count is off.

Bunny Amigurumi Pattern

Make a soft, cuddly plush bunny using plush/velvet yarn with clear step-by-step photos and instructions. This beginner-friendly amigurumi pattern walks you through paws, ears, body and assembly so you can create a charming handmade companion. Perfect for gifting or decorating a nursery, the pattern uses simple stitches and offers helpful tips to achieve a neat, hole-free finish.

Beginner Friendly 5-7 Hours

Materials Needed for Bunny Amigurumi Pattern

β€” Main Fabric

  • 01
    Plush/velvet yarn (approx. 130 yards / 120m per 100 g) - 2 skeins (main color)
  • 02
    Example used: Baby Love plush yarn, peach color, 2 skeins
  • 03
    Small amount of contrast yarn for embroidery of the muzzle/details

β€” Tools Required

  • 01
    Crochet hook size 4 mm
  • 02
    Crochet hook size 6 mm
  • 03
    Safety eyes 15 mm (2 pieces)
  • 04
    Soft polyester stuffing
  • 05
    Plastic needle with large eyelet (darning/yarn needle)
  • 06
    Stitch markers (3 pieces recommended)
  • 07
    Scissors

Progress Tracker

0% Complete

β€” Materials & Tools :

Info :

Any plush or velvet yarn 130 yards (120m)/100gr, 2 skeins. In my example, I used Baby Love plush yarn, peach color; 4 mm and 6 mm hooks; Safety eyes, 15 mm; Soft stuffing; Any yarn for embroidery of the muzzle; Plastic needle with large eyelet; Marker, 3 pieces; Scissors.

Info :

Gauge: 16 stitches and 13 rows = 4*4 inches (10*10 cm).

Info :

Finished bunny from the specified materials: height - 12 inches (30 cm), length of the ears - 11 inches (27 cm).

Info :

Link to the video of the process (1 h. 58 min.): https://youtu.be/61w3TEIbCOs?si=C0iDIkIpxO7CDQbT

β€” Abbreviations :

Infos :

MR - magic ring, CH - chain stitch, SlSt - slip stitch, SC - single crochet, HDC - half double crochet, DTR - double treble crochet, Inc - increase (2 SC/ 2 HDC in 1), Dec - decrease (2 SC/ 2 HDC together).

β€” Hind paws :

Info :

Take the 4 mm hook.

Info :

Crochet 5 CH.

Round 1 :

From the 2nd loop from the hook 3 SC, 3 SC in 1, 2 SC, 1 Inc (=10)

Info :

Next crochet a spiral.

Round 2 :

1 Inc, 2 SC, 3 Inc, 2 SC, 2 Inc (=16)

Info :

Place the marker in the 1st SC of the row. Next rearrange the marker to the 1st SC of the each subsequent row.

Info :

When crochet SC, pull the working loop to the level of the hook. Then the canvas will be without holes.

Info :

Then tighten the loop on the hook back.

Round 3 :

1 SC, 1 Inc, 3 SC, 1 Inc, 3 SC, 1 Inc, 3 SC, 1 Inc, 2 SC (=20)

Round 4 :

1 SC, 1 Inc, (4 SC, 1 Inc)*3, 3 SC (=24)

Round 5-6 :

2 rows of 24 SC

Round 7 :

6 SC, (1 Dec, 1 SC)*3, 1 Dec, 5 SC, 1 Dec (=19)

Round 8 :

4 SC, 4 Dec, 5 SC, 1 Dec (=14)

Round 9-14 :

6 rows of 14 SC

Info :

Take some stuffing. Take the same amount for the second paw to ensure they are equally filled. Gently stuff the lower part of the paw. Fold in half.

Info :

Crochet 6 SC on both part. Cut the thread, pull out the end.

Info :

Similarly crochet the 2nd paw.

β€” Front paws :

Info :

Take the 4 mm hook.

Info :

Crochet 2 CH.

Round 1 :

6 SC in the 2nd loop from the hook

Info :

Next crochet a spiral.

Round 2 :

6 Inc (=12)

Info :

Place the marker in the 1st SC of the row. Next rearrange the marker to the 1st SC of the each subsequent row.

Round 3 :

(5 SC, 1 Inc)*2 (=14)

Round 4-7 :

4 rows of 14 SC

Round 8 :

10 SC, 2 Dec (=12)

Round 9-13 :

5 rows of 12 SC

Info :

Take some stuffing. Take the same amount for the second paw to ensure they are equally filled. Gently stuff the lower 2/3 of the paw. Fold in half.

Info :

Crochet 5 SC on both part. Cut the thread, pull out the end.

Info :

Similarly crochet the 2nd paw.

β€” Ears :

Info :

Take the 6 mm hook.

Info :

Crochet 2 CH.

Round 1 :

6 HDC in the 2nd loop from the hook

Info :

Next crochet a spiral. Crochet the loops loosely to create a voluminous pattern.

Round 2 :

6 Inc (=12). Place the marker in the 1st HDC of the row. Next rearrange the marker to the 1st HDC of the each subsequent row.

Round 3 :

(1 HDC, 1 Inc)*6 (=18)

Round 4-8 :

5 rows of 18 HDC

Round 9 :

(4 HDC, 1 Dec)*3 (=15)

Round 10-12 :

3 rows of 15 HDC

Round 13 :

(3 HDC, 1 Dec)*3 (=12)

Round 14-16 :

3 rows of 12 HDC

Round 17 :

(4 HDC, 1 Dec)*2 (=10)

Round 18 :

10 HDC

Round 19 :

(3 HDC, 1 Dec)*2 (=8)

Round 20-22 :

3 rows of 8 HDC

Info :

Fold in half. Crochet 4 SlSt on both part. Cut the thread, pull out the end.

Info :

Similarly crochet the 2nd ear.

β€” Body :

Info :

Take the 4 mm hook.

Info :

Crochet 2 CH.

Round 1 :

6 SC in the 2nd loop from the hook

Info :

Next crochet a spiral.

Round 2 :

6 Inc (=12). Place the marker in the 1st SC of the row. Next rearrange the marker to the 1st SC of the each subsequent row.

Round 3 :

12 Inc (=24)

Round 4 :

(3 SC, 1 Inc)*6 (=30)

Assembly Instructions

  • Attach the ears to the top of the head by folding each ear in half and sewing the folded edge to the head near the indicated ear placement, spacing them symmetrically.
  • Sew the front paws to the upper sides of the body (around the upper body rounds) positioning them evenly and angled slightly forward for a natural pose.
  • Attach the hind paws to the bottom of the body, aligning seams so the bunny can sit steadily; sew securely with a yarn needle using the long tail.
  • Insert and secure safety eyes between the indicated head rounds (place marker as pattern suggests), then embroider the muzzle and nose with contrast yarn before final stuffing if required.

Important Notes

  • πŸ’‘Use a stitch marker to mark the first stitch of each round and move it up each round to avoid losing your place.
  • πŸ’‘When crocheting single crochet in plush yarn, pull the working loop to the level of the hook to prevent holes in the fabric.
  • πŸ’‘Stuff pieces evenly and use the same amount of stuffing for symmetrical parts so both paws and ears match in shape.

This sweet Bunny Amigurumi is designed to be soft, cuddly and beginner-friendly, bringing a handmade touch to any nursery or gift pile. Follow the step-by-step rounds and photo tips to create perfectly shaped paws, long floppy ears, and a lovable face. Have fun personalizing colors and facial details, and enjoy gifting your handmade companion to someone special. πŸ§ΆπŸ’•

You ask,

we answer.

FAQs

What size will the finished piece be?

The finished bunny measures approximately 12 inches (30 cm) tall with ears about 11 inches (27 cm) long when made with the recommended plush yarn and hook sizes.

Can I use different yarn weights for this pattern?

Yes, you can use different yarn weights, but this will affect the final size and texture; choose a suitable hook and note the gauge may change significantly with non-plush yarns.

Do I need prior crochet experience for this pattern?

This pattern is beginner friendly, so basic crochet knowledge such as SC, HDC, increases and decreases is recommended for best results.

How long does this project typically take to complete?

Most crocheters complete this project in 5-7 hours depending on experience and finishing details like embroidery and assembly.