🧢 Beautiful ✨ Detailed πŸ’ Adorable

Bobby the Bighorn Sheep Amigurumi Pattern

Bobby the Bighorn Sheep Amigurumi Pattern
4.2β˜… Rating
5-7 Hours Time Needed
4.0K Made This
βœ‚οΈ

Intermediate Level

Ideal for those with basic crochet experience, featuring slightly more advanced stitches and techniques to expand your skills.

⏱️

Weekend Treat

Takes 5-7 hours, making it an enjoyable project to finish over a couple of days.

πŸ₯

Charming Critter

Delightful animal designs with sweet details that capture the essence of your favorite woodland and farmyard friends.

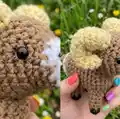
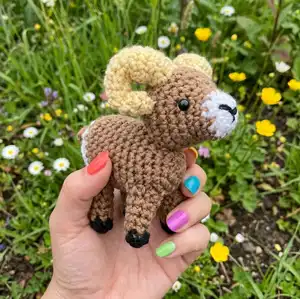
About This Bobby the Bighorn Sheep Amigurumi Pattern

This pattern creates a small, realistic bighorn sheep amigurumi complete with curled horns and a little tail. It uses basic amigurumi construction with increases, decreases and simple shaping. Youll make separate pieces and sew them together for a polished finish. Ideal for gifting or displaying on a shelf.

Bobby the Bighorn Sheep Amigurumi Pattern crochet pattern - detailed view of completed project

Pattern uses US crochet terms and worsted weight yarn in multiple colors. Clear round-by-round instructions and assembly notes are included to guide you through each step.

Why You'll Love This Bobby the Bighorn Sheep Amigurumi Pattern

I absolutely love this pattern because it captures the character of a bighorn sheep in a tiny, handheld amigurumi. I enjoy the horn shaping β€” it adds so much personality and becomes the focal point of the finished piece. The pattern is satisfying to stitch because the shaping is steady and visible as you work, making progress fun and encouraging. I also love that the finished sheep stands on its own and makes a great gift or a little shelf companion.

Bobby the Bighorn Sheep Amigurumi Pattern step 1 - construction progress Bobby the Bighorn Sheep Amigurumi Pattern step 2 - assembly progress Bobby the Bighorn Sheep Amigurumi Pattern step 3 - details and accessories Bobby the Bighorn Sheep Amigurumi Pattern step 4 - final assembly and finishing

Switch Things Up

I love how easy it is to customize Bobby by changing yarn colors; try a cream body with grey horns for a different look.

I often make a tiny flock by using thinner yarn and a smaller hook to create mini keychain versions of the sheep.

I like adding embroidered freckles or eyebrow details to change the expression and personality of each sheep I make.

You can substitute safety eyes with embroidered eyes for a fully washable toy, especially if making for small children.

To make a cuddly, chunky version, I use bulky yarn and a larger hook which results in a softer, larger sheep perfect for snuggling.

I sometimes add wire inside the legs for posability, but keep it optional depending on the recipient and use.

Experiment with different horn shapes by adjusting increases and decreases to create looser or tighter curls.

I recommend trying contrast hooves (black or dark brown) to make the legs pop β€” it adds a cute finished detail I really like.

If you want more weight, I add a small pebble pouch or extra pennies inside the body before closing to help the sheep stand sturdily.

I also make tiny accessories like a crocheted scarf or bell to personalize each sheep and make it gift-ready.

Common Mistakes & How to Fix Them

βœ— Skipping the color change at the last stitch of the white nose area; follow the instruction to change to brown on the last stitch so the nose and head lines remain neat. βœ— Placing safety eyes too close together or too high on the head; measure between rows 5 and 6 and space eyes eight stitches apart to maintain correct facial proportions. βœ— Under stuffing the body causing the sheep to flop; stuff generously and add a penny as suggested to give weight and stability in the body. βœ— Not stuffing evenly in the head and horns which leads to odd shaping; stuff gradually, shaping as you go and lightly stuff the horns so they hold their curl without being overfilled.

Bobby the Bighorn Sheep Amigurumi Pattern

Make a charming miniature bighorn sheep you can hold in your hand. This pattern guides you step-by-step through crocheting the head, body, legs, tail and signature curled horns. Youll learn simple shaping and assembly techniques to create a sturdy, lovable amigurumi companion.

Intermediate 5-7 Hours

Materials Needed for Bobby the Bighorn Sheep Amigurumi Pattern

β€” Main Fabric

  • 01
    Worsted weight yarn (#4) in beige - small amount for horns and highlights
  • 02
    Worsted weight yarn (#4) in brown - main body and head, small amount
  • 03
    Worsted weight yarn (#4) in white - small amount for nose and tail detail
  • 04
    Worsted weight yarn (#4) in black - small amount for mouth stitching and hoof tips
  • 05
    Fiber fill (polyester stuffing) - small bag to stuff head, body, legs and horns

β€” Tools Required

  • 01
    3 mm crochet hook (for horns only)
  • 02
    3.5 mm crochet hook (main pieces)
  • 03
    6 mm black safety eyes (2 pieces)
  • 04
    Scissors
  • 05
    Sewing needle (for sewing pieces together and stitching mouth)
  • 06
    Stitch markers or stitch counter (if needed)
  • 07
    Polyester stuffing (fiber fill)
  • 08
    Penny (optional, to weigh body)

Progress Tracker

0% Complete

β€” Head :

Info :

*Start using white yarn

Round 1 :

6 SC in MC (6)

Round 2 :

INC X 6 (12)

Info :

*on the last stitch change color to brown, the remainder of the head will be made using brown yarn.

Round 3 - 4 :

SC around (12)

Round 5 :

6 SC, 6 INC (18)

Round 6 :

SC around (18)

Round 7 :

(2SC, INC) X 6 (24)

Round 8 :

(3SC, INC) X 6 (30)

Info :

*Stop and put eyes in and using your needle stitch in the nose.

Round 9 :

SC around (30)

Round 10 :

(3SC, DEC) x 6 (24)

Round 11 :

(2SC, DEC) x 6 (18)

Info :

*stop and lightly stuff head

Round 12 :

(SC, DEC) x 6 (12)

Info :

*continue stuffing so head will stay nice and firm

Round 13 :

SC around (6)

Info :

*SL, close up hole and leave long tail of yarn for sewing onto body

Info :

**Eyes should be placed in between rows 5 & 6 and be 8 stiches apart. The top of the nose should start between rows 2 and 3 and the bottom should be in the middle of the original magic circle.

β€” Body :

Info :

*Use brown yarn

Round 1 :

6 SC in MC (6)

Round 2 :

INC X 6 (12)

Round 3 :

(SC, INC) X 6 (18)

Round 4 :

(2SC, INC) x 6 (24)

Round 5- 14 :

24 around (24)

Info :

*On last stitch change to white yarn. At this point you lightly stuff and add a penny inside to weigh it down.

Round 15 :

(2SC, DEC) x 6 (18)

Round 16 :

(SC, DEC) x 6 (12)

Info :

*stop and stuff generously so it will stay nice and firm

Round 17 :

DEC x 6 (6), SL and close up hole.

β€” Legs (Make 4) :

Info :

*Start off using black yarn

Round 1 :

5SC in MC (5)

Round 2 :

SC around in BLO (change to brown yarn in 5th stitch)

Round 3 :

INC, 4SC (6)

Round 4 :

SC around (6)

Round 5 :

(2 SC, INC) X 2 (8)

Round 6-7 :

SC around (8)

Info :

*SL, stuff with fiber fill and leave long tail for sewing onto body

β€” Tail :

Info :

*Use brown yarn

Item Name (P1) :

Chain 4. SC in 2nd chain from hook and next two stitches, SL in last stitch. Leave tail for sewing onto body.

β€” Horns (Make 2) :

Info :

*Use Beige Yarn & 3mm hook

Round 1 :

4SC in MC (4)

Round 2 :

3SC, INC (5)

Round 3 :

4SC, INC (6)

Round 4 :

6 around (6)

Round 5 :

(2 SC, INC) X 2 (8)

Round 6-7 :

SC around (8)

Round 8 :

(3SC, INC) X 2 (10)

Round 9 :

SC around (10)

Round 10 :

4SC, INC X 2 (12)

Round 11 :

12 around (12)

Round 12 :

(2 SC, DEC) X 3 (9)

Round 13 :

SC around (9)

Info :

*Finish off and leave a long tail for sewing onto head. Lightly stuff your horns.

Assembly Instructions

  • Attach head to body between rows 4 and 5. Tail should be sewed on the back 2 rows up.
  • Attach horns between rows 8 & 9 of the head. Roll the horns backward to create the curled shape and sew them securely onto the head.
  • Sew front legs between rows 4-6. Back legs will go between rows 11-13; position legs evenly for balance and stability.
  • Place safety eyes between rows 5 and 6, spacing them 8 stitches apart, and use your needle to stitch the nose before closing the head.
  • Weigh the body by adding a penny inside before closing, then stuff generously and close the opening firmly to keep the sheep standing.

Important Notes

  • πŸ’‘This pattern is made using US terms; convert stitches if you prefer UK terminology before starting.
  • πŸ’‘The bighorn sheep can be made smaller by reducing the ply yarn and using a smaller hook size if desired.
  • πŸ’‘Crochet using a tight stitch and stuff generously so the amigurumi keeps its shape and stands properly.
  • πŸ’‘Place safety eyes and embroider the nose before fully closing the head to make finishing easier.

This little Bobby the Bighorn Sheep is a delightful, handheld amigurumi full of character and charm. It features tiny curled horns, a weighted body for stability, and a sweet embroidered nose for personality. Perfect as a handmade gift, shelf decoration, or a tiny companion to brighten someone’s day. πŸ‘πŸ§Ά

You ask,

we answer.

FAQs

What size will the finished piece be?

The finished amigurumi measures approximately 8-10 cm tall when using worsted weight yarn and the recommended hook sizes; exact size will vary with tension.

Can I use different yarn weights for this pattern?

Yes, you can use different yarn weights, but the final size will change; use an appropriate hook for your yarn and expect to adjust stuffing and proportions.

Do I need prior crochet experience for this pattern?

This pattern is rated intermediate and assumes you know basic amigurumi stitches (SC, INC, DEC, SL) and can work in the round.

How long does this project typically take to complete?

Most crocheters complete this project in 5-7 hours, depending on experience level and how much time you spend on assembly and finishing.