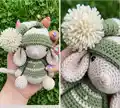
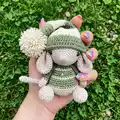
Make an adorable Noel the Christmas Mouse to hang on your tree or display as a festive keepsake. This beginner-friendly amigurumi pattern walks you through shaping the head, body, ears, limbs and hat with clear rounds and helpful tips. You will love the tiny details like the embroidered nose and a sparkly pom pom to finish him off. Perfect for holiday gifting and quick holiday makes.
Progress Tracker
0% Complete
— Pattern Instructions :
Info :
This pattern is written using American terminology and is worked in continuous rounds unless otherwise stated. If Noel is made using the materials described, he will be ~12 cm / 4.75 inches tall from the top of his hat to the base of his body.
— Head :
Info :
IN COLOUR 18, TAUPE. Starting from the tip of the nose.
Round 1 :
Start 6 sc in a magic ring [6]
Round 2 :
(Sc in next st, inc in next st) x 3 [9]
Round 3 :
(Sc in each of next 2 st, inc in next st) x 3 [12]
Round 4 :
(Sc in each of next 3 st, inc in next st) x 3 [15]
Round 5 :
(Sc in each of next 4 st, inc in next st) x 3 [18]
Round 6 :
Sc in next st, inc in next st, sc in each of next 2 st, (inc in next st, sc in each of next 2 st) x 3, inc in next st, sc in each of next 2 st, inc in next st, sc in next st [24]
Info :
Mark the 8th/9th and 16th/17th stitches with a spare piece of yarn. These indicate the top centre of the head and will help with placement of the eyes and nose.
Round 7 :
Sc in all 24 st [24]
Round 8 :
Sc in each of next 2 st, (inc in next st, sc in each of next 3 st) x 2, inc in next st, sc in each of next 2 st, inc in next st, (sc in each of next 3 st, inc in next st) x 2, sc in each of next 2 st [30]
Round 9 :
Sc in all 30 st [30]
Round 10 :
Sc in each of next 2 st, inc in next st, (sc in each of next 4 st, inc in next st) x 5, sc in each of next 2 st [36]
Round 11 :
Sc in each of next 3 st, (inc in next st, sc in each of next 5 st) x 2, inc in next st, sc in each of next 4 st, inc in next st, (sc in each of next 5 st, inc in next st) x 2, sc in each of next 3 st [42]
Round 12 :
Sc in each of next 3 st, inc in next st, (sc in each of next 6 st, inc in next st) x 5, sc in each of next 3 st [48]
Round 13-18 :
Sc in all 48 st [48]
Info :
Insert 5 mm safety eyes between Rnd 9 and 10, 14 st apart (Picture 1). Use the marked st from Rnd 6 as a guide to centre the eyes.
Info :
Use all six strands of the pink embroidery thread to sew his nose. The nose is sewn over Rnd 1 to 3. The base of the nose goes through the starting magic ring, the top of the nose should be 3 st wide (Picture 1).
Info :
Start stuffing the head firmly with fibrefill and continue to do so as you crochet the rest of the head.
Round 19 :
(Sc in each of next 6 st, dec) x 6 [42]
Round 20 :
(Sc in each of next 5 st, dec) x 6 [36]
Round 21 :
(Sc in each of next 4 st, dec) x 6 [30]
Round 22 :
(Sc in each of next 3 st, dec) x 6 [24]
Round 23 :
Sc in all 24 st [24]
Round 24 :
(Sc in each of next 2 st, dec) x 6 [18]
Round 25 :
(Sc in next st, dec) x 6 [12]
Info :
Sl st in next st and fasten off, leaving a long yarn tail.
Info :
Thread the tail through a needle. Weave the needle through the front loop of each of the 6 st, always going in the direction from the centre and under the front loop. Pull the yarn tail and the hole should close. Insert the needle through the middle of the hole and pull through the head. Fasten off and weave the end in.
— Body :
Info :
START IN COLOUR 18, TAUPE. Starting from the bottom of the body.
Round 1 :
Start 6 sc in a magic ring [6]
Round 2 :
Inc in all 6 st [12]
Round 3 :
(Sc in next st, inc in next st) x 6 [18]
Round 4 :
(Sc in each of next 2 st, inc in next st) x 6 [24]
Round 5 :
(Sc in each of next 3 st, inc in next st) x 6 [30]
Round 6 :
(Sc in each of next 4 st, inc in next st) x 6 [36]
Round 7 :
(Sc in each of next 5 st, inc in next st) x 6 [42]
Round 8 :
(Sc in each of next 6 st, inc in next st) x 6 [48]
Round 9-11 :
Sc in all 48 st [48]
Info :
Change to Colour 42, Green yarn.
Round 12 :
(Sc in each of next 6 st, dec) x 6 [42]
Round 13 :
Sc in all 42 st [42]
Round 14 :
(Sc in each of next 5 st, dec) x 6 [36]
Round 15 :
Sc in all 36 st [36]
Info :
Change to Colour 02, Off White yarn.
Round 16 :
(Sc in each of next 10 st, dec) x 3 [33]
Info :
Change to Colour 42, Green yarn.
Round 17 :
Sc in all 33 st [33]
Infos :
Optional: For Rnd 18, every fifth stitch (starting from the 3rd st of the Rnd) is made in Colour 02, Off White yarn. These are the 3rd, 8th, 13th, 18th, 23rd, 28th stitches of Rnd 18.
Round 18 :
Sc in each of next 3 st, dec, (sc in each of next 9 st, dec) x 2, sc in each of next 6 st [30]
Round 19 :
Sc in all 30 st [30]
Info :
Change to Colour 02, Off White yarn.
Round 20 :
Sc in each of next 5 st, dec, (sc in each of next 8 st, dec) x 2, sc in each of next 3 st [27]
Info :
Change to Colour 42, Green yarn.
Round 21 :
Sc in each of next 5 st, dec, (sc in each of next 7 st, dec) x 2, sc in each of next 2 st [24]
Round 22 :
(Sc in each of next 2 st, dec) x 6 [18]
Info :
Sl st in next st and fasten off. Leave a long tail to sew the body to the head. Stuff the body firmly with fibrefill.
— Arm X 2 :
Info :
START IN COLOUR 18, TAUPE. Starting from the tip of the arm.
Round 1 :
Start 6 sc in a magic ring [6]
Round 2 :
(Sc in next st, inc in next st) x 3 [9]
Round 3-4 :
Sc in all 9 st [9]
Round 5 :
(Sc in next st, dec) x 2, sc in each of next 3 st [7]
Info :
Change to Colour 42, Green yarn.
Round 6-11 :
Sc in all 7 st [7]
Round 12 :
Sc in each of next 3 st [3]. Leave the remaining stitches unworked
Info :
Stuff the hand firmly with fibrefill (Rnd 1 to 5), with gradually less further up the arm.
Info :
Flatten the top opening of the arm and sc in each of next 3 st through both layers to close the opening. Fasten off and leave a long tail for sewing the arm to the body.
— Leg X 2 :
Info :
START IN COLOUR 08, PINK. Starting from the base of the leg.
Round 1 :
Start 6 sc in a magic ring [6]
Round 2 :
Inc in all 6 st [12]
Round 3 :
(Sc in next st, inc in next st) x 6 [18]
Info :
Change to Colour 18, Taupe yarn.
Round 4 :
(Sc in each of next 2 st, inc in next st) x 6 [24]
Round 5-6 :
Sc in all 24 st [24]
Round 7 :
Sc in each of next 3 st, (dec, sc in next st) x 5, dec, sc in each of next 4 st [18]
Round 8 :
Sc in each of next 3 st, dec x 6, sc in each of next 3 st [12]
Round 9 :
(Sc in each of next 2 st, dec) x 3 [9]
Round 10-14 :
Sc in all 9 st [9]
Info :
FOR THE LEFT LEG: Rnd 15: Sc in each of next 2 st [2] Leave the remaining st unworked
Info :
FOR THE RIGHT LEG: Rnd 15: Sc in each of next 7 st [7] Leave the remaining st unworked
Info :
Stuff the leg firmly with fibrefill (Rnd 1 to 9), with gradually less further up the leg. Flatten the top opening of the leg and sc in each of next 4 st through both layers to close the opening. Fasten off and leave a long tail for sewing the leg to the body.
— Inner Ear X 2 :
Info :
IN COLOUR 08, PINK. Starting from the centre of the inner ear.
Round 1 :
Start 6 sc in a magic ring [6]
Round 2 :
Inc in all 6 st [12]
Round 3 :
(Sc in next st, inc in next st) x 6 [18]
Round 4 :
(Sc in each of next 2 st, inc in next st) x 6 [24]
Round 5 :
(Sc in each of next 3 st, inc in next st) x 6 [30]
Info :
Sl st in next st. Fasten off and weave in the yarn tails.
— Outer Ear X 2 :
Info :
IN COLOUR 18, TAUPE. Starting from the centre of the outer ear.
Round 1 :
Start 6 sc in a magic ring [6]
Round 2 :
Inc in all 6 st [12]
Round 3 :
(Sc in next st, inc in next st) x 6 [18]
Round 4 :
(Sc in each of next 2 st, inc in next st) x 6 [24]
Round 5 :
(Sc in each of next 3 st, inc in next st) x 6 [30]
Info :
At the end of Rnd 5, do not fasten off. We will now crochet the inner and outer ears together. Place the backs of the inner and outer ears together (Picture 2).
Round 6 :
Continuing from the end of Rnd 5 of the outer ear, ch 1, sc in each of next 30 st through both the inner and outer ear layers.
Info :
At the end of Rnd 6, fold the joined ears in half, working through both layers, sc in each of next 2 st, sl st in next st (Picture 3).
Info :
Fasten off and leave a long yarn tail for sewing the ear to the head.
— Hat :
Info :
START IN COLOUR 42, GREEN. Starting from the tip of the hat. Start with a long starting yarn tail.
Round 1 :
Start 4 sc in a magic ring [4]
Round 2 :
(Sc in next st, inc in next st) x 2 [6]
Round 3 :
Sc in all 6 st [6]
Round 4 :
(Hdc in next st, hdc-inc in next st) x 3 [9]
Round 5 :
Hdc in all 9 st [9]
Round 6 :
(Hdc in each of next 2 st, hdc-inc in next st) x 3 [12]
Round 7 :
Hdc in all 12 st [12]
Info :
Change to Colour 02, Off White yarn.
Round 8 :
(Hdc in each of next 3 st, hdc-inc in next st) x 3 [15]
Round 9 :
Hdc in all 15 st [15]
Round 10 :
(Hdc in each of next 4 st, hdc-inc in next st) x 3 [18]
Round 11 :
Hdc in all 18 st [18]
Info :
Change to Colour 42, Green yarn.
Round 12 :
(Hdc in each of next 5 st, hdc-inc in next st) x 3 [21]
Round 13 :
Hdc in all 21 st [21]
Round 14 :
(Hdc in each of next 6 st, hdc-inc in next st) x 3 [24]
Round 15 :
Hdc in all 24 st [24]
Info :
Change to Colour 02, Off White yarn.
Round 16 :
(Hdc in each of next 3 st, hdc-inc in next st) x 6 [30]
Round 17 :
Hdc in all 30 st [30]
Round 18 :
(Hdc in each of next 4 st, hdc-inc in next st) x 6 [36]
Round 19 :
Hdc in all 36 st [36]
Info :
Change to Colour 42, Green yarn.
Round 20 :
(Hdc in each of next 5 st, hdc-inc in next st) x 6 [42]
Round 21 :
(Hdc in each of next 6 st, hdc-inc in next st) x 6 [48]
Round 22 :
Hdc in all 48 st [48]
Round 23 :
Sc in all 48 st [48]
Info :
Sl st in next st and fasten off. Leave a long tail for sewing the hat to the head.
Info :
Pull the start yarn tail out between Rnd 5 and 6 of the hat (Picture 4), preferably on the same side as the colour change line so that this gets hidden when you sew the tip of the hat down.
Info :
Using Colour 02, Off White yarn and the gold yarn, make a 35 mm pom pom and sew the pom pom to the tip of the hat. Use the start yarn tail that you brought to the outside of the hat to sew the tip of the hat down. Sew the start yarn tail to between Rnd 20 and 21 of the hat.
— Tail :
Info :
IN COLOUR 18, TAUPE. Starting from the tip of the tail.
Round 1 :
Start 6 sc in a magic ring [6]
Round 2 :
Sc in each of next 5 st, inc in next st [7]
Round 3-17 :
Sc in all 7 st [7]
Info :
Do not stuff the tail. Flatten the opening of the tail and sc in each of next 3 st across both layers to close the opening.
Info :
Sl st and fasten off. Leave a long tail for sewing the tail to the body.
— Assembly :
Item 1 (P1) :
Sew the body to the head. The opening of the body should be sewn over Rnd 12 to 18 at the bottom of the head (Picture 6). Note that the colour change line of the body should face the back. If you created the white stitches in Rnd 18 of the body, ensure that this is evenly spaced relative to the head (Picture 7). You can tilt his head slightly to give him a cuter look.
Item 2 (P1) :
Sew the arms to the body. The flat edge of each arm should be sewn between Rnd 21 and 22 of the body. The front corners of each arm should be 7 st apart.
Item 3 (P1) :
Sew the legs to the body. The top of each leg should be sewn over Rnd 7 to 10 of the body and just behind the midline of the body (Picture 8). Sew a few extra stitches along each leg to hold the legs snug against the body (Picture 8).
Item 4 (P1) :
Sew the ears with the flat edge over Rnd 13 to 15 of the head (Picture 9). The front of the ears should be 22 st apart (Picture 10).
Item 5 (P1) :
Sew the tail to the back of the body centred between the legs. The flat edge of the tail should be sewn over Rnd 7 to 9 of the body.
Item 6 (P1) :
Place and sew the hat to the head.
Item 7 (P1) :
Thread a piece of gold string through the top of the hat for hanging (Picture 11).
Your little Noel the Christmas Mouse is all ready to bring festive cheer to your home! Make a set of them in different colours or create matching stockings for gift sets. Whether you hang him on your tree or keep him on a shelf, he is sure to be a seasonal favorite. 🎄🧶✨