🧢 Beautiful ✨ Detailed πŸ’ Adorable

Starlight Square Pattern

Starlight Square Pattern
3.9β˜… Rating
5-7 Hours Time Needed
3.8K Made This
βœ‚οΈ

Intermediate Level

Ideal for those with basic crochet experience, featuring slightly more advanced stitches and techniques to expand your skills.

⏱️

Weekend Treat

Takes 5-7 hours, making it an enjoyable project to finish over a couple of days.

🏑

Cozy Accent

A warm touch for your space that transforms ordinary corners into inviting nooks filled with handmade charm.

About This Starlight Square Pattern

Starlight Square is a layered, decorative crochet square designed to be used as a standalone accent or joined into a larger blanket. The pattern uses multiple yarn colors with post stitches, clusters, popcorns, and third-loop work to create a starburst effect. Each round is written in full with counts, color changes, and helpful notes for colorway options.

Starlight Square Pattern crochet pattern - detailed view of completed project

Two curated colorways are provided, plus clear notes on carrying yarn and blocking for a professional finish. The pattern includes stitch definitions and helpful photos to guide you through the trickier steps.

Why You'll Love This Starlight Square Pattern

I absolutely love this pattern because it blends bold texture with elegant color transitions that make every square feel like a tiny piece of art. I designed the rounds to build layers slowly so you can see the starburst emerge as you work. The variety of stitches β€” clusters, post stitches, third-loop work β€” keeps the project interesting without being overwhelming. I enjoy how the pattern works equally well in bright, saturated colors or soft tone-on-tone palettes, making it very versatile.

Starlight Square Pattern step 1 - construction progress Starlight Square Pattern step 2 - assembly progress Starlight Square Pattern step 3 - details and accessories Starlight Square Pattern step 4 - final assembly and finishing

Switch Things Up

I love how easy it is to customize this square by swapping colors for a whole new look; try pastels for a soft baby blanket or jewel tones for a dramatic throw.

I sometimes change yarn weight to create different sizes; using a bulky cotton and a larger hook will give you a chunky, cozy square much faster.

I often make mini versions for coasters by using lighter yarn and a smaller hookβ€”adjust rounds as needed and watch your gauge.

For a lacy effect, omit some post stitches and replace them with chains and dc clusters to open up the motif.

I recommend experimenting with a neutral background color and bold contrast for the star to make the center pop visually.

If you want posability or extra structure, I will add interfacing or thin foam between layers before sewing squares together for placemats.

I like to add a simple border in single crochet rounds for a clean finish, or try a scalloped border to soften the corners and add a decorative frame.

Try joining squares with a visible seam in a contrasting color for a graphic grid, or use the join-as-you-go method to keep the back tidy.

I also add small embroidered details or beads at the center for special gifts; just secure embellishments carefully so they are washable.

When making a full blanket, I mix both colorways shown and alternate them to create a balanced, designer look that reads well at any size.

Common Mistakes & How to Fix Them

βœ— Skipping the invisible join at the end of rounds can create an obvious seam; always perform the invisible join or specified finishing method to keep edges neat. βœ— Carrying yarn too tightly during color changes will pucker the fabric and distort stitch definition; keep the carried yarn loose and stitch over strands where recommended. βœ— Not placing or moving stitch markers when instructed can cause you to lose your starting stitch position; place a marker in the marked st and move it each round to track your spot. βœ— Forgetting to fold ch-2 spaces back (as noted in rnd 6) will misalign later rounds; follow the fold-and-work instructions exactly to ensure proper layering and counts. βœ— Pulling front- and back-post stitches too tight will close the texture and hide the 3D elements; work post stitches with even tension and maintain a slightly looser gauge for texture.

Starlight Square Pattern

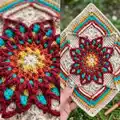
Create a stunning, textured crochet square with the Starlight Square Pattern. This colorful, modular block features layered stitches, post stitches, clusters, and decorative popcorns to give your blanket or cushion a professional, dimensional look. Follow the full round-by-round instructions and colorway notes to make a single 11–12 inch finished square depending on your hook. Ideal for makers who love colorwork and thoughtful stitch sequences.

Intermediate 5-7 Hours

Materials Needed for Starlight Square Pattern

β€” Main Fabric

  • 01
    I Love This Cotton (Worsted Weight), 100% cotton - used in Colorway 1 and Colorway 2 (A Parchment, B Gold, C Canyon, D Turquoise, E Burnt Sienna noted for Colorway 1; Colorway 2 lists A White, B Deep Orchid (Loops & Threads Crme Cotton), C Purple, D Pale Orchid, E Dark Denim).
  • 02
    KC Essential Yarn (Lightweight), 100% cotton - used for select colorway accents in pattern notes.
  • 03
    Loops & Threads ~ Creme Cotton (Worsted Weight) 87% cotton, 13% nylon - used for Colorway 2 B (Deep Orchid) and D (Pale Orchid) in example.
  • 04
    Colorway 1 mapping: A - Parchment (I Love This Cotton), B - Gold (I Love This Cotton), C - Canyon (KC), D - Turquoise (I Love This Yarn), E - Burnt Sienna (I Love This Yarn).
  • 05
    Colorway 2 mapping: A - White (I Love This Cotton), B - Deep Orchid (Loops & Threads Creme Cotton), C - Purple (I Love This Cotton), D - Pale Orchid (Loops & Threads Creme Cotton), E - Dark Denim (I Love This Yarn).

β€” Tools Required

  • 01
    Crochet hook size 4.5 mm (use for sample / finished 11" x 11")
  • 02
    Crochet hook size 5.0 mm (use for alternate finish / finished 12" x 12")
  • 03
    Stitch markers
  • 04
    Scissors
  • 05
    Tapestry / yarn needle for weaving ends
  • 06
    Blocking tools (blocking pins, foam board) and wet or steam block method as recommended
  • 07
    Optional: small crochet hook for weaving in ends and finishing
  • 08
    Optional: clips or pins to hold folds in place when folding ch-2 spaces

Progress Tracker

0% Complete

β€” Starlight Square :

Info :

Hook used/Finished and Blocked Size: 4.5 mm, 11" x 11"; 5 mm, 12" x 12". Crochet Terms: US terminology throughout. Skill Level: ending intermediate.

Infos :

Yarn and Colors Used: I Love This Cotton (Worsted Weight) 100% cotton; KC Essential Yarn (Lightweight) 100% cotton; Loops & Threads ~ Creme Cotton (Worsted Weight) 87% cotton, 13% nylon. Colorway 1: A Parchment, B Gold, C Canyon, D Turquoise, E Burnt Sienna. Colorway 2: A White, B Deep Orchid, C Purple, D Pale Orchid, E Dark Denim.

Info :

Symbol Guide and Special Instructions included: Asterisks, parentheses, and brackets are used exactly as described in the symbol guide. Instructions for all rounds start with a standing stitch and end with an invisible join to 2nd st of rnd, and fasten off unless otherwise noted. See Special Instructions for Changing Yarn Colors and Carrying Yarn guidance and blocking recommendations.

Round 1 :

Start in a double magic circle, ch 3 or use a chainless dc (as first dc of rnd), 7 dc; cut yarn, invisible join. Counts: 8 dc (8 total)

Round 2 :

Start in any dc, *(sc, tr) in dc; repeat from * around; cut yarn, invisible join. Counts: 8 sc, 8 tr (16 total)

Round 3 :

Start in any st, *(2dc-cluster, ch 1) in each st around; cut yarn, invisible join. Counts: 16 2dc-cluster, 16 ch-1 sp (32 total)

Round 4 :

Working in ch-1 sps only, *(2 sc, ch 1) in each ch-1 sp around; cut yarn, invisible join. Counts: 32 sc, 16 ch-1 sp (48 total)

Round 5 :

Note: Work in rnd 3 only and in front of rnd 4 ch-1 sp. Start in any 2dc-cluster, tr2tog working in two 2dc-clusters, skipping (2 sc), ch 2; [tr2tog working in 2dc-cluster just worked and NEXT UNworked 2dc-cluster, skipping (2 sc), ch 2] 14 times; tr2tog working in 2dc-cluster just worked and 1st worked 2dc-cluster of rnd, skipping (2 sc), ch 2; cut yarn, invisible join. Counts: 16 tr2tog, 16 ch-2 sp (48 total)

Round 6 :

Note: Fold ch-2 sp of rnd 5 back and work in ch-1 sp of rnd 4 only, Start in any ch-1 sp; *working in rnd 4, 2dc-cluster in ch-1 sp; ch 2, sk NEXT tr2tog of rnd 5; repeat from * around; cut yarn, invisible join. Counts: 16 2dc-cluster, 16 ch-2 sp (48 total)

Round 7 :

Start in any 2dc-cluster, *PC in 2dc-cluster; ch 4, sk NEXT ch-2 sp; repeat from * around; cut yarn, invisible join. Counts: 16 PC, 16 ch-4 sp (80 total)

Round 8 :

Start in any PC, *sc in PC, ch 2; working in rnd 6 and in front of rnd 7, (2 dc) in NEXT ch-2 sp; working in rnd 7, ch 2, sk ch-4 sp; repeat from * around; cut yarn, invisible join. Counts: 16 sc, 32 dc, 32 ch-2 sp (112 total)

Round 9 :

Starting in any sc, *sc in sc; ch 3, FPsc around NEXT tr2tog of rnd 5; ch 3, sk (ch-2 sp, 2 dc, ch-2 sp); repeat from * around; cut yarn, invisible join. Counts: 16 sc, 16 FPsc, 32 ch-3 sp (128 total)

Round 10 :

Working in rnd 8 only, start in 1st dc of any group of (2 dc), *sc in 2 dc and NEXT ch-2 sp-place st marker in 1st sc; sc back-stitch in NEXT sc worked in PC-this sc back-stitch will be known as a sc in rnd 11; sc in NEXT ch-2 sp; repeat from * around; cut yarn, invisible join. Counts: 64 sc, 16 sc back-stitch (80 total)

Round 11 :

Start in marked st of rnd 10, *sc in 4 sc-remove marker, hdc in NEXT sc, dc in NEXT sc, ch 1; working in NEXT 4 sc, tr4tog; ch 3, sk sc, tr in NEXT sc, ch 2 as a corner; working behind tr just worked, tr in sc just skipped; ch 3; working in NEXT 4 UNworked sc, tr4tog; ch 1, dc in NEXT sc, hdc in NEXT sc, sc in NEXT 2 sc; repeat from * around; cut yarn, invisible join. Counts: 24 sc, 8 hdc, 8 dc, 8 tr, 8 tr4tog, 8 ch-1 sp, 8 ch-3 sp, 4 ch-2 corner sp (88 total/22 per side)

Round 12 :

Note: Be sure to read the instructions for the e-FPtr2tog before starting this rnd. Start in any corner sp with color A, * (2 dc, ch 2, 2 dc) in corner sp; sk tr, (4 hdc) in NEXT ch-3 sp; hdc in NEXT tr4tog and ch-1 sp-add color E, sk dc; working in rnd 9 around scs but working under the two ch-3 sps located to the right and left of current position, e-FPtr2tog-change to color A; working in rnd 11, sc in NEXT 8 sts - the 1st hdc may be covered by e-FPtr2tog just worked-change to color E, sk dc; working in rnd 9 and under NEXT two Unworked ch-3 sps, e-FPtr2tog-change to color A; working in rnd 11, hdc in NEXT ch-1 sp and tr4tog, (4 hdc) in NEXT ch-3 sp, sk tr; repeat from * around; cut yarn, invisible join. Counts: 32 sc, 48 hdc, 16 dc, 8 e-FPtr2tog, 4 ch-2 corner sp (104 total/26 per side)

Round 13 :

Start in any corner sp, * (hdc, ch 2, hdc) in corner sp; hdc in NEXT 8 sts; FPdc around NEXT e-FPtr2tog; sc in NEXT 8 sc; FPdc around NEXT e-FPtr2tog, hdc in NEXT 8 sts - the 1st hdc may be covered by FPdc just worked; repeat from * around; cut yarn, invisible join. Counts: 32 sc, 72 hdc, 8 FPdc, 4 ch-2 corner sp (112 total/28 per side)

Round 14 :

Start in any corner sp with color C, * (dc, ch 2, dc) in any corner sp; BPdc around NEXT 9 hdc; ch 1, FPtr around NEXT FPdc-add color A; sk sc, sc in NEXT 6 sc-change to color C; sk sc, FPtr around NEXT FPdc, ch 1; BPdc around NEXT 9 hdc; repeat from * around; cut yarn, invisible join. Counts: 24 sc, 8 dc, 72 BPdc, 8 FPtr, 8 ch-1 sp, 4 ch-2 corner sp (120 total/30 per side)

Round 15 :

Start in any corner sp with color D for colorway 1 / color B for colorway 2, * (2 dc, ch 2, 2 dc) in corner sp; working in 3LP, dc in NEXT 10 dc; ch 1, sk ch-1 sp, FPtr around NEXT FPtr-add color A-be sure to keep the carried yarn loose because you can't conceal the yarn behind the ch-1 sp; sk sc, sc in NEXT 4 sc, change to color D/B, sk sc; FPtr around NEXT FPtr, ch 1, sk ch-1 sp-keep the carried yarn loose; working in 3LP, dc in NEXT 10 dc; repeat from * around; cut yarn, invisible join. Counts: 16 sc, 96 dc, 8 FPtr, 8 ch-1 sp, 4 ch-2 corner sp (128 total/32 per side)

Round 16 :

Start in any corner sp with color B for colorway 1 / color D for colorway 2, * (dc, ch 2, dc) in corner sp; working in 3LP, dc in NEXT 12 sts; ch 1, FPtr around NEXT FPtr-add color A; working in NEXT 4 sc, dc4tog-change to color B/D; FPtr around NEXT FPtr; ch 1; working in 3LP, dc in NEXT 12 dc; repeat from * around; cut yarn, invisible join. Counts: 4 dc4tog, 104 dc, 8 FPtr, 8 ch-1 sp, 4 ch-2 corner sp (124 total/31 per side)

Round 17 :

Start in any corner sp, * (2 dc, ch 2, 2 dc) in corner sp; working in 3LP, dc in NEXT 13 dc, ch 2; working around NEXT 2 FPtr, FPtr2tog, skipping dc4tog, ch 2; working in 3LP, dc in 13 dc; repeat from * around; cut yarn, invisible join. Counts: 120 dc, 4 FPtr2tog, 8 ch-2 sp, 4 ch-2 corner sp (140 total/35 per side)

Round 18 :

Start in any corner sp, * (2 hdc, ch 2, 2 hdc) in corner sp; hdc in NEXT 15 dc; (2 hdc) in NEXT ch-2 sp; FPhdc around NEXT FPtr2tog; (2 hdc) in NEXT ch-2 sp; hdc in NEXT 15 dc; repeat from * around; cut yarn, invisible join. Counts: 152 hdc, 4 FPhdc, 4 ch-2 corner sp (156 total/39 per side)

Info :

Special stitches and stitch definitions (double magic circle, standing stitch, invisible join, sc back-stitch, FPsc, BPdc, FPhdc, FPtr, e-FPtr2tog etc.) are shown earlier in the pattern with photo references and step-by-step notes. See 'Special Instructions' for changing yarn colors, carrying yarn, and finishing tips such as blocking (wet or steam block) for best results.

Assembly Instructions

  • Block the finished square to measurements listed for your hook size. Wet block or steam block carefully and pin to shape (11" x 11" for 4.5 mm hook or 12" x 12" for 5 mm hook) before allowing to dry fully.
  • Weave in ends on the wrong side using a tapestry needle, taking care to follow the direction of the yarn strands in the surrounding stitches for an invisible finish.
  • When joining multiple squares, align star points and ch-2 corners; use whipstitch or published join-as-you-go methods to keep motif alignment consistent.
  • If carrying yarn across the wrong side, keep floats loose and secure at regular intervals or over ch-1 spaces to prevent tightness and puckering in the finished blanket.
  • Pin folds (for rnd 5 folding instruction) into place before continuing the next rounds to ensure even layering and to keep the ch-2 spaces correctly positioned.

Important Notes

  • πŸ’‘Use stitch markers to mark the start of rounds and the marked stitch in rnd 10 so you don't lose your place during long rounds.
  • πŸ’‘Keep carried yarn slightly loose when working FPtr or FPdc over carried strands so the back side remains tidy and the front texture stays pronounced.
  • πŸ’‘Block your finished square to open up lace and post stitch details; blocking will make the layers even and help squares join cleanly.

This Starlight Square Pattern brings vibrant texture and layered stitchwork to any blanket, cushion, or cozy project. The starburst center and framed posts create a beautiful focal point for modular blankets or a single decorative square. Try the two colorways provided or mix your own palette to make a bespoke set of squares. 🧢✨

You ask,

we answer.

FAQs

What size will the finished piece be?

The finished block measures approximately 11" x 11" when using a 4.5 mm hook and the recommended yarn, and approximately 12" x 12" when using a 5.0 mm hook.

Can I use different yarn weights for this pattern?

Yes, you can use different yarn weights but this will affect the final size and texture; adjust your hook size accordingly and swatch to check measurements before making multiple squares.

Do I need prior crochet experience for this pattern?

This pattern is rated intermediate, so basic crochet knowledge (sc, hdc, dc, tr) plus experience with post stitches and clusters is recommended for the best results.

How long does this project typically take to complete?

Most crocheters finish one square in around 5-7 hours depending on experience and how familiar they are with the special stitches and color changes.

How should I block and finish my square?

Wet or steam block the square gently, pinning to the correct dimensions; allow to dry fully. Weave in ends on the wrong side following the yarn direction to hide tails.