🧶 Beautiful ✨ Detailed 💝 Adorable

Bernat Alize EZ Baby Blanket Pattern

Bernat Alize EZ Baby Blanket Pattern
4.7★ Rating
5-7 Hours Time Needed
2.1K Made This
✂️

Beginner Friendly Level

Perfect for those just starting their crochet journey, with clear instructions and simple techniques

⏱️

Weekend Treat

Takes 5-7 hours, making it an enjoyable project to finish over a couple of days.

🤗

Soft Hug

Gentle, plush, and full of warmth, creating a sense of comfort and coziness wherever they find a home.

About This Bernat Alize EZ Baby Blanket Pattern

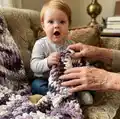
This pattern creates a plush, textured baby blanket using Bernat Alize Blanket-EZ loop yarn. The technique uses loops pulled through a foundation of 50 loops to form a dense, cushioned fabric. The finished blanket measures approximately 39" [99 cm] square, making it perfect for strollers, cribs, or lap blankets.

Bernat Alize EZ Baby Blanket Pattern crochet pattern - detailed view of completed project

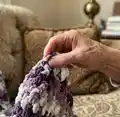
Designed with beginners in mind, no crochet hook is required — you work with the loops directly. The instructions include bind-off directions and helpful notes for starting and finishing.

Why You'll Love This Bernat Alize EZ Baby Blanket Pattern

I absolutely love this pattern because the looped yarn creates an incredibly soft and cozy fabric with minimal effort. I enjoy how quickly the blanket grows — the thick yarn gives instant gratification and a professional-looking finish. I also appreciate that no hook is required, making it accessible to people who are new to traditional crochet. Finally, the simple repeat of rows makes it easy to customize size and color, so each finished blanket feels personal and unique.

Bernat Alize EZ Baby Blanket Pattern step 1 - construction progress Bernat Alize EZ Baby Blanket Pattern step 2 - assembly progress Bernat Alize EZ Baby Blanket Pattern step 3 - details and accessories Bernat Alize EZ Baby Blanket Pattern step 4 - final assembly and finishing

Switch Things Up

I love changing up this blanket by working different numbers of foundation loops — increasing loops widens the blanket and makes a great stroller size.

I sometimes alternate two colors ball by ball to create wide stripes without changing yarn mid-row, giving a subtle variegated look.

I will often add a simple crocheted or sewn-on border in a contrasting color to frame the blanket and hide any uneven edges.

I like to make smaller versions as loveys by using fewer foundation loops and stopping when the piece is 12-16 inches square.

Try using a solids-only color for a modern look, or choose multiple balls of coordinating shades for a playful striped blanket.

If you want a chunkier, cozier blanket, try using a different brand of loop yarn with more loft or use double the yarn thickness where compatible.

I sometimes add little pom-poms or tassels to the corners for a playful finishing touch that kids love.

For a gift-ready finish, embroider a small name or initial on a corner with a tapestry needle after weaving in ends.

I recommend blocking the finished blanket lightly by pinning to shape and smoothing loops; it evens out edges before gifting.

When making for babies, consider using machine-washable yarn colors for easy care and include washing instructions with the gift.

Finally, combine two balls of different textures to create a marled effect — it adds visual depth while staying soft and snuggly.

Common Mistakes & How to Fix Them

✗ Not counting the foundation loops carefully; recount and ensure you start with exactly 50 loops to maintain correct stitch count and blanket width. ✗ Turning the work after each row even when instructed not to; follow the pattern and do not turn after rows to keep loop orientation consistent. ✗ Pulling loops inconsistently which leads to uneven texture; maintain steady tension and pull loops from back to front in the same manner for each stitch. ✗ Pulling the working yarn from the wrong side which creates twisted or lopsided stitches; always pull the next loop up from behind through the stitch as instructed to form the proper knit-like loop. ✗ Skipping the bind off steps or cutting the loop too short; work the bind off in the same direction as the last row and cut the last loop with enough tail to tie and weave in securely.

Bernat Alize EZ Baby Blanket Pattern

Create a plush, squishy baby blanket using Bernat Alize Blanket-EZ yarn — perfect for cozying up little ones. This beginner-friendly pattern guides you through an easy looped technique that requires no hook, producing a soft textured throw. Youll finish a beautiful 39" [99 cm] square blanket that makes a thoughtful handmade gift.

Beginner Friendly 5-7 Hours

Materials Needed for Bernat Alize EZ Baby Blanket Pattern

— Main Fabric

  • 01
    Bernat® Alize® Blanket-EZ™ (6.4 oz/180 g; 18 yds/16 m) Thistle (37021) - 3 balls

— Tools Required

  • 01
    Scissors
  • 02
    Yarn needle for weaving in ends
  • 03
    Tape measure to check blanket dimensions
  • 04
    Pins for blocking or holding edges while finishing (optional)

Progress Tracker

0% Complete

— Measurement :

Info :

Approximately 39" [99 cm] square.

— Materials :

Info :

Bernat® Alize® Blanket-EZ™ (6.4 oz/180 g; 18 yds/16 m) Thistle (37021) 3 balls

— Notes :

Infos :

Right side of project is facing at all times. 'Working yarn' is held behind stitches throughout work. Loops from working yarn are always pulled through stitches from back to front of work.

Info :

Count 50 loops for foundation row (noting yarn end is at far right and all loops are facing upwards).

Info :

Note: When beginning project, yarn end can start at far right or far left. Instructions are written with yarn end starting on the far right. Please reverse direction throughout the pattern if the opposite is more comfortable.

— Instructions :

Round 1 :

1st row: Working from left to right, pull the 51st loop (from 'working yarn') up through 50th loop (last loop of foundation row) from behind to create a knit stitch. Pull next loop from working yarn up through next loop of foundation row. Continue in this manner to end of row. Do not turn work. 50 stitches in row.

Round 2 :

2nd row: Working from right to left, pull next loop from working yarn up from behind through last stitch worked on previous row. *Pull next loop from working yarn up from behind through next stitch. Repeat from * across to end of row. Do not turn.

Round 3 :

3rd row: Working from left to right, pull next loop from working yarn up from behind through last stitch worked on previous row. *Pull next loop from working yarn up from behind through next stitch. Repeat from * across to end of row. Do not turn.

Info :

Repeat 2nd and 3rd rows until Blanket measures approximately 39" [99 cm], ending on a 3rd row.

— Bind Off :

Bind off row :

Working in same direction as last row, pull 2nd stitch through first stitch. Pull 3rd stitch through 2nd stitch. Pull 4th stitch through 3rd stitch. Continue in this manner to end of row. Cut last loop to create a yarn 'tail'. Tie to secure and weave in ends.

Assembly Instructions

  • Tie the final yarn tail securely after binding off, then weave the tail through several loops on the edge using a yarn needle to secure and hide the end.
  • Weave in all remaining yarn ends along the edge of the blanket, following the rows to keep the woven-in ends invisible and secure.
  • If desired, pin the edges in place on a flat surface before finishing to ensure a straight, even edge while you weave in ends.
  • Check the blanket edges for any loose loops after binding off and secure them with small knots or a few stitches worked through neighboring loops.
  • Trim any excess tails after weaving in ends and gently fluff loops to even out texture across the blanket surface.

Important Notes

  • 💡Keep the right side of the project facing at all times to maintain consistent loop orientation and finished appearance.
  • 💡Hold the working yarn behind the stitches throughout the project; loops should always be pulled from back to front for correct stitch formation.
  • 💡Count and set up exactly 50 loops for the foundation row before beginning to ensure the blanket width matches the pattern measurement.
  • 💡Do not turn your work after each row as instructed; instead work back and forth in the specified directions to maintain the loop structure.

This plush Baby Blanket pattern produces a cozy, cloud-like throw that babies and grown-ups will adore. The looped texture is soft to the touch and quick to work up, making it a perfect weekend project. Make one in classic Thistle or mix colors to create your own heirloom blanket. 🧶🍼

You ask,

we answer.

FAQs

What size will the finished piece be?

The finished blanket measures approximately 39" [99 cm] square when using the recommended Bernat Alize Blanket-EZ yarn and following the pattern exactly.

Can I use a different yarn or change the size?

Yes, you can change yarn types or quantity to alter size, but the finished measurement and texture will vary. To change size, adjust the number of foundation loops and maintain the pattern's stitch technique.

Do I need crochet hooks or special tools to make this blanket?

No crochet hook is required for the loop technique used in this pattern; you will work directly with the loops and need only basic tools like scissors and a yarn needle to finish.

How long does this project typically take to complete?

Most crafters finish this blanket in 5-7 hours, depending on speed and familiarity with the loop technique, though time may vary with color changes or added edging.