🧢 Beautiful ✨ Detailed πŸ’ Adorable

Bee No Sew Amigurumi Pattern

Bee No Sew Amigurumi Pattern
4.1β˜… Rating
2-3 Hours Time Needed
2.3K Made This
βœ‚οΈ

Intermediate Level

Ideal for those with basic crochet experience, featuring slightly more advanced stitches and techniques to expand your skills.

⏱️

Bite-Sized Project

Finishes in 2-4 hoursβ€”perfect for an afternoon of creative relaxation.

🎁

Tiny Treasure

Small, sweet, and gift-worthy creations that fit perfectly in the palm of your hand with detailed charm.

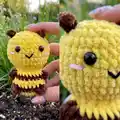
About This Bee No Sew Amigurumi Pattern

This pattern creates an adorable, no-sew bee amigurumi worked from the body up into the head, with striped color changes and bobble stitch details. You will work in continuous rounds, switch between yellow and brown yarn, and finish with simple embroidered features. The finished toy is compact and great for gifting or displaying as a tiny handmade keepsake.

Bee No Sew Amigurumi Pattern crochet pattern - detailed view of completed project

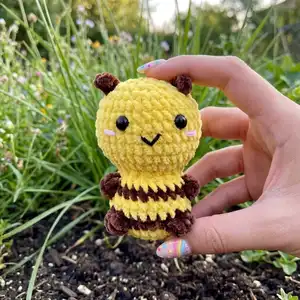
Includes full materials, abbreviations, step-by-step rounds, and assembly notes so you can complete it with confidence. Photos and clear instructions show color changes and placement for eyes and facial details.

Why You'll Love This Bee No Sew Amigurumi Pattern

I absolutely love this pattern because it combines simple construction with playful textured details that make the bee irresistibly cute. The no-sew approach means you get a seamless finish that looks professional while saving time on assembly. I enjoy how the color changes create a classic bumblebee look with minimal effort. Working the bobble stitches adds a fun tactile element that children love to touch. Overall, it is a satisfying, fast project that delivers a delightful result every time.

Bee No Sew Amigurumi Pattern step 1 - construction progress Bee No Sew Amigurumi Pattern step 2 - assembly progress Bee No Sew Amigurumi Pattern step 3 - details and accessories Bee No Sew Amigurumi Pattern step 4 - final assembly and finishing

Switch Things Up

I love how easily this bee can be customized by changing colors; try soft pastels for a nursery-friendly version or bright neons for a quirky twist.

I sometimes swap the bobble rows for simple SC rows to create a smoother body texture for a different look.

If you want a keychain, make the bee smaller by using a thinner yarn and a smaller hook, and add a small metal ring at the top.

For a plush, squishier bee use a slightly larger hook and looser tension with the same yarn to get a more cuddly finish.

I often add a tiny crocheted flower or felt wings glued to the back to make the bee extra charming as a gift topper.

Try embroidering different facial expressions: a straight smile, open mouth, or winking eye to give each bee its own personality.

Use safety stitch markers or pins to position the eyes before fixing them permanently; small adjustments change the character a lot.

I also like combining yarn texturesβ€”add a small metallic thread to one stripe for a subtle sparkle effect that catches the light.

To make a set, vary sizes and colors and display them in a small shadow box for seasonal decor or a handmade gift set.

Remember to experiment and have funβ€”these little changes make each finished piece uniquely yours and a joy to give away.

Common Mistakes & How to Fix Them

βœ— Forgetting to change colors exactly where indicated leads to uneven stripes; follow the color change notes at the start of the specified rounds and carry or fasten off yarn neatly. βœ— Skipping the back loop/bobble instructions causes the texture to disappear; work BO (bobble stitch) and FLO/BLO exactly as written to achieve the intended look. βœ— Not stuffing at the right moment will distort shaping; stuff gradually at the *Stuffing* point to maintain the round shape and avoid lumps. βœ— Placing safety eyes too high or low changes facial expression; attach the eyes between rows 16 and 17 exactly as instructed for the correct look. βœ— Pulling yarn too tight while working bobbles makes them small and stiff; maintain even tension and gently shape bobbles with your fingers as you go. βœ— Failing to weave in and cut yarn ends securely can lead to unraveling; weave in the yarn end and cut as instructed after the closing rounds.

Bee No Sew Amigurumi Pattern

Make a sweet no-sew bee amigurumi you can finish in a single craft session. This pattern guides you through every round, color change, and finishing detail so your little bee turns out neat and cuddly. Perfect for gifting or keeping as a pocket-sized handmade treasure. Clear photos and step notes help you follow along with confidence.

Intermediate 2-3 Hours

Materials Needed for Bee No Sew Amigurumi Pattern

β€” Main Fabric

  • 01
    Super Bulky yarn (Category 6) - Yellow (main color) - quantity: small skein (approx 50-100g)
  • 02
    Super Bulky yarn (Category 6) - Brown (accent) - quantity: small skein (approx 30-50g)
  • 03
    Short pieces of pink and black yarn for cheeks and mouth embroidery
  • 04
    Fiberfill stuffing (small amount to fill body and head)
  • 05
    Plastic safety eyes 8mm (2 pieces)

β€” Tools Required

  • 01
    3.5mm (E) crochet hook
  • 02
    Stitch marker
  • 03
    Sewing needle (yarn needle) for weaving in ends and embroidery
  • 04
    Scissors
  • 05
    Hot gun glue (optional for securing eyes if not using safety backs)
  • 06
    Fiberfill stuffing
  • 07
    Safety eye backings (if using safety eyes)

Progress Tracker

0% Complete

β€” Body and Head :

Info :

Begin with Yellow yarn

Round 1 :

6 SC in an MR (6)

Round 2 :

6 INC (12)

Round 3 :

(SC, INC) 6 times (18)

Round 4 :

(2 SC, INC) 6 times (24)

Info :

Change to Brown yarn

Round 5 :

8 SC, BO, 6 SC, BO, 8 SC (24)

Info :

Change to Yellow yarn

Round 6 :

8 SC, SC into the stitch's BO, 6 SC, SC into the stitch's BO, 8 SC (24)

Round 7 :

24 SC (24)

Info :

Change to Brown yarn

Round 8 :

6 SC, BO, 10 SC, BO, 6 SC (24)

Info :

Change to Yellow yarn

Round 9 :

6 SC, SC into the stitch's BO, 10 SC, SC into the stitch's BO, 6 SC (24)

Round 10 :

(SC, DEC) 8 times (16)

Round 11 :

FLO, (SC, INC) 8 times (24)

Round 12 :

(SC, INC) 12 times (36)

Round 13-18 :

36 SC (36)

Round 19 :

(2 SC, DEC) 9 times (27)

Info :

*Stuffing*

Round 20 :

(SC, DEC) 9 times (18)

Round 21 :

(SC, DEC) 6 times (12)

Round 22 :

6 DEC (6)

Info :

Weave in the yarn end and cut

β€” Beard & Ear/Face Details :

Info :

Begin with brown

Item Beard (P1) :

Pick up the yarn from row 19: 4CH, turn: 3SC

Info :

Cut the yarn

Info :

Attach the eyes between rows 16 and 17.

Info :

Use black yarn to embroider the mouth and pink yarn to embroider the cheeks.

Assembly Instructions

  • Attach the beard (picked up from row 19) by fastening off the small piece and weaving the tail securely into the stitches so it sits centered under the mouth area.
  • Position and attach safety eyes between rows 16 and 17, spacing them evenly and securing with safety backs or extra glue if needed.
  • Embroider the mouth with black yarn and add two small pink embroidered cheeks on either side of the face as shown in the photos.
  • Weave in all yarn ends and trim neatly after closing the final rounds to ensure a clean finish.
  • Stuff the body and head at the indicated *Stuffing* point (after round 19) and add small amounts gradually to maintain a round shape.

Important Notes

  • πŸ’‘Use stitch markers to mark the beginning of each round so you do not lose track when working in continuous rounds.
  • πŸ’‘Stuff gradually at the indicated stuffing point to avoid overfilling and to keep a smooth, round shape for the head and body.
  • πŸ’‘Attach safety eyes before major closing rounds (between rows 16 and 17) so they sit securely and symmetrically.
  • πŸ’‘Weave in ends and cut yarn after the final rounds to prevent unraveling and to keep the finish tidy.

This cute Bee No Sew amigurumi is ready to brighten any day with its tiny stripes and happy face. Whether you make one for a friend or keep it as a cheerful desk buddy, it brings instant handmade joy. 🐝 Keep crocheting and sharing little moments of handmade happiness! 🧢

You ask,

we answer.

FAQs

What size will the finished piece be?

The finished amigurumi measures approximately 8-10 cm tall when using super bulky (category 6) yarn and a 3.5mm hook; size may vary with different yarns.

Can I use different yarn weights for this pattern?

Yes, you can use different yarn weights, but this will affect the final size and texture; choose an appropriate hook for your yarn and adjust stuffing accordingly.

Do I need prior crochet experience for this pattern?

This pattern is rated intermediate because it uses bobble stitches, color changes, and working into bobble's loops; familiarity with SC, INC, DEC, and working in rounds is recommended.

How long does this project typically take to complete?

Most crocheters complete this project in 2-3 hours, depending on experience, yarn handling, and whether you add extra embroidery or finishing details.