🧶 Beautiful ✨ Detailed 💝 Adorable

Basic Knots & Techniques Pattern

Basic Knots & Techniques Pattern
4.0★ Rating
2-3 Hours Time Needed
3.8K Made This
✂️

Beginner Friendly Level

Perfect for those just starting their crochet journey, with clear instructions and simple techniques

⏱️

Bite-Sized Project

Finishes in 2-4 hours—perfect for an afternoon of creative relaxation.

🏡

Cozy Accent

A warm touch for your space that transforms ordinary corners into inviting nooks filled with handmade charm.

About This Basic Knots & Techniques Pattern

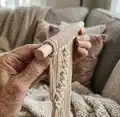
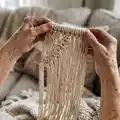
This guide teaches the foundational knots used in macrame and decorative cordwork, with step-by-step instructions and photos for clarity. Youll learn how to mount cords on a dowel and form common knots used in wall hangings and plant hangers. Each knot includes clear steps and pictured sequences to help you follow along easily.

Basic Knots & Techniques Pattern crochet pattern - detailed view of completed project

Designed as a beginner-friendly reference, the pattern focuses on technique and practical tips. Use it to build confidence and expand into larger projects like wall hangings or accessories.

Why You'll Love This Basic Knots & Techniques Pattern

I absolutely love this pattern because it simplifies core macrame techniques into approachable, photographed steps that anyone can follow. I enjoy how each knot is clearly explained so you can see how tension and placement affect the final look. I appreciate that the pattern covers both mounting methods and decorative knots, making it a compact reference for many projects. I find it rewarding when students quickly progress from these basics to full wall hangings after practicing these steps.

Basic Knots & Techniques Pattern step 1 - construction progress Basic Knots & Techniques Pattern step 2 - assembly progress Basic Knots & Techniques Pattern step 3 - details and accessories Basic Knots & Techniques Pattern step 4 - final assembly and finishing

Switch Things Up

I love experimenting with cord thickness to change the scale of these knots; using a thicker cord makes bolder, more dramatic patterns while thinner cord creates delicate, intricate designs.

I often switch colors mid-project for stripes or ombre effects — try alternating colored filler cords or working cords for visual interest.

I add beads between knots to create texture and rhythm; sliding small wooden or glass beads onto filler cords before knotting can really elevate a piece.

For a rustic look I use natural jute or hemp cord, while soft cotton gives a polished, boho finish — choose fiber depending on the final use and look.

I like to vary spacing between rows of knots to create negative space and pattern; experiment with larger gaps to emphasize certain rows.

If I want a tidy front, I use the Reverse Lark's Head to hide bumps at the back and keep the face of the piece smooth.

To make a hanging more stable I sometimes double-up the dowel or use two dowels connected by macrame; this supports wider pieces better.

I play with mirrored patterns by repeating the same knot sequence on both sides of a center line, which looks great for symmetrical wall hangings.

Try combining Square Knots and Double Half Hitches in rows — alternating knot types creates contrast and movement across the piece.

I also trim and shape the fringe differently — diagonal cuts, V-cuts, or rounded edges change the piece’s character dramatically.

Common Mistakes & How to Fix Them

✗ Failing to place the loop correctly on the dowel when doing a Lark's Head knot can lead to uneven mounting; fold the cord evenly and position the loop over the dowel before tightening. ✗ Not keeping wraps snug but separate when tying a Gathering Knot causes sloppy, overlapping coils; keep each wrap tight against the previous one without overlapping for a neat finish. ✗ Pulling working cords with inconsistent tension while making Square Knots results in uneven knots and gaps; maintain steady, even tension and tighten each half of the knot equally. ✗ Cutting leftover strands too early after a Gathering Knot can let wraps loosen; finish tightening and secure the final tail before trimming the leftover strands.

Basic Knots & Techniques Pattern

Learn essential macrame knots with clear, photo-backed instructions so you can mount cords and create beautiful textile pieces. Youll learn Lark's Head, Square Knot, Double Half Hitch, Overhand, and Gathering Knot with step-by-step directions. Perfect for beginners exploring macrame techniques and for makers who want reliable reference notes while crafting.

Beginner Friendly 2-3 Hours

Materials Needed for Basic Knots & Techniques Pattern

— Main Fabric

  • 01
    Filler cords (Core) - the unknotted cords over which the working cords are tied (as described in Terms)
  • 02
    Working cords (Tying cords, Knotters) - the cords used to form the knots (as described in Terms)
  • 03
    Single cord for Lark's Head and Gathering Knot - used as the working or wrapping strand depending on the knot
  • 04
    Wooden dowel or rod - used to mount loops and cords for knotting projects

— Tools Required

  • 01
    Wooden dowel or rod (for mounting cords)
  • 02
    Scissors (to trim leftover strands after finishing knots)

Progress Tracker

0% Complete

— Terms :

Infos :

Sinnet: A series of knots usually consisting of one specific type. Filler cords (Core): The unknotted cords over which the working cords are tied. Working cords (Tying cords, Knotters): The cords used to form the knots.

— The Lark's Head Knot :

Info :

The most common method of mounting cords is done with the Lark's head knot. To make this knot, we need 1 cord.

Step No.1 :

Fold working cord in half, Place loops on top of the dowel (Picture A).

Step No.2 :

Pull the loop down behind and over the dowel (Picture B).

Step No.3 :

Pull the cord ends through the loop (Picture C).

Step No.4 :

Tighten it (Picture D)

Info :

Reverse Lark’s Head Knot: A Reverse Lark's Head Knot is done in the reverse, so the bump is hidden in the back of the knot.

Step No.1 :

Fold the cord in half and place the loop under the dowel rod.

Step No.2 :

Bring the loop round to the front and pull your two cords through the loop to tighten

— The Square Knot :

Info :

To make a Square Knot, you’ll need four cords. The ones on the left and right will be your working cords and the two in the center will be your filler cords (Picture A).

Step No.1 :

Make the “number 4” shape with the left cord over 2 middle filler cords and behind the right (Picture B).

Step No.2 :

Then, bring the right cord behind the filler cords and up through the loop you made in with the left cord and tighten (Picture C, D).

Step No.3 :

make the reserved “number 4” with the right cord over 2 middles and under the left. Bring the left cord behind 2 middles and up through the right loop. Tighten it ( E, F, G).

— The Double Half Hitch Knot :

Info :

To make a Double Half Hitch Knot, you’ll have a filler cord and a working cord.

Step No.1 :

Take the cord on the right, the filler cord, and hold it diagonally across the other cords (Picture A).

Step No.2 :

Take the next cord (your first working cord) and bring it forward, up, and around the filler cord towards the right to form a counter-clockwise loop (Picture B).

Step No.3 :

Take the same working cord and to the left of the first knot, take it up, over, and through the loop (Picture C).

Step No.4 :

Repeat steps 2 through 3 of the double half hitch, moving down diagonally instead of straight across. Repeat until you have the look you want (Picture D, E).

— Overhand Knot :

Info :

The Overhand Knot is a basic knot that ties multiple cords together. It can be done with multiple cords or just one cord.

Step No.1 :

Fold the cord into a loop (Picture A).

Step No.2 :

Pass the ends of the cords through the loop to tighten (Picture B, C).

— Gathering Knot :

Info :

Gathering Knot: To tie this knot, we need 1 strand as the wrapping strand, and the rope strand is the filler strand.

Step No.1 :

Place the wrapping strand in front of the rope strand and create the U shape by one end of it. (Picture A).

Step No.2 :

Use the long part of wrapping strand wrapping around the rope strand. Each wrap will be under the previous wrap and be sure to keep them all snug together but not overlapping. Don’t wrap it until the end of “U shape”. Pull the remaining strand through the loop which created by the end of the “U shape” (Picture B).

Step No.3 :

Pull the other ends of wrapping strand until the loop underneath the wrapping strand. Cut off the left-over strands in both sides (Picture C).

Assembly Instructions

  • Mount cords on a dowel using the Lark's Head Knot by folding the working cord in half, placing the loop over the dowel, pulling the loop down behind and over the dowel, then pulling cord ends through and tightening.
  • Mount cords in reverse by placing the loop under the dowel and bringing it round to the front, then pulling both cords through to hide the bump at the back for a neater finish.
  • Form Square Knots by using two outer working cords and two center filler cords; make the number '4' with the left cord, bring the right cord behind and through, tighten, then repeat the sequence in reverse for the second half.
  • Create diagonal patterns with Double Half Hitch Knots by using a filler cord diagonally and wrapping working cords around it in repeated half hitches, moving down diagonally until you achieve the desired length and shape.
  • Finish gathered sections with a Gathering Knot by wrapping the wrapping strand snugly around the rope strand, pulling the remaining strand through the loop, tightening and then trimming leftover ends.

Important Notes

  • 💡Keep consistent tension while knotting to ensure even, professional-looking results across the piece.
  • 💡When wrapping for the Gathering Knot, keep each wrap snug but do not overlap them to maintain a neat column of wraps.
  • 💡Use the Reverse Lark's Head when you want the bump of the knot hidden at the back for a cleaner front appearance.
  • 💡Trim leftover strands only after the final tightening to prevent loosening or slipping of the knot.

This compact knots guide gives you the core techniques to start beautiful macrame projects. Practice each knot slowly and refer to the photos to match your work. These foundations will open up wall hangings, plant hangers, and more for your home decor. 🧶✨

You ask,

we answer.

FAQs

What materials do I need to get started?

You need a wooden dowel or rod to mount cords, filler cords (core), working cords (tying cords), and scissors to trim leftover strands.

Which knot should I learn first as a beginner?

Start with the Lark's Head to mount cords and then practice the Square Knot and Overhand Knot; they form the basis for many macrame designs.

How tightly should I pull each knot?

Tighten knots evenly and consistently; too tight can distort the pattern while too loose can leave gaps, so aim for moderate, even tension.

Can I hide the bump of a Lark's Head knot?

Yes, use the Reverse Lark's Head Knot by placing the loop under the dowel and bringing it to the front before pulling the cords through, which hides the bump at the back.