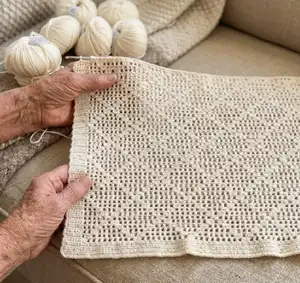
Make a light, airy baby summer blanket worked in a reversed filet crochet motif that features more holes than fillings. This pattern is worked in one piece with a neat chainless foundation and a pretty turning technique for straight edges. You will find a detailed swatch, diagram, and clear row-by-row instructions to help you create a beautiful, breathable blanket for warm days. Suitable for baby gifts or a summer stroller cover.
Progress Tracker
0% Complete
— Before getting started :
Info :
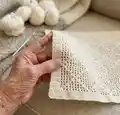
The blanket here is a blanket crocheted in filet crochet. It’s designed a little reverse of what one typically does with filet crochet, where there are more holes than there are fillings. It’s crocheted in one piece, so you don’t need to make an edge, when it’s finished – weave in ends.
Info :
It is the perfect blanket for a warm baby or for the balmy summer days.
Info :
Skill level: Medium. Size Blanket 1: 70 x 100 cm. Size Blanket 2: 100 x 100 cm. Size Blanket 3: 110 x 110 cm. 10 x 10 cm = 25 S x 11 R (All measurements are before blocking).
Info :
Materials: Infinity Hearts Baby Merino in color no. 06 Nature: Blanket 1 = 8 balls, Blanket 2 = 11 balls, Blanket 3 = 14 balls. Or Drops Baby Merino same amount. "Handmade" label for edge size M.
Info :
Tools: 3.5 mm crochet hook. Scissors. Stitch Markers. Yarn needle. Blocking mats and needles for finishing.
— Filet Crochet and Filet Chain (fch) :
Info :
This type of crochet is called "Filet Crochet". The holes comes because you make a chain and skip 1 stitch. In the pattern, it will be written as a filet chain (fch), which means that when you make a chain, you also skip a stitch. When you have to crochet on top of a chain, you just crochet around it. FYI: "fch" is just a term I came up with, because it gives a much more manageable pattern. So not a term you can Google your way to :-)
— Parentheses, commas and stars :
Info :
When crocheting according to a pattern, there are some different characters you use, so you avoid very long lines: Parentheses: What is in between parentheses must be multiplied by the number of times, that follows. Comma: What stands between commas, you just do as is. Star: The star is like the parentheses. To keep the characters apart, a star is used, when there is repetitions inside a parentheses. What is between the two stars, is repeated the number of times, that is stated after the last star.
— Chainless foundation with double crochet :
Info :
Since the blanket is designed with a bottom in only double crochet, you start with a chainless foundation. That makes the edge so pretty, and when you’re done, it’s not possible to tell what is top, and what is bottom.
— Pretty Turning: PT :
Info :
There is a specific technique that gives you completely straight edges when you turn. This technique is called "Foundation Turning Chain" or "Alternative Turning Chain" - I have chosen to call it "Pretty Turning: PT". You make 2 single crochet on top of each other, and you therefore do not turn with the regular turning chain. This counts as the first double crochet in the row.
Step 1 :
Turn without making a turning chain. Pull the loop a little loose, so you have a bit to work with.
Step 2 :
Make a single crochet in the first stitch.
Step 3 :
At the back of the stitch, insert the hook into the loop there is. Yarn over and pull through.
Step 4 :
Yarn over and pull through both loops on the hook. Now you have 2 stitches on top of each other = 2 pt.
— Diagram :
Info :
Diagram shows the pattern repeated three times to help understand the structure. Symbols: Pretty Turning: PT. Chainless foundation. (Filet) Chain: (F)CH. Double Crochet: DC.
— Pattern for crochet swatch :
START :
Chain 43 + 1 tch (start in 2. stitch from hook).
R 1 :
2 pt, 2 dc (*1 fch, 1 dc* 9 times, 2 dc) 2 times, turn.
R 2 :
2 pt, fch, dc (2 dc, *1 fch, 1 dc* 7 times, 2 dc, 1 fch, 1 dc) 2 times, turn.
R 3 :
2 pt, fch, dc (1 fch, 3 dc, *1 fch, 1 dc* 5 times, 2 dc, *1 fch, 1 dc* 2 times) 2 times, turn.
R 4 :
2 pt, fch, dc (*1 fch, 1 dc* 2 times, 2 dc, *1 fch, 1 dc* 3 times, 2 dc, *1 fch, 1 dc* 3 times) 2 times, turn.
R 5 :
2 pt, fch, dc (*1 fch, 1 dc* 3 times, 2 dc, *1 fch, 1 dc* 1 time, 2 dc, *1 fch, 1 dc* 4 times) 2 times, turn.
R 6 :
2 pt, fch, dc (*1 fch, 1 dc* 4 times, 2 dc, *1 fch, 1 dc* 5 times) 2 times, turn.
Info :
Now you have crocheted all the different rows, there is. From here on it’s just repetitions: R 7 like R 5, R 8 like R 4, R 9 like R 3, R 10 like R 2, og R 11 like R 1.
Info :
Now you have crocheted the pattern in 11 rows, and is ready to measure out the 10 x 10 cm. Count how many rows and stitches you have on the 10 cm. It should be 25 stitches x 11 rows. Do you have too many stitches pr. 10 cm, go up in hook size (too few = go down). Do you have too many or too few rows, you can adjust "The Golden Loop".
— Pattern for blanket 1: 70 x 100 cm :
R 1 :
Use the technique Chainless Foundation and make 173 stitches (the first 3 ch counts as the first stitch, so when they are done, you crochet 172 double crochets after).
R 2-3 :
2 pt, 172 double crochet, turn.
R 4 :
2 pt, 4 dc, 3 dc (*1 fch, 1 dc* 9 times, 2 dc) 8 times, 5 dc, turn.
R 5 :
2 pt, 4 dc, dc, fch, dc (2 dc, *1 fch, 1 dc* 7 times, 2 dc, 1 fch, 1 dc) 8 times, 5 dc, turn.
R 6 :
2 pt, 4 dc, dc, fch, dc (1 fch, 3 dc, *1 fch, 1 dc* 5 times, 2 dc, *1 fch, 1 dc* 2 times) 8 times, 5 dc, turn.
R 7 :
2 pt, 4 dc, dc, fch, dc (*1 fch, 1 dc* 2 times, 2 dc, *1 fch, 1 dc* 3 times, 2 dc, *1 fch, 1 dc* 3 times) 8 times, 5 dc, turn.
R 8 :
2 pt, 4 dc, dc, fch, dc (*1 fch, 1 dc* 3 times, 2 dc, *1 fch, 1 dc* 1 time, 2 dc, *1 fch, 1 dc* 4 times) 8 times, 5 dc, turn.
R 9 :
2 pt, 4 dc, dc, fch, dc (*1 fch, 1 dc* 4 times, 2 dc, *1 fch, 1 dc* 5 times) 8 times, 5 dc, turn.
Info :
Now you have crocheted all the different rows, there is. From here on it’s just repetitions: Row 10 like row 8, row 11 like row 7, row 12 like row 6, row 13 like row 5, row 14 like row 4.
Info :
Now you crochet row 5, 6, 7, 8, 9, and again 8, 7, 6, 5, 4 and so on, till you reach 101 rows of the pattern. Finish with 3 rows in dc, so your top will be like your bottom.
— Pattern for blanket 2: 100 x 100 cm :
R 1 :
Use the technique Chainless Foundation and make 233 stitches (the first 3 ch counts as the first stitch, so when they are done, you crochet 232 double crochets after).
R 2-3 :
2 pt, 232 double crochet, turn.
R 4 :
2 pt, 4 dc, 3 dc (*1 fch, 1 dc* 9 times, 2 dc) 11 times, 5 dc, turn.
R 5 :
2 pt, 4 dc, dc, fch, dc (2 dc, *1 fch, 1 dc* 7 times, 2 dc, 1 fch, 1 dc) 11 times, 5 dc, turn.
R 6 :
2 pt, 4 dc, dc, fch, dc (1 fch, 3 dc, *1 fch, 1 dc* 5 times, 2 dc, *1 fch, 1 dc* 2 times) 11 times, 5 dc, turn.
R 7 :
2 pt, 4 dc, dc, fch, dc (*1 fch, 1 dc* 2 times, 2 dc, *1 fch, 1 dc* 3 times, 2 dc, *1 fch, 1 dc* 3 times) 11 times, 5 dc, turn.
R 8 :
2 pt, 4 dc, dc, fch, dc (*1 fch, 1 dc* 3 times, 2 dc, *1 fch, 1 dc* 1 time, 2 dc, *1 fch, 1 dc* 4 times) 11 times, 5 dc, turn.
R 9 :
2 pt, 4 dc, dc, fch, dc (*1 fch, 1 dc* 4 times, 2 dc, *1 fch, 1 dc* 5 times) 11 times, 5 dc, turn.
Info :
Now you have crocheted all the different rows, there is. From here on it’s just repetitions: Row 10 like row 8, row 11 like row 7, row 12 like row 6, row 13 like row 5, row 14 like row 4. Now you crochet row 5, 6, 7, 8, 9, and again 8, 7, 6, 5, 4 and so on, till you reach 101 rows of the pattern. Finish with 3 rows in dc, so your top will be like your bottom.
— Pattern for blanket 3: 110 x 110 cm :
R 1 :
Use the technique Chainless Foundation and make 273 stitches (the first 3 ch counts as the first stitch, so when they are done, you crochet 272 double crochets after).
R 2-3 :
2 pt, 272 double crochet, turn.
R 4 :
2 pt, 4 dc, 3 dc (*1 fch, 1 dc* 9 times, 2 dc) 13 times, 5 dc, turn.
R 5 :
2 pt, 4 dc, dc, fch, dc (2 dc, *1 fch, 1 dc* 7 times, 2 dc, 1 fch, 1 dc) 13 times, 5 dc, turn.
R 6 :
2 pt, 4 dc, dc, fch, dc (1 fch, 3 dc, *1 fch, 1 dc* 5 times, 2 dc, *1 fch, 1 dc* 2 times) 13 times, 5 dc, turn.
R 7 :
2 pt, 4 dc, dc, fch, dc (*1 fch, 1 dc* 2 times, 2 dc, *1 fch, 1 dc* 3 times, 2 dc, *1 fch, 1 dc* 3 times) 13 times, 5 dc, turn.
R 8 :
2 pt, 4 dc, dc, fch, dc (*1 fch, 1 dc* 3 times, 2 dc, *1 fch, 1 dc* 1 time, 2 dc, *1 fch, 1 dc* 4 times) 13 times, 5 dc, turn.
R 9 :
2 pt, 4 dc, dc, fch, dc (*1 fch, 1 dc* 4 times, 2 dc, *1 fch, 1 dc* 5 times) 13 times, 5 dc, turn.
Info :
Now you have crocheted all the different rows, there is. From here on it’s just repetitions: Row 10 like row 8, row 11 like row 7, row 12 like row 6, row 13 like row 5, row 14 like row 4. Now you crochet row 5, 6, 7, 8, 9, and again 8, 7, 6, 5, 4 and so on, till you reach 121 rows of the pattern. Finish with 3 rows in dc, so your top will be like your bottom.
— Blocking :
Info :
It’s a really good idea to block this blanket before using it. Blocking makes it more even and the edges becomes completely straight. You wash it as indicated on the yarn’s label, and stretch it out with needles on either blocking mats, a carpet with towels on or whatever you have. Tighten it well. It will shrink a bit again, when it’s taken off the board again. Here you leave it until it is dry, and it will just look nice sharp :-)
Info :
Here you can find blocking mats and needles: Blocking mats. Needles.
This airy Baby Summer Blanket is perfect for warm naps and stroller walks, featuring an elegant filet motif and beautifully straight edges after blocking. The pattern includes a swatch, diagram, and three size options with yarn counts so you can start right away. Make one for baby showers, gifts, or to keep for a summer heirloom. 🧶🌞