🧶 Beautiful ✨ Detailed 💝 Adorable

Baby Fledermaus Amigurumi Pattern

Baby Fledermaus Amigurumi Pattern
4.6★ Rating
2-3 Hours Time Needed
1.6K Made This
✂️

Intermediate Level

Ideal for those with basic crochet experience, featuring slightly more advanced stitches and techniques to expand your skills.

⏱️

Bite-Sized Project

Finishes in 2-4 hours—perfect for an afternoon of creative relaxation.

🧸

Cute Companion

An adorable friend to cherish, handcrafted with love to bring comfort and joy for years to come.

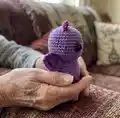
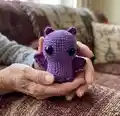
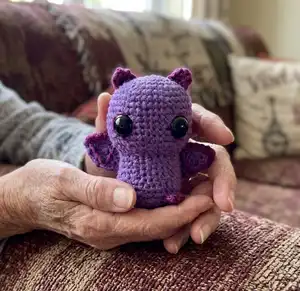
About This Baby Fledermaus Amigurumi Pattern

This pattern makes a small, sweet baby bat (Fledermaus) worked primarily in continuous rounds for the head and body. The wings are crocheted flat in rows and finished with embroidered triangle details for personality. You will sew on ears, feet and wings and add safety eyes to bring your little bat to life.

Baby Fledermaus Amigurumi Pattern crochet pattern - detailed view of completed project

Written in round-by-round format with clear counts for each step, it includes materials and notes so you can follow along easily. Small and quick, it is great for using scrap yarn and practicing shaping techniques.

Why You'll Love This Baby Fledermaus Amigurumi Pattern

I absolutely love this pattern because it combines simple shaping with tiny details that give the bat a lot of character. I enjoy making small amigurumi that you can finish quickly yet still look polished. The wings with embroidered triangles are a fun, creative touch that makes each bat unique. I also love that the head and body are made in one piece — it keeps assembly minimal and the finished toy neat. Sharing this design brightens up the season and gives you a quick, satisfying crochet project.

Baby Fledermaus Amigurumi Pattern step 1 - construction progress Baby Fledermaus Amigurumi Pattern step 2 - assembly progress Baby Fledermaus Amigurumi Pattern step 3 - details and accessories Baby Fledermaus Amigurumi Pattern step 4 - final assembly and finishing

Switch Things Up

I love how easy it is to customize this baby bat pattern with color swaps — try pastel shades for a softer look or black for a classic bat vibe.

I sometimes change the wing embroidery color to create contrast; a bright thread really makes the triangles pop.

If you want a larger bat, use a thicker yarn and a larger hook; the same rounds will create a chunky, cuddly version.

To make a tiny keychain, use a finer yarn and a smaller hook and add a metal ring to the top of the head.

I often add blush with a tiny bit of pastel chalk or embroidery behind the eyes to give more expression.

Try sewing felt inner-ear details or adding a tiny bow for a feminine or whimsical style.

For posability, you can insert thin wire into the wings before stuffing the body, but be careful to secure and cover the wire ends safely.

Embroider different eye shapes or use safety eyes in various sizes to change the character from sweet to spooky.

Consider making a set in multiple colors for seasonal decor or a gift bundle — they make delightful party favors.

If you like, crochet tiny accessories like a scarf or hat using leftover yarn to personalize each bat you make.

Common Mistakes & How to Fix Them

✗ Placing safety eyes too low or too close together will change the bat's expression; measure and mark between rounds 12 and 13 with nine stitches between eyes before inserting them. ✗ Forgetting to stuff as you go can make it hard to shape the neck and body; stuff firmly in small increments while checking the silhouette to maintain smooth shaping. ✗ Using a much larger hook than recommended results in loose fabric and visible stuffing; use the suggested 2.5 mm hook and adjust yarn weight carefully if altering size. ✗ Skipping the invisible decrease technique causes visible gaps or uneven decreases; practice the invisible decrease or follow blog video instructions to close rounds cleanly and invisibly.

Baby Fledermaus Amigurumi Pattern

Make a tiny, adorable bat amigurumi you can finish in an afternoon. This pattern guides you through crocheting the head and body in one piece and adding sweet little wings, ears and feet. Clear round-by-round instructions help you stay on track while you craft a charming handmade gift. Perfect for gifting or keeping as a whimsical pocket pal.

Intermediate 2-3 Hours

Materials Needed for Baby Fledermaus Amigurumi Pattern

— Main Fabric

  • 01
    Schachenmayr Catania (Cotton) size 2 yarn - Color 0113 violet (A)
  • 02
    Schachenmayr Catania (Cotton) size 2 yarn - Color 0282 phlox (B)
  • 03
    Small amount of contrast yarn for embroidery/details (phlox or similar)
  • 04
    Polyester stuffing for filling the head and body

— Tools Required

  • 01
    Crochet hook size 2.5 mm
  • 02
    Schachenmayr Catania yarn (size 2) in colors A and B
  • 03
    Polyester filling (stuffing)
  • 04
    Yarn needle (darning needle) for sewing and finishing
  • 05
    Scissors
  • 06
    Safety eyes 11 mm (2 pieces)
  • 07
    Embroidery needle (for stitching wing triangles and eye details)
  • 08
    Stitch markers (recommended)

Progress Tracker

0% Complete

— Abkürzungen :

Infos :

mR magischer Ring. Lm Luftmasche. Km Kettmasche. M Masche. fM feste Masche. hStb halbes Stäbchen. Stb Stäbchen. vMg nur in vorderes Maschenglied. Zun Zunahme. uns Abn unsichtbare Abnahme. R Nummer Anzahl der Runde/n oder Reihe/n.

— Materialien :

Info :

2.5 mm Häkelnadel. Nummer 2 Schachenmayr Catania. In den Farben 0113 violett (A) und 0282 phlox (B). Füllung. Garnnadel. Schere. Sicherheitsaugen 11 mm. Sticknadel.

— Anmerkungen :

Info :

Körper und Kopf werden in Runden an einem Stück gehäkelt. Die Flügel werden in Reihen gehäkelt und dann an den Körper genäht. Wir machen keine Wendeluftmaschen an den Flügeln. In meinem Blog finden sich Videos zur unsichtbaren Abnahme und wie man die letzte Runde schließt. Link zum Blog, siehe Kopfzeile. Ich empfehle die genannte Garnstärke sowie Baumwollgarn zu verwenden. Die Sicherheitsaugen können mit einem Feuerzeug erhitzt und flach gedrückt werden, um noch sicherer zu sein.

— Kopf :

R1 :

6 fM in den mR

R2 :

2 fM in jede M (12)

R3 :

(1 fM, Zun) x6 (18)

R4 :

(2 fM, Zun) x6 (24)

R5 :

(3 fM, Zun) x6 (30)

R6 :

(4 fM, Zun) x6 (36)

R7 :

(5 fM, Zun) x6 (42)

R8-14 :

1 fM in jede M

Info :

Sicherheitsaugen zwischen Runde 12 und 13 mit 9 Maschen Abstand anbringen.

R15 :

(5 fM, uns Abn) x6 (36)

R16 :

(4 fM, uns Abn) x6 (30)

R17 :

(3 fM, uns Abn) x6 (24)

Info :

Den Kopf fest füllen.

R18 :

1 fM in jedes vMg (24)

R19 :

(3 fM, Zun) x6 (30)

R20-22 :

1 fM in jede M

R23 :

(4 fM, Zun) x6 (36)

R24-25 :

1 fM in jede M

R26 :

(4 fM, uns Abn) x6 (30)

R27 :

(3 fM, uns Abn) x6 (24)

R28 :

(2 fM, uns Abn) x6 (18)

Info :

Körper füllen.

R29 :

(1 fM, uns Abn) x6 (12)

R30 :

uns Abn x6 (6)

— Flügel :

Info :

mit A 25 Lm, wenden

R1 :

1 fM in jede M, wenden (24)

R2 :

uns Abn, 20 fM, uns Abn, wenden (22)

R3 :

uns Abn, 18 fM, uns Abn, wenden (20)

R4 :

uns Abn, 16 fM, uns Abn, wenden (18)

R5 :

uns Abn, 14 fM, uns Abn, wenden (16)

Info :

Garn abschneiden, Garnende zum Nähen lassen. Den Faden im Flügel vernähen, so dass das Ende näher zur Mitte des Flügels herauskommt. Damit wir die Flügel später annähen können.

Info :

mit B Garn an der ersten Reihe des Flügels anbringen. 24 fM entlang häkeln. Garn abschneiden und ein langes Ende lassen. Mit der Garnnadel Dreiecke auf den Flügel sticken.

— Ohren (x2) :

Info :

mit B 2 Lm, in die zweite Lm von der Nadel: hStb, Stb, hStb, fM. Garn abschneiden, langes Ende lassen.

— Füße (x2) :

Info :

mit B 2 Lm in zweite Lm von der Nadel 4 fM häkeln. Garn abschneiden und Ende lassen.

— Assembly :

Info :

Die Flügel, Ohren und Füße annähen. Die Augen umsticken.

Assembly Instructions

  • Attach safety eyes between rounds 12 and 13 with 9 stitches between them before continuing to round 15.
  • Sew wings to the sides of the body with the embroidered triangles facing out, positioning them roughly at the upper body where the neck meets the head.
  • Sew ears to the top of the head, space them evenly near round 6-8 for symmetry and a cute appearance.
  • Sew feet to the bottom front of the body so the bat can sit upright; position evenly and tack securely with stitches.
  • Weave in all yarn ends and embroider around the eyes for finished detail using the contrasting yarn.

Important Notes

  • 💡Körper und Kopf werden in Runden an einem Stück gehäkelt; do not break yarn between head and body when following rounds.
  • 💡Flügel werden in Reihen gehäkelt ohne Wendeluftmaschen; work rows flat and finish edges as described.
  • 💡Use cotton yarn and the recommended hook for best shape and firmness; adjust hook only if you know how it affects gauge.
  • 💡Safety eyes can be slightly melted and flattened with a heated tool to make them sit more securely if desired.
  • 💡Watch a tutorial for the invisible decrease and closing the last round if you are not familiar with those techniques.

You made it to the end — congratulations on your tiny bat! This little Baby Fledermaus is perfect for gifts, decorations, or a pocket-sized companion you can finish quickly. Keep experimenting with colors and embroidered details to make each bat your own. 🧶🦇

You ask,

we answer.

FAQs

What size will the finished piece be?

The finished amigurumi measures approximately 8-10 cm tall when using Schachenmayr Catania and a 2.5 mm hook; exact height depends on stuffing and tension.

Can I use different yarn weights for this pattern?

Yes, you can use different yarn weights, but the final size will change; use an appropriate hook for your yarn and expect a looser or tighter fabric accordingly.

Do I need prior crochet experience for this pattern?

This pattern is rated intermediate because it uses continuous rounds, increases and invisible decreases; familiarity with basic stitches and amigurumi techniques is recommended.

How long does this project typically take to complete?

Most crocheters complete this project in 2-3 hours, though time may vary based on experience level and how much time you spend on embroidery and finishing.