🧢 Beautiful ✨ Detailed πŸ’ Adorable

Baby Bears Amigurumi Pattern

Baby Bears Amigurumi Pattern
4.6β˜… Rating
8-10 Hours Time Needed
2.2K Made This
βœ‚οΈ

Intermediate Level

Ideal for those with basic crochet experience, featuring slightly more advanced stitches and techniques to expand your skills.

⏱️

All-Day Adventure

Requires 8-10 hours, ideal for a full day of immersive crocheting.

🧸

Cute Companion

An adorable friend to cherish, handcrafted with love to bring comfort and joy for years to come.

About This Baby Bears Amigurumi Pattern

This pattern teaches you how to crochet a pair of baby bears with coordinating accessories including a blanket, beanie, pacifier and bassinet. Each piece is broken into simple rounds with photo references to help you follow along. The design is customizable in color and yarn choice so you can create a personalized set.

Baby Bears Amigurumi Pattern crochet pattern - detailed view of completed project

Perfect for gift-making or nursery decor, the pattern includes full assembly and finishing details. Detailed stitch counts and placement instructions make it easy to sew parts together for a polished result.

Why You'll Love This Baby Bears Amigurumi Pattern

I absolutely love this pattern because it balances simplicity and charm, letting you create a fully dressed baby bear set without overly complex shaping. I enjoyed designing the coordinating blanket and bassinet to make the finished set feel special and gift-ready. The pattern photos and step-by-step rounds make assembly intuitive, which I find really satisfying. It is a delightful project I return to when I want a thoughtful handmade present.

Baby Bears Amigurumi Pattern step 1 - construction progress Baby Bears Amigurumi Pattern step 2 - assembly progress Baby Bears Amigurumi Pattern step 3 - details and accessories Baby Bears Amigurumi Pattern step 4 - final assembly and finishing

Switch Things Up

I love how easy it is to customize these baby bears by changing color palettes; try soft pastels for a newborn look or neutrals for a modern nursery.

I often swap yarn types β€” using a slightly thicker yarn and larger hook gives a chunkier, more plush bear while thinner yarn creates a mini version perfect for keychains.

I recommend adding little embroidered details like heart patches or initials on the blanket to personalize gifts for special occasions.

For extra durability, you can sew the head to the body with a few hidden whipstitches instead of relying only on crocheted joins.

I sometimes add wire inside the arms to make them poseable, especially if I plan to display the bear in a sitting position.

Try different closures for the overall straps: small buttons, snaps or tied bows each create a distinct look.

Mixing yarn textures (smooth cotton body with fluffy bassinet) creates a pleasing contrast that photographs beautifully.

Want a simpler project? Skip the bassinet and blanket and make a tiny bear using sport weight yarn for a quick gift.

Consider embroidering alternate facial expressions to give each bear a unique personality β€” sleepy, smiling, or surprised are all charming.

I recommend testing one piece first to adjust tension and hook size so your final set matches your intended dimensions and feel.

Common Mistakes & How to Fix Them

βœ— Skipping stitch markers when joining pieces can cause misalignment; place a marker at the start of each round and when joining limbs to keep track of placement. βœ— Forgetting to stuff gradually will cause uneven shapes and lumps; stuff small amounts frequently and shape as you go for a smooth finish. βœ— Using a hook that is too large will make stitches loose and stuffing visible; use the recommended smaller hook sizes to keep amigurumi stitches tight. βœ— Not counting stitches after increases or decreases leads to incorrect shaping; count stitches at the end of each round to ensure accuracy.

Baby Bears Amigurumi Pattern

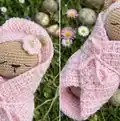
Create two adorable baby bear amigurumi complete with a cozy blanket and bassinet. This pattern guides you step-by-step through crocheting each part β€” feet, arms, body, head, ears, tail, accessories and finishing touches. With clear photos and detailed rounds, you can craft a charming handmade gift for a newborn or a sweet keepsake to cherish.

Intermediate 8-10 Hours

Materials Needed for Baby Bears Amigurumi Pattern

β€” Main Fabric

  • 01
    Medium cotton yarn (worsted/medium) - 100 gr (colors: blue/pink/beige) for main pieces and blanket
  • 02
    Himalaya Baby Dolphin yarn - 100 gr (colors: blue/pink/beige/grey) for bassinet (or use medium cotton double thread alternative)
  • 03
    Small amount of embroidery thread for facial details
  • 04
    Polyester fiberfill stuffing - sufficient to stuff head, body, hands, feet and small accessories

β€” Tools Required

  • 01
    Crochet hook size 2mm
  • 02
    Crochet hook size 3.5mm
  • 03
    Crochet hook size 4mm
  • 04
    Crochet hook size 5mm
  • 05
    Scissors
  • 06
    Tapestry needle for sewing parts
  • 07
    Embroidery needle for facial features
  • 08
    Stitch markers
  • 09
    Pen or markers for marking stitch positions

Progress Tracker

0% Complete

β€” Feet x2 :

Info :

With beige yarn and hook size 2mm

Round 1 :

6 sc in a magic ring (6)

Round 2 :

6 inc (12)

Round 3 :

1 sc, 1 inc (18)

Round 4 - 5 :

18 sc (2 rounds) (18)

Round 6 :

3 dec, 12 sc (15)

Round 7 :

15 sc (15)

Round 8 :

3 dec, 9 sc (12)

Round 9 - 10 :

12 sc (2 rounds) (12)

Info :

Stuff only the bottom, the rest of the leg is empty.

Round 11 :

4 sc, 1 dec (10)

Round 12 - 15 :

10 sc (4 rounds) (10)

Round 16 :

fold the edge flatt and close with 5 sc.

β€” Arms x2 :

Info :

with hook size 2mm

Round 1 :

6 sc in a magic ring (6)

Round 2 :

6 inc (12)

Round 3 :

12 sc (12)

Round 4 :

3 dec, 6 sc (9)

Round 5 :

2 dec, 5 sc (7)

Round 6 :

7 sc (7)

Round 7 - 17 :

7 sc (11 rounds) (7)

Round 18 :

fold the edge flatt and crochet 3 sc

Info :

Stuff only the hand, the rest of the arm is empty.

β€” Body :

Info :

With hook size 2mm

Round 1 :

6 sc in a magic ring (6)

Round 2 :

6 inc (12)

Round 3 :

1 sc, 1 inc (18)

Round 4 :

2 sc, 1 inc (24)

Round 5 :

3 sc, 1 inc (30)

Round 6 :

4 sc, 1 inc (36)

Round 7 :

5 sc, 1 inc (42)

Round 8 :

6 sc, 1 inc (48) (Photo 1)

Round 9 :

48 sc (48)

Round 10 :

Place the legs and work 5 sc together with the body, 19 sc, 5 sc with the other leg, 19 sc (48) (Photos 2 -4)

Round 11 - 14 :

48 sc (4 rounds) (48)

Round 15 :

6 sc, 1 dec (42)

Round 16 :

42 sc (42)

Round 17 :

5 sc, 1 dec (36)

Round 18 :

36 sc (36)

Round 19 :

4 sc, 1 dec (30)

Round 20 :

30 sc (30)

Round 21 :

3 sc, 1 dec (24)

Round 22 :

24 sc (24)

Round 23 :

2 sc, 1 dec (18)

Info :

Stuff the body.

Round 24 :

place the arms and work 3 sc together with the body, 6 sc, 3 sc with the other arm and 6 sc (18) (Photo 5)

Round 25 :

18 sc (18)

Round 26 :

1 sc, 1 dec (12)

Round 27 :

12 sc (Photo 6)

β€” Head :

Info :

(Continue from the body)

Round 1 :

12 inc (24)

Round 2 :

3 sc, 1 inc (30) (Photo7)

Round 3 :

4 sc, 1 inc (36)

Round 4 :

5 sc, 1 inc (42)

Round 5 :

6 sc, 1 inc (48)

Round 6 :

7 sc, 1 inc (54)

Round 7 - 8 :

54 sc (3 rounds) (54) (Photo 8)

Round 9 :

8 sc, 1 inc (60)

Round 10 - 17 :

60 sc (8 rounds) (60)

Round 18 :

8 sc, 1 dec (54)

Round 19 :

7 sc, 1 dec (48)

Round 20 :

6 sc, 1 dec (42)

Round 21 :

5 sc, 1 dec (36)

Round 22 :

4 sc, 1 dec (30)

Round 23 :

3 sc, 1 dec (24)

Round 24 :

2 sc, 1 dec (18)

Info :

Stuff the head firmly.

Round 25 :

1 sc, 1 dec (12)

Round 26 :

6 dec (6) (Photo 9)

Info :

Close the hole with the sewing needle.

β€” Ears x2 :

Info :

With hook size 2mm

Round 1 :

6 sc in a magic ring (6)

Round 2 :

6 inc (12)

Round 3 :

1 sc, 1 inc (18)

Round 4 - 5 :

18 sc (2 rounds) (18)

Round 6 :

1 sc, 1 dec (12)

Round 7 :

fold the edge flatt and crochet 6 sc.

Info :

Leave a long yarn tail to sew.

β€” Tail :

Info :

With hook size 2mm

Round 1 :

6 sc in a magic ring (6)

Round 2 :

6 inc (12)

Round 3 :

1 sc, 1 inc (18)

Round 4 :

18 sc (18)

Round 5 :

1 sc, 1 dec (12)

Round 6 :

4 sc, 1 dec (10)

Info :

Leave a long yarn tail to sew. Stuff a little bit. Sew it between rounds 5 - 8 of the body.

β€” Pacifier :

Info :

with hook size 3.5mm

Round 1 :

Magic ring, ch 2, 11 hdc, close with a ssl (12)

Round 2 :

12 sc FLO (12)

Info :

Pacifier ring: ch 6, 1 ssl.

β€” Overall :

Info :

With medium coton yarn and hook size 3.5mm

Round 1 :

ch 17 + ch 2, 17 hdc, join ends with ssl (18)

Round 2 - 3 :

ch 2, 17 hdc, 1 ssl (18)

Info :

Cut the yarn and make another piece.

Round 4 :

1 ssl in the ending of the first leg (Photos 5 - 6), ch 2, 17 hdc around the first round (Photos 7 - 8), keep crocheting in the second leg and finish with 1 ssl (36)

Round 5 - 10 :

ch 2, 35 hdc (6 rounds) (36)

Info :

Mark 9 st in the front center, 9 st in the sides and 9 st in the back center. (Photo 12)

Round 11 :

start from the front center, ch 2, 8 hdc (Photo 13) (9)

Round 12 - 13 :

ch 2, 8 hdc (Photo 14) (2 rounds)

Info :

Crochet the straps: ch 12 from one side of the front, 1 ssl in the the back (Photo 15). Cut the yarn and crochet the other strap the same way (Photos 16 - 17).

Info :

In the edge of the legs, crochet 18 ssl (Photo 19).

Info :

Dress the overall as it shows in the pictures.

Info :

Sew the tail over rounds 6 - 7 of the overall, in the center of the back.

β€” Beanie :

Info :

With hook size 3.5mm

Round 1 :

6 sc in a magic ring (6)

Round 2 :

6 inc (12)

Round 3 :

1 sc, 1 inc (18)

Round 4 :

2 sc, 1 inc (24)

Round 5 :

3 sc, 1 inc (30)

Round 6 :

4 sc, 1 inc (36)

Round 7 :

5 sc, 1 inc (42)

Round 8 - 11 :

42 sc (4 rounds) (42)

Round 12 :

38 sc, turn (leave 4 stitches unused)

Info :

From now on you will not crochet in spiral.

Round 13 :

ch 1, BLO all the round, 7 sc, 6 ch, skip 6 st, 8 sc, 6 ch, skip 6 st, 8 sc, turn (38)

Round 14 :

ch 2 (this count as 1 hdc), 37 hdc, turn (38)

Round 15 :

ch 2, 37 hdc (38)

Info :

Lace: ch 20, 19 hdc, 1 ssl, cut the yarn. Repeat the same for the other side.

β€” Finishing touches :

Item Name (P1) :

Eyes: Option 1: use an embroidery needle. Mark 4 stitches for both eyes, 6 st separated, sew a black yarn from 11 rnd to 12 rnd. Option 2: in rnd 11 with 7 stitches separated, embroider onto 1 st vertically, by passing the needle 3 times.

Item Name (P2) :

Nose: mark 3 stitches between the eyes, in the 11 rnd and pass the needle 2 times.

Item Name (P3) :

Snout: draw a vertical line, between 9 - 10 rnds.

Item Name (P4) :

Pacifier: sew it between 10 - 6 rnds of the head.

Item Name (P5) :

Ears: sew them between 14 - 20 rnds of the head, 12 stitches apart between both ears, counted from the top side.

Item Name (P6) :

Place the beanie on the head by passing the ears through the holes.

β€” Blanket :

Info :

With medium cotton yarn and hook size 5mm

Round 1 :

Ch 40 + 3, 1 sc in the 4th chain, ch 1; Repeat till the end 1 sc, ch 1, skip 1 st; Finish with 1 sc, ch 2 and turn.

Round 2 :

1 sc in between sc (below each chain) and repeat all the round *1 sc, 1 ch* till the end. Repeat this sequence till you have a square of 27 x 27 cm.

Info :

You can see this process here: https://youtu.be/ylim_KTTBYc

Round 3 :

Crochet a separate chain 90 to tie the blanket.

Round 4 :

Mark 10 cm between 1 corner and the center of the blanket and pass the chain through the blanket.

β€” Bassinet :

Info :

With Himalaya Baby Dolphin and hook size 4mm. It can be made also with medium cotton yarn, using double thread. Start with the base.

Round 1 :

ch 26 (photo 1), 24 sc, 3 sc in the last ch, 24 in the other side of the chain, 24 sc, 3 sc (photo 2) (54) Place the marker.

Round 2 :

24 sc, 3 inc, 24 sc, 3 inc (60)

Round 3 :

24 sc, (1 sc, 1 inc)x3, 24 sc, (1 sc, 1 inc)x3 (66)

Round 4 :

24 sc, (2 sc, 1 inc)x3, 24 sc, (2 sc, 1 inc)x3 (72)

Round 5 :

24 sc, (3 sc, 1 inc)x3, 24 sc, (3 sc, 1 inc)x3 (78)

Round 6 :

24 sc, (4 sc, 1 inc)x3, 24 sc, (4 sc, 1 inc)x3 (84)

Round 7 :

24 sc, (5 sc, 1 inc)x3, 24 sc, (5 sc, 1 inc)x3 (90)

Round 8 :

24 sc, (6 sc, 1 inc)x3, 24 sc, (6 sc, 1 inc)x3 (96)

Round 9 :

24 sc, (7 sc, 1 inc)x3, 24 sc, (7 sc, 1 inc)x3 (102)

Round 10 :

102 sc BLO (102) (Photos 3 - 4)

Round 11 - 19 :

102 sc (9 rounds) (102)

Round 20 :

change color, 102 sc BLO (102) (Photo 6)

Round 21 - 30 :

102 sc (10 rounds) (102)

Info :

Crochet another base with the second color

Round 31 :

place the new base over the bassinet and join the edges. work 102 ssl from 1 loop, the back loop from rnd 30 of the bassinet and the front loop from the base.

Round 32 :

in the loops from rnd 20, work 2 rounds of sc. Start with ch 1, 101 sc. In the second round finish with a ssl in the end.

Info :

In the 10 rnd of the base work 1 ch, 101 sc, close with a ssl, crocheting the whole round with the bassinet up side down. Adjust the base inside the bassinet.

Info :

It's finished!

Assembly Instructions

  • Attach the head to the body by continuing from the body rounds as indicated and then close the hole with the sewing needle after round 26 of the head.
  • Position the arms on either side of the body at round 24 and work 3 sc together with the body to secure; sew ends and weave in tails for a neat finish.
  • Sew the ears between rounds 14 - 20 of the head, placing them 12 stitches apart measured from the top center.
  • Place the legs at round 10 of the body and crochet them into the body by working 5 sc together with the body and legs as instructed to join securely.
  • Sew the tail between rounds 5 - 8 of the body, centering it on the back; stuff slightly before sewing for shape.
  • Dress the overall as shown in the photos and sew the pacifier between rounds 10 - 6 of the head according to placement photos.

Important Notes

  • πŸ’‘Use smaller hooks (1-2 sizes down) for amigurumi to keep stitches tight so stuffing does not show through.
  • πŸ’‘Stuff parts gradually and firmly but not overly tight to maintain shape while avoiding lumps or broken stitches.
  • πŸ’‘Place stitch markers when changing rounds, joining pieces or marking eye placement to ensure accurate alignment.
  • πŸ’‘Weave in and hide yarn tails carefully inside the head or body after finishing facial embroidery to secure details.

These sweet Baby Bears make a heartfelt handmade gift that will be treasured for years. The set includes a cuddly bear, cozy blanket, beanie and a cute bassinet, perfect for new babies or nursery decor. Follow the step-by-step rounds and photos to create your very own miniature family of bears. πŸ§ΆπŸ’•πŸ˜Š

You ask,

we answer.

FAQs

What size will the finished piece be?

The finished baby bear measures approximately 20 cm tall using the recommended yarn and hooks; the blanket is about 27 x 27 cm and the bassinet measures approximately 27 cm across.

Can I use different yarn weights for this pattern?

Yes, you can use different yarn weights but this will change the final size; adjust your hook accordingly and note the pattern uses thinner hooks for amigurumi to keep stitches tight.

Do I need prior crochet experience for this pattern?

This pattern is rated intermediate, so basic knowledge of single crochet, increases, decreases, working in rounds and reading stitch counts is recommended for best results.

How long does this project typically take to complete?

Most crocheters complete the set in 8-10 hours depending on experience and how many accessories (blanket, bassinet, beanie) you make.