🧢 Beautiful ✨ Detailed πŸ’ Adorable

Baby Barefoot Sandals Pattern

Baby Barefoot Sandals Pattern
4.8β˜… Rating
2-3 Hours Time Needed
3.7K Made This
βœ‚οΈ

Beginner Friendly Level

Perfect for those just starting their crochet journey, with clear instructions and simple techniques

⏱️

Bite-Sized Project

Finishes in 2-4 hoursβ€”perfect for an afternoon of creative relaxation.

🏑

Cozy Accent

A warm touch for your space that transforms ordinary corners into inviting nooks filled with handmade charm.

About This Baby Barefoot Sandals Pattern

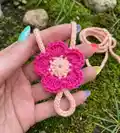
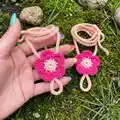
This pattern creates a delicate pair of baby barefoot sandals featuring a small triangular sandal base, long tie straps, and a pretty five-petal flower embellishment. It is written for both baby and toddler sizes and includes photo references for each major step. With simple stitches like single crochet, double crochet, chains, and slip stitches, you can crochet charming sandals quickly.

Baby Barefoot Sandals Pattern crochet pattern - detailed view of completed project

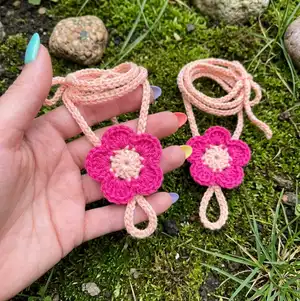
The pattern works for different yarn weights and hook sizes to make either a baby 1.5 inch flower or a toddler 2 inch flower. Detailed notes explain how to read brackets and parenthesis in the pattern for size variations and grouped stitches.

Why You'll Love This Baby Barefoot Sandals Pattern

I absolutely love this pattern because it transforms simple stitches into a delightful floral sandal that is both practical and sweet. I enjoy how quickly a small accessory like this comes together, making it a satisfying project for an afternoon. The design is versatile β€” you can make delicate sandals using crochet thread or chunkier versions with worsted yarn to match outfits. I also love the way the flower is constructed on the exposed front loops for a pretty layered look. Making multiple color combinations keeps this pattern fresh and perfect for gift-making.

Baby Barefoot Sandals Pattern step 1 - construction progress Baby Barefoot Sandals Pattern step 2 - assembly progress Baby Barefoot Sandals Pattern step 3 - details and accessories Baby Barefoot Sandals Pattern step 4 - final assembly and finishing

Switch Things Up

I love how easy it is to customize these sandals by changing yarn weight and hook size; switching to worsted yarn makes a chunkier, more durable sandal for toddlers or bigger kids.

I often swap the flower colors to match outfits β€” try a two-tone flower with a contrasting center for added pop.

You can shorten or lengthen the strap chain (Ch 60) to adjust how long the ties are; I measure around the ankle and add extra chains for bows.

I like adding a small bead or button where the straps meet the sandal base for a decorative touch and extra security.

For a boho look I braid three strands of yarn into the straps instead of using single chains for a textured tie.

To make adult versions, increase the base rounds slightly and lengthen the straps, or use bulkier yarn and a larger hook for a statement sandal.

I sometimes embroider tiny leaves or seed beads onto the flower petals to create a special heirloom feel.

If you prefer a closed toe or more coverage, work additional rounds around the base before creating the straps to expand the sandal shape.

I recommend experimenting with cotton yarn for a summer-friendly, washable option that holds shape well and is gentle on skin.

When gifting, I like to make matching headbands or hair clips using the same flower motif so the set feels cohesive and extra special.

Common Mistakes & How to Fix Them

βœ— Counting the initial chain as a stitch at the beginning of a round; remember the pattern notes: the initial chain does not count as a stitch. βœ— Joining to the wrong stitch at the end of a round and creating a shifted seam; always join to the top of the chain stitch you began the round with to keep joins invisible. βœ— Skipping the instruction to work the whole round 3 in the back loops only; carefully work Round 3 into the back loops only to expose the front loops for the flower. βœ— Not working grouped stitches in the same stitch when brackets are shown; follow bracketed groups exactly and work all stitches between brackets into the same stitch. βœ— Not filling the flower center with slip stitches and leaving holes visible; continue slip stitching randomly across the center until it is filled and looks neat.

Baby Barefoot Sandals Pattern

Create delicate, floral baby barefoot sandals with this easy-to-follow crochet pattern. You will make a small triangular sandal base with pretty straps and a five-petal flower embellishment to finish. The pattern is written for baby and toddler sizes and includes clear step-by-step rounds and photo references so you can follow along with confidence.

Beginner Friendly 2-3 Hours

Materials Needed for Baby Barefoot Sandals Pattern

β€” Main Fabric

  • 01
    Color A (Sandal Base) - Fingering weight yarn, crochet thread, or embroidery floss for baby size (flower approx. 1.5 inches)
  • 02
    Color B (Flower) - Fingering weight yarn, crochet thread, or embroidery floss for baby size (flower approx. 1.5 inches)
  • 03
    Color A and B - Worsted weight yarn for toddler size (flower approx. 2 inches)
  • 04
    Featured examples use Knit Picks Comfy Fingering and Worsted weight yarns

β€” Tools Required

  • 01
    Crochet hook size C / 2.75 mm (for baby size)
  • 02
    Crochet hook size D / 3.25 mm (for toddler size)
  • 03
    Scissors
  • 04
    Yarn needle for sewing and weaving in ends
  • 05
    Stitch markers (optional)
  • 06
    Tapestry needle
  • 07
    Pins for assembly (optional)

Progress Tracker

0% Complete

β€” Materials :

Info :

Baby Size: 1.5 inches across flower. Sandal Base Color A - C or 2.75 mm hook. Fingering weight yarn, crochet thread or embroidery Floss. Flower Color B - Fingering weight yarn, crochet thread or embroidery Floss.

Info :

Toddler Size: 2 inches across flower. D or 3.25 mm hook. Color A and B are Worsted Weight yarn.

Info :

Featured Sandals are made with Knit Picks Comfy Fingering and Worsted weight yarns. Use the same pattern for both sizes.

β€” Abbreviations :

Info :

Ch = Chain. Sc = Single crochet. Dc = Double Crochet. Sl st = Slip stitch.

β€” Notes :

Infos :

1. Do not count the chain stitch as a stitch at the beginning of round. 2. When joining at end of round always join to the top of the chain stitch you began the round with. 3. I did not do an end of the round stitch count in this pattern because of all the chaining; it might be confusing. Other patterns have stitch counts though.

β€” How to read pattern :

Infos :

A. When you see parenthesis () in the pattern they are either referring to the numbers for the larger sizes or will be around notations such as (See Note A). B. When you see Brackets [] in the pattern that means that you work everything in them as a set or together. C. When I have a number followed by a st, that stitch needs to be worked over that number of stitches. Example: "10 sc" that is 1 sc in each of the next 10 stitches.

β€” Gauge :

Info :

I wasn't sure what to put here for gauge; the pattern author left gauge unspecified for this small accessory.

β€” Sandal Base and Flower Instructions :

Round 1 :

With color A ch 4, join with slip stitch to 4th chain from hook to form a small ring. (See Picture A)

Round 2 :

Chain 1 (does not count as stitch) place 9 sc in ring. Join with slip stitch to the chain 1 from the beginning of round. (See Picture B) Do not turn.

Round 3 :

In this pattern when stitches are in brackets that means to put that group of stitches in the same stitch. This whole round will be worked in the back loops only of the previous round. Ch 3, starting in first stitch *[2 dc, chain 2, 2 dc], 1 dc in each of the next two stitches. Repeat from * 1 more time. [2 dc, chain 11, now working back down chain put 1 slip stitch in 10th chain from hook, ch 1, 2 dc back in same stitch], 1 dc in each of the next two stitches. Join with slip stitch to the top of the chain 3 that you started the round with. Do not turn.

First strap :

Slip stitch in next 3 stitches. This should bring you to the middle of the first chain 2 spot. (See pictures C and D) Ch 60, Bind off!

Second Strap :

Attach yarn to next chain three spot with a single crochet. (See Picture D on first page) Ch 60, Bind off!

Note :

I tied the ends of my straps in a knot to kind of finish them off. You don't have to, I just thought it made them look better. :o)

Flower :

With color B attach yarn to any one of the exposed front loops that were not worked in round 3. (See Picture E). Starting in the stitch you attached to, remember to work all stitches between brackets in the same stitch. [Ch 2, 5 dc, ch 2, slip stitch back to same stitch], first petal made! :o) Now skip next stitch, *[slip stitch to next stitch, Ch 2, 5 dc, ch 2, slip stitch back to same stitch], skip next stitch, repeat from * all the way around and end round by joining with a slip stitch to base of first flower petal made. You should have 5 flower petals when complete. Bind off!

Finishing :

Using color A again attach to center of flower by pulling a loop of yarn from back to front and top stitch by slip stitching all the way around the center of the flower at the base of the petals. (See arrows in picture G) After slip stitching around the center circle fill in the center by slip stitching across the flower's center in random stitches until the center is filled to your liking. This may look ugly before it is finished but no worries! Just keep slip stitching away and fill in the holes until it is pretty. (See Picture H) Bind Off!

Info :

Weave in Ends and you are Done! (See final photos.)

Assembly Instructions

  • Attach the first strap by slip stitching in the next 3 stitches of the base (this brings you to the middle of the first chain-2 spot), then chain 60 and bind off to form the tie strap.
  • Attach the second strap by inserting yarn into the next chain-3 spot with a single crochet, chain 60 and bind off; optionally knot strap ends for a finished look.
  • Place the flower on the exposed front loops of the base (these front loops were not worked in Round 3) and sew or slip stitch at the base of the petals to secure it to the sandal.
  • Using Color A, attach yarn to the center of the flower and slip stitch around and across the center randomly to fill gaps until the center looks neat, then bind off and weave in ends.
  • Before final sewing, fold a corner of the sandal back to make it easier to reach exposed front loops and pin the flower in place to check placement before permanently stitching.

Important Notes

  • πŸ’‘Do not count the chain stitch as a stitch at the beginning of a round; follow the pattern notes to avoid off-counts.
  • πŸ’‘Work Round 3 in the back loops only so that the front loops remain exposed for attaching the flower petals.
  • πŸ’‘Join rounds to the top of the chain stitch you began the round with to keep joins neat and consistent.
  • πŸ’‘When you see brackets [] in the pattern, work all stitches inside the brackets into the same stitch as a grouped set.
  • πŸ’‘Pin parts and test strap lengths before finishing knots so you can make adjustments for fit and symmetry.

These baby barefoot sandals are a quick and delightful project that adds a handmade flourish to any little outfit. The floral design is perfect for photos, gifts, or a sweet everyday accessory. Make them in a single color or mix shades for a playful stack β€” happy stitching! 🧢🌸

You ask,

we answer.

FAQs

What size will the finished piece be?

The baby-sized flower measures approximately 1.5 inches across while the toddler version measures approximately 2 inches across, depending on yarn and hook choice.

Can I use different yarn weights for this pattern?

Yes, you can use fingering, crochet thread, or worsted weight yarn; use the recommended hook sizes for each weight to achieve the correct size and fabric look.

Do I need prior crochet experience for this pattern?

This pattern is beginner friendly and uses basic stitches (chain, single crochet, double crochet, slip stitch), but familiarity with working in rounds and reading bracketed groups is helpful.

How long does this project typically take to complete?

Most crocheters complete a single pair of baby barefoot sandals in about 2-3 hours, though time may vary depending on experience and customization.