About This WOLF HAND PUPPET Amigurumi Pattern
This pattern walks you through crocheting a wolf hand puppet using plush yarn and small cotton yarn details. It includes head, muzzle, nose, ears, arms, and body instructions with photo references and helpful video links. You will learn how to insert and indent eyes, attach limbs seamlessly, and embroider facial details for character.
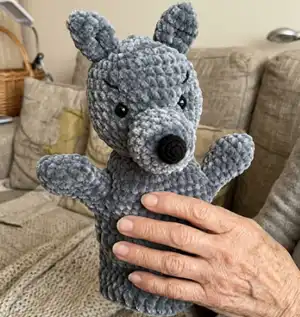
Designed for intermediate crocheters, the toy uses simple increases, decreases, and joining techniques. The finished puppet measures approximately 27 cm (10") tall.
Why You'll Love This WOLF HAND PUPPET Amigurumi Pattern
I absolutely love this pattern because it combines soft plush yarn with small detailed pieces to create an adorable, expressive wolf puppet. I enjoy how quickly the head and body take shape, and how the muzzle and nose add so much personality. Sewing the ears and embroidering the eyebrows always feels like bringing the character to life. This design is fun to customize with different colors and makes a wonderful gift or classroom prop.
Switch Things Up
I love how easy it is to customize this pattern by changing yarn color; try a light brown or silver for a different wolf character.
You can make a mini version by using a finer yarn and smaller hook to create a pocket-sized puppet or keychain companion.
I often add a little scarf or tiny crocheted accessory to give the puppet extra personality and seasonal flair.
For a friendlier look, change eyebrow placement and mouth shape with embroidery to alter the expression from grumpy to cheerful.
I sometimes replace safety eyes with embroidered eyes for baby-safe versions or to achieve a softer, handmade aesthetic.
If you want posable arms, consider inserting thin wire inside the arm before sewing closed to help the puppet hold poses.
I also enjoy stitching small clothing pieces like a vest or hat to create a set of character puppets that can interact in play.
Vary the yarn texture for different feels — plush for cuddly puppets or acrylic for a more structured finish.
Experiment with ear shapes and sizes to create fox-like or bear-like versions using the same basic ear pattern as a starting point.
Don't be afraid to mix yarn types: a contrasting cotton yarn for the muzzle or nose details can add crisp facial definition and visual interest.
Common Mistakes & How to Fix Them
✗ Skipping stitch markers during round joins can lead to losing the start of round and uneven shaping; place a stitch marker at the first stitch of each round and move it as you work to keep track.
✗ Using a larger hook or different yarn weight will change the finished size and density; match the recommended hook and yarn or adjust hook size after making a gauge test to achieve the correct measurements.
✗ Inserting safety eyes too early or too far apart will misplace facial features; fix safety eyes between rounds 10 and 11 and space them 7 sc apart as instructed for proper placement.
✗ Overstuffing or under-stuffing head and muzzle leads to distorted shapes and sewing difficulties; stuff gradually, checking shape frequently and stop when the piece is firm but not stretched.
✗ Not leaving long sewing tails on small parts like the nose and ears makes assembly harder; always leave the recommended tail length (20 cm where noted) for easy and secure sewing.
✗ Skipping the sc2tog joins when attaching arms can create holes or gaps at sleeve joins; follow the sc2tog instructions exactly to close gaps and create a neat attachment.


