🧶 Beautiful ✨ Detailed 💝 Adorable

Wendi the Watermelon Amigurumi Pattern

Wendi the Watermelon Amigurumi Pattern
4.6★ Rating
2-3 Hours Time Needed
1.7K Made This
✂️

Intermediate Level

Ideal for those with basic crochet experience, featuring slightly more advanced stitches and techniques to expand your skills.

⏱️

Bite-Sized Project

Finishes in 2-4 hours—perfect for an afternoon of creative relaxation.

🧸

Cute Companion

An adorable friend to cherish, handcrafted with love to bring comfort and joy for years to come.

About This Wendi the Watermelon Amigurumi Pattern

This pattern creates a charming watermelon amigurumi named Wendi with a rounded body, four cuddly legs, an optional bow, and optional embroidered seeds. The pattern features simple increases and decreases, color changes, and working in the round for neat shaping. Detailed photo notes and step-by-step rounds help you follow every stage of construction.

Wendi the Watermelon Amigurumi Pattern crochet pattern - detailed view of completed project

Designed for intermediate crocheters comfortable with single crochet shaping and color changes. The finished toy is compact and perfect for gifts, nursery decor, or a personal handmade collectible.

Why You'll Love This Wendi the Watermelon Amigurumi Pattern

I absolutely love this pattern because it balances sweet, playful design with approachable techniques that still teach shaping and color work. I enjoy how quick it is to make yet how polished the final toy looks, especially with the contrast stripe and optional bow. I love personalizing mine by changing colors and adding little embroidered seeds to vary expressions. This pattern lets me share joy through a small handmade gift that always brings a smile.

Wendi the Watermelon Amigurumi Pattern step 1 - construction progress Wendi the Watermelon Amigurumi Pattern step 2 - assembly progress Wendi the Watermelon Amigurumi Pattern step 3 - details and accessories Wendi the Watermelon Amigurumi Pattern step 4 - final assembly and finishing

Switch Things Up

I love experimenting with color palettes on this pattern; try pastel shades for a soft nursery friend or bold brights for a playful look.

I sometimes swap the Sweet Snuggles Lite for another chenille-style yarn to change texture—just go up or down a hook size to compensate.

To make a mini keychain version, use sport or DK weight yarn and smaller hooks to scale the pattern down proportionally.

Want a larger plush? Use bulky yarn and larger hooks and add extra stuffing for a squishier toy that still keeps the same charm.

I enjoy embroidering different facial expressions—move the eyes or change the mouth style to create personalities from shy to silly.

Try different seed patterns: spaced seeds, clustered seeds, or even tiny felt seeds glued on for a mixed-media look.

Make a matching set by altering the bow color or adding tiny crocheted props like a mini slice or a leaf.

If you want posable legs, consider inserting thin wire into the leg stuffing before closing so you can gently pose them.

For a baby-safe toy, skip safety eyes and embroider the eyes securely with black yarn, and ensure all tails are woven in and sewn tightly.

I often personalize mine with initials on the underside or a tiny tag—small details make each one truly unique.

Common Mistakes & How to Fix Them

✗ Skipping the instruction to work the last 12 sc on the opposite side of the chain in round 1 can prevent the piece from closing properly; follow the special notes and photos to start your round correctly. ✗ Forgetting to add stuffing gradually causes lumps or gaps inside the body or legs; stuff small amounts at a time and shape as you go to keep an even look. ✗ Adding safety eyes too early or on the wrong side can interfere with leg placement; place safety eyes between rounds 11-12 and ensure theyre on the side with the open holes for legs. ✗ Not counting stitches after increases and decreases results in uneven shaping; count after every round change and verify stitch totals shown in brackets to stay accurate.

Wendi the Watermelon Amigurumi Pattern

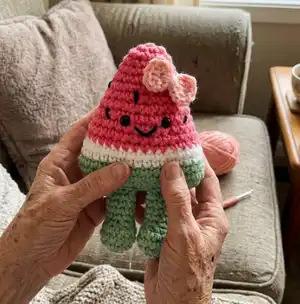
Bring a sweet, squishy friend to life with this Wendi the Watermelon amigurumi pattern. Youll enjoy simple shaping, color changes, and a cute little bow and seeds option to personalize your creation. Perfect for gifting or brightening a shelf, this pattern walks you through every round so you can crochet with confidence and joy.

Intermediate 2-3 Hours

Materials Needed for Wendi the Watermelon Amigurumi Pattern

— Main Fabric

  • 01
    Sweet Snuggles Lite yarn - Baby Green (for rind/legs)
  • 02
    Sweet Snuggles Lite yarn - White (for stripe)
  • 03
    Sweet Snuggles Lite yarn - Carmine Rose (for main pink body)
  • 04
    Optional: Black yarn for embroidered seeds

— Tools Required

  • 01
    Crochet hook size 8 mm (for watermelon body)
  • 02
    Crochet hook size 6.5 mm (for legs and bow)
  • 03
    Tapestry needle
  • 04
    Scissors
  • 05
    Poly-fiber fill
  • 06
    Safety eyes 12-14 mm (2 pieces)

Progress Tracker

0% Complete

— Abbreviations :

Info :

chain (ch), stitch (st), slip stitch (sl st), single crochet (sc) front Loop only (flo), back loop only (blo) increase (inc), decrease (dec), repeat (rep), fasten off (F/O), round (rnd) Figure (fig= picture)

— Special Notes :

Info :

***This project you will be working in the round. When working round 1, you will work the last 12 sc on the opposite side of the chain creating a round. Round 2 will start in the next st, the first stitch of round 1. Refer to the photos on the last page for more detailed information.

— Watermelon Body :

Info :

Hook: 8 mm. Watermelon Body *Green color

Round 1 :

Rnd 1: ch. 14, 12 sc, inc, 12 sc [26]

Round 2 :

Rnd 2: inc, 12sc, inc, 12 sc [28]

Round 3 :

Rnd 3: inc, inc, 12 sc , inc, inc, 12 sc [32]

Round 4 :

Rnd 4: (*blo entire round) 7 sc, ch. 2, skip 2 scs, 2 sc, ch. 2, skip 2 scs, 19 sc [32]

Round 5-6 :

Rnd 5-6: sc [32]

Info :

*Color change- white. *See picture #4 on the last page.

Round 7 :

Rnd 7: 19 sc, dec, 11 sc [31]

Round 8 :

Rnd 8: dec, 17 sc, dec, 10 sc [29]

Info :

*Add stuffing. *Color change- pink. Refer to picture #4 on the last page.

Round 9 :

Rnd 9: dec, 15 sc, dec, 10 sc [27]

Round 10 :

Rnd 10: dec, 13 sc, dec, 10 sc, [25]

Info :

*Add stuffing

Round 11 :

Rnd 11: dec, 11 sc, dec, 10 sc, [23]

Round 12 :

Rnd 12: dec, 10 sc, dec, 9 sc, [21]

Round 13 :

Rnd 13: dec, 8 sc, dec, 9 sc, [19]

Round 14 :

Rnd 14: dec, 8 sc, dec, 7 sc, [17]

Info :

*Add eyes to rnd 11-12 - about 3 stitches apart.. Be sure to add eyes on the side with the open holes for legs.

Info :

*Add mouth to rnd 10-11 about 2 stitches across..

Round 15 :

Rnd 15: 8 sc, dec, 7 sc [16]

Round 16 :

Rnd 16: dec, 6 sc, dec, 6 sc, [14]

Round 17 :

Rnd 17: (dec, 2 sc) x3, 2 sc [11]

Info :

*Weave in and out of front loops to close.

— Legs :

Info :

Hook: 6.5 mm. *Start legs in the open holes of watermelon body.

Round 1 :

Rnd 1: attach yarn, ch. 1, 7 sc [8]

Round 2-6 :

Rnd 2-6: sc [8]

Round 7 :

Rnd 7: (sc, inc, inc) x2, inc, inc [14]

Round 8 :

Rnd 8: (2 sc, dec) x3, 2 sc [11]

Info :

*Add stuffing to the bottom of the feet only.

Round 9 :

Rnd 9: sc, slst [11]

Info :

*Weave in and out of the front loops to close.

— Bow :

Info :

*Optional (requires minimal sewing). Hook 6.5mm

Row 1 :

Row 1: ch. 7

Row 2 :

Row 2: 6 sc, ch. 1, turn

Row 3 :

Row 3: 6 sc, ch. 1, turn

Row 4 :

Row 4: 6 sc, ch 1 turn

Info :

f/o leave long tail- 14-16 in. *sew in one end to hide. The other end will be sewn in to the middle then wrap around to create a tight bow. Leave about 8-10 in tail after wrapping to attach to watermelon body.

Info :

*Attach bow in the upper left corner of Wendi the Watermelon body. I like to attach it at an angle.

— Seeds :

Info :

*Optional. Using black yarn weave in and out of the pink watermelon creating black seeds all over the main part of the watermelon.

— Notes - Pictures :

Info :

Picture #1 - Round 1- 12th stitch completed. Picture #2 - Round 1- The 13th and 14th stitch (increase). Picture #3 - Round 1- starting the 15th stitch with a single crochet. You will be working back down the chain your created. Picture #4 - Attach new color: Pull new color through the last step of the last stitch of the row. Count this as a stitch when attaching.

Assembly Instructions

  • Place and secure safety eyes between rounds 11-12, approximately 3 stitches apart, on the side with the open holes for legs before final stuffing.
  • Sew the legs into the open holes at the bottom of the watermelon body, spacing them evenly and stuffing the foot bottoms before closing.
  • Embroider the mouth across rounds 10-11 spanning about 2 stitches using black or contrasting yarn before final assembly.
  • Attach the optional bow to the upper left corner of the watermelon body using the long tail left from the bow, wrapping the center tight and sewing the tail into the body; attach at an angle if desired.

Important Notes

  • 💡Work round 1 carefully: crochet the last 12 single crochets on the opposite side of the chain to form a continuous round.
  • 💡Add stuffing gradually in multiple steps, shaping as you go to avoid lumps and preserve the watermelon shape.
  • 💡Place safety eyes before closing the body and ensure they are on the side with the open leg holes so assembly is not obstructed.

This adorable Wendi the Watermelon amigurumi is a quick, charming make that's full of personality and pink delight. Customize colors and add a tiny bow or sewn-in seeds for unique flair. Perfect for gifting, nursery decor, or as a cheerful craft to brighten your day. 🍉🧶

You ask,

we answer.

FAQs

What size will the finished piece be?

The finished amigurumi measures approximately 7 inches tall by 6 inches long using the recommended Sweet Snuggles Lite yarn and 8 mm hook.

Can I use different yarn weights for this pattern?

Yes, you can substitute yarn weights, but it will change the finished size and texture; adjust hook size accordingly and test a small swatch first.

Do I need prior crochet experience for this pattern?

This pattern is rated intermediate, so basic knowledge of single crochet, increases, decreases, and working in the round is recommended.

How long does this project typically take to complete?

Most crocheters complete this project in 2-3 hours, though time may vary depending on experience, customization, and finishing details.