๐Ÿงถ Beautiful โœจ Detailed ๐Ÿ’ Adorable

Steve & Zombie Amigurumi Pattern

Steve & Zombie Amigurumi Pattern
4.9โ˜… Rating
5-7 Hours Time Needed
1.4K Made This
โœ‚๏ธ

Intermediate Level

Ideal for those with basic crochet experience, featuring slightly more advanced stitches and techniques to expand your skills.

โฑ๏ธ

Weekend Treat

Takes 5-7 hours, making it an enjoyable project to finish over a couple of days.

๐Ÿงธ

Cute Companion

An adorable friend to cherish, handcrafted with love to bring comfort and joy for years to come.

About This Steve & Zombie Amigurumi Pattern

This pattern teaches you how to crochet two Minecraft-inspired characters: Steve and a Zombie, complete with head colorwork and a little sword. It includes full round-by-round instructions for head, arms, legs, body, sword and assembly with photos for guidance. Youll work color changes, simple shaping and join-as-you-go techniques to build stable amigurumi figures.

Steve & Zombie Amigurumi Pattern crochet pattern - detailed view of completed project

The pattern uses fine/4ply yarn and a 2.0 mm hook for dense, neat stitches. Safety eyes are used for movable arms and the instructions explain placement and finishing in detail.

Why You'll Love This Steve & Zombie Amigurumi Pattern

I absolutely love this pattern because it captures the charm of Minecraft characters in a small, collectible amigurumi form. I enjoy the colorwork on the head โ€” it feels like pixel-art in crochet and gives each character so much personality. The construction is clever: legs join into the body so you crochet continuously, making assembly neat and straightforward. I also love that the arms are made movable using safety eyes instead of cotter pins, which is an easy way to add posability. This project balances simple shaping with a few intermediate techniques, so it keeps me engaged without being overwhelming.

Steve & Zombie Amigurumi Pattern step 1 - construction progress Steve & Zombie Amigurumi Pattern step 2 - assembly progress Steve & Zombie Amigurumi Pattern step 3 - details and accessories Steve & Zombie Amigurumi Pattern step 4 - final assembly and finishing

Switch Things Up

I love how easy it is to personalize these characters โ€” try switching the shirt and pant colors to create different outfits or a whole gang of unique Steves.

For a chunkier look, use a bulkier yarn and a larger hook; this will make a larger, cuddlier version perfect for little hands.

To create keychains or tiny versions, swap to fingering yarn and a smaller hook to make pocket-sized miniatures that are great for gifts.

I often add embroidered scars, patches or tiny accessories (like a backpack or hat) to give each figure its own personality and backstory.

Try swapping the safety eyes for sewn-on embroidered eyes for a softer, child-friendly toy โ€” just skip washers and use secure stitching.

Make the sword metallic by using a yarn with a slight sheen or embroider silver stripes to make it pop in photos and play scenes.

If you want posed limbs, consider adding thin florist wire inside the arms before stuffing to gently bend and pose them for display.

Experiment with facial expressions: moving the blue and white color blocks slightly will make Steve look surprised, happy or cheeky.

Use felt or small beads for different eye effects โ€” felt is great for soft toys, beads for a glossy, expressive look.

I like making a set: multiple Steves with different hairstyles and colored shirts make a fun, collectible display and are great for gifting as a themed set.

Common Mistakes & How to Fix Them

โœ— Skipping stitch markers when joining the legs to the body leads to misplaced seams; mark the last stitch of each round and the joining points before sewing to keep everything aligned. โœ— Changing colors without securing tails neatly causes loose loops and messy joins; carry color when possible and weave in ends as you go to keep the work tidy. โœ— Overstuffing the head or body makes the stitches stretch and distort the shape; stuff gradually and evenly, adding small amounts until you reach a firm but smooth result. โœ— Crocheting increases and decreases unevenly will warp the pixel placement on the head; count your stitches after each color row and maintain consistent tension to preserve the design.

Steve & Zombie Amigurumi Pattern

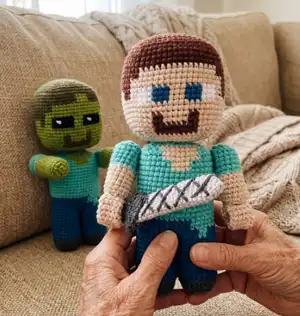
Create adorable Minecraft-inspired Steve and Zombie amigurumi with this detailed crochet pattern. Youll follow clear step-by-step rounds for head, arms, legs, body, sword and assembly. Perfect for making a pair of pocket-sized characters to gift or display, with colorwork and movable arms using safety eyes.

Intermediate 5-7 Hours

Materials Needed for Steve & Zombie Amigurumi Pattern

โ€” Main Fabric

  • 01
    Fine/4ply yarn Gazzal Jeans (50g/170m), beige color (code 1114) for Steve's head and hands
  • 02
    Fine/4ply yarn YarnArt Jeans (50g/160m), brown color (code 70) for Steve's hair and beard and for parts of the sword
  • 03
    Fine/4ply yarn YarnArt Jeans (50g/160m), navy blue color (code 16) for Steve's pants
  • 04
    Fine/4ply yarn YarnArt Jeans (50g/160m), turquoise color (code 33) for Steve's shirt and body
  • 05
    Fine/4ply yarn Gazzal Jeans (50g/170m), dark gray color (code 1140) for boots and sword details
  • 06
    Fine/4ply yarn Gazzal Jeans (50g/170m), green color (code 1151) for Zombie's head and hands
  • 07
    Fine/4ply yarn Gazzal Jeans (50g/170m), dark green color (code 1129) for Zombie's hair
  • 08
    Fine/4ply yarn YarnArt Jeans (50g/160m), light gray color (code 49) for sword blade
  • 09
    Small amounts of white and black yarn for embroidered eyes
  • 10
    Polyester fiberfill stuffing (fiberfill or synthetic filling), amount to taste

โ€” Tools Required

  • 01
    Crochet hook size 2.0 mm
  • 02
    Safety eyes (for the arms fastening)
  • 03
    Scissors
  • 04
    Tapestry needle for embroidery and sewing on pieces
  • 05
    Stitch marker (or thread to mark round start)
  • 06
    Pins for assembly (optional)
  • 07
    Plastic card or thick plastic piece to keep soles flat (for legs)
  • 08
    Washers for safety eyes (included with safety eyes)
  • 09
    Any stuffing material to your taste (fiberfill)

Progress Tracker

0% Complete

โ€” Head :

Info :

Start in brown color.

Rnd 1 :

8 sc in a MR [8]

Rnd 2 :

(1 sc, 3in1)*4 [16]

Rnd 3 :

2 sc, (3in1, 3 sc)*3, 3in1, 1 sc [24]

Rnd 4 :

3 sc, (3in1, 5 sc)*3, 3in1, 2 sc [32]

Rnd 5 :

4 sc, (3in1, 7 sc)*3, 3in1, 3 sc [40]

Rnd 6 :

5 sc, (3in1, 9 sc)*3, 3in1, 4 sc [48]

Rnd 7 :

6 sc, (3in1, 11 sc)*3, 3in1, 5 sc [56]

Rnd 8 :

7 sc, (3in1, 13 sc)*3, 3in1, 6 sc [64]

Rnd 9 :

BLO 64 sc [64]

Rnd 10-12 :

(3 rounds): 64 sc [64]

Info :

In the next rounds alternate brown, blue, white and beige colors.

Rnds 13-14 :

25 sc (brown), 15 sc (beige), 24 sc (brown) [64]

Rnds 15-16 :

23 sc (brown), 19 sc (beige), 22 sc (brown) [64]

Rnds 17-18 :

18 sc (brown), 3 sc (beige), 2 sc (brown), 2 sc (beige), 3 sc (white), 3 sc (blue), 3 sc (beige), 3 sc (blue), 3 sc (white), 2 sc (beige), 2 sc (brown), 3 sc (beige), 17 sc (brown) [64]

Rnd 19 :

18 sc (brown), 7 sc (beige), 3 sc (white), 3 sc (blue), 3 sc (beige), 3 sc (blue), 3 sc (white), 7 sc (beige), 17 sc (brown) [64]

Rnds 20-21 :

18 sc (brown), 29 sc (beige), 17 sc (brown) [64]

Rnds 22-23 :

18 sc (brown), 10 sc (beige), 2 sc (brown), 5 sc (beige), 2 sc (brown), 10 sc (beige), 17 sc (brown) [64]

Rnd 24 :

15 sc (brown), 13 sc (beige), 9 sc (brown), 13 sc (beige), 14 sc (brown) [64]

Rnd 25 :

15 sc (brown), 13 sc (beige), 9 sc (brown), 27 sc (beige) [64]

Info :

Continued on the next page =>

Info :

Next, crochet only in beige color.

Rnd 26 :

7 sc, (sc3tog, 13 sc)*3, sc3tog, 6 sc [56]

Rnd 27 :

6 sc, (sc3tog, 11 sc)*3, sc3tog, 5 sc [48]

Rnd 28 :

5 sc, (sc3tog, 9 sc)*3, sc3tog, 4 sc [40]

Info :

Stuff the head tightly and evenly with fiberfill and continue:

Rnd 29 :

4 sc, (sc3tog, 7 sc)*3, sc3tog, 3 sc [32]

Rnd 30 :

3 sc, (sc3tog, 5 sc)*3, sc3tog, 2 sc [24]

Rnd 31 :

2 sc, (sc3tog, 3 sc)*3, sc3tog, 1 sc [16]

Rnd 32 :

1 sc, (sc3tog, 1 sc)*3, sc3tog [8]

Info :

Sl st at the end, cut the yarn, pull off the hole to close and fasten off.

โ€” Arms :

Item Name (PALMS P1) :

PALMS (make 2). Crochet in beige color. Ch 5, start in the second chain from the hook.

Rnd 1 :

1 inc, 2 sc, 3 sc in the last chain, on the other side of the chain 3 sc [10]

Rnds 2-9 :

(8 rounds): 10 sc [10]

Info :

Do not stuff, fold in half and crochet 5 sc through both sides (photo1).

Info :

Then crochet the fingers. From the last stitch: ch 4, 3 sc (along the chain), 3 sl st (along the last round of the palm), ch4, 3 sc (along the chain) (photo2).

Info :

Sew the fingers to round 1 of the palm (see photo on the next page).

Item Name (ARMS P1) :

ARMS (make 2). Crochet in beige color.

Rnd 1 :

8 sc in a MR [8]

Rnd 2 :

(1 sc, 3in1)*4 [16]

Rnd 3 :

BLO 16 sc [16]

Info :

Sew the crocheted part to the palm as shown in the photo

Rnds 4-8 :

(5 rounds): 16 sc [16]

Info :

Change color to turquoise:

Rnds 9-14 :

(6 rounds): 16 sc [16]

Info :

Leave the yarn end about 40 cm long to finish the arm after fastening it to the body.

โ€” Legs :

Info :

(make 2) Start in dark gray color.

Rnd 1 :

8 sc in a MR [8]

Rnd 2 :

(1 sc, 3in1)*4 [16]

Rnd 3 :

2 sc, (3in1, 3 sc)*3, 3in1, 1 sc [24]

Rnd 4 :

BLO 24 sc [24]

Rnds 5-6 :

24 sc [24]

Info :

To keep the soles flat, cut out a piece of thick plastic to fit the shape of the sole and put it inside (see photo 1). So after stuffing it will not be rounded.

Info :

Change color to blue:

Rnd 7 :

BLO 24 sc [24]

Rnds 8-15 :

(8 rounds): 24 sc [24]

Rnd 16 :

17 sc (short round), cut the yarn, leaving a long end for sewing.

Info :

Crochet the second leg in the same way from Rnd 1 to Rnd 15, and finish Rnd 16 to the end:

Rnd 16 :

24 sc [24]

Info :

After the second leg is done, do not cut the yarn. From this point, we will continue to crochet the body.

โ€” Body :

Info :

Place the legs as shown in photo 1 and sew up 6 sc on the right and 6 sc on the left leg (photo 1). Before sewing, pay attention to how the square is located at the base of the legs. Sew the stitches together along the side of this square. After sewing, continue to crochet from the last stitch on the second leg. Work around both legs, making extra sc at the sewing points (see photo 3):

Rnd 1 :

4 sc, 2 extra sc between the legs, 13 sc (blue), 2 sc (turquoise), 3 sc, 2 extra sc between the legs, 14 sc (blue) [40]

Rnd 2 :

19 sc (blue), 2 sc (turquoise), 19 sc (blue) [40]

Rnds 3-4 :

17 sc (blue), 6 sc (turquoise), 17 sc (blue) [40]

Info :

Change color to turquoise:

Rnd 5 :

(work in back loops along blue stitch and in both loops along turquoise stitches): 40 sc [40]

Rnds 6-14 :

(9 rounds): 40 sc [40]

Rnds 15-16 :

24 sc (turquoise), 4 sc (beige), 12 sc (turquoise) [40]

Rnds 17-18 :

22 sc (turquoise), 8 sc (beige), 10 sc (turquoise) [40]

Rnd 19 :

6 sc (turquoise), move the marker of the round beginning into the last stitch and start a new round:

Rnd 20 :

5 sc, sc3tog, 3 sc, sc3tog, 1 sc (turquoise), 10 sc (beige), 1 sc, sc3tog, 3 sc, sc3tog, 5 sc (turquoise) [32]

Info :

Stuff the legs and body tightly with fiberfill, next crochet only in turquoise color:

Rnd 21 :

4 sc, sc3tog, 1 sc, sc3tog, 10 sc, sc3tog, 1 sc, sc3tog, 4 sc [24]

Rnd 22 :

4 sc, sc3tog, 10 sc, sc3tog, 1 sl st.

Info :

Cut the yarn, leaving a long end for sewing the head.

โ€” Assembly :

Info :

In order for Steve's arms to be movable, I'll use safety eyes instead of joints (cotter pins). Insert eyes into the body between rounds 18 and 19 symmetrically on both sides (see photos 1,2). Now pass these eyes through the arms (move 2 rounds down from the edge), as shown in photo 3.

Info :

Pay attention that the arms after joining are placed correctly (fingers back). Put washers on the legs of the eyes and stuff the body and arms tightly with fiberfill.

Info :

Finish crocheting the arms: Rnd 15: (1 sc, sc3tog)*4 [8].

Info :

Sl st at the end, stuff the upper part tightly with fiberfill, pull off the hole to close and fasten off.

Info :

Sew the head to the last round of the body around the perimeter. See more assembly photos on the next page.
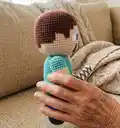
โ€” Sword :

Item Name (BLADE) :

Crochet in light gray color:

Rnd 1 :

6 sc in a MR [6]

Rnd 2 :

6 sc [6]

Rnd 3 :

6 inc [12]

Rnds 4-19 :

(16 rounds): 12 sc [12]

Info :

Fold in half and crochet 6 sc through both sides. Cut the yarn, fasten off.

Item Name (GRIP) :

Start in dark gray color:

Rnd 1 :

6 sc in a MR [6]

Rnds 2-3 :

6 sc [6]

Info :

Change color to brown:

Rnd 4 :

2 sc, 1 dec, 2 sc [5]

Rnds 5-7 :

(3 rounds): 5 sc [5]

Info :

Change color to dark gray:

Rnd 8 :

5 inc [10]

Rnd 9 :

10 inc [20]

Rnd 10 :

20 sc [20]

Rnd 11 :

(1 sc, 1 inc)*10 [30]

Info :

Sl st at the end, cut the yarn, leaving a long end for sewing pieces. Insert the blade into the grip (see photo) and sew the last round of the grip with the blade. After that, if desired, embroider stripes on the blade. Cut the yarn, fasten off.

โ€” Steve is ready :

Info :

So we have done our Steve!

โ€” Zombie :

Info :

Start crocheting the head in dark green color.

Info :

Rounds 1-9 are the same as for Steve.

Rnd 10 :

64 sc [64]

Info :

In the next rounds alternate dark green, green and black colors.

Rnds 11-12 :

32 sc (dark green), 4 sc (green), 28 sc (dark green) [64]

Rnds 13-14 :

25 sc (dark green), 15 sc (green), 24 sc (dark green) [64]

Rnds 15-16 :

23 sc (dark green), 19 sc (green), 22 sc (dark green) [64]

Rnds 17-18 :

18 sc (dark green), 3 sc (green), 2 sc (dark green), 2 sc (green), 6 sc (black), 3 sc (green), 6 sc (black), 2 sc (green), 2 sc (dark green), 3 sc (green), 17 sc (dark green) [64]

Rnd 19 :

18 sc (dark green), 7 sc (green), 6 sc (black), 3 sc (green), 6 sc (black), 7 sc (green), 17 sc (dark green) [64]

Rnds 20-21 :

18 sc (dark green), 29 sc (green), 17 sc (dark green) [64]

Rnds 22-23 :

18 sc (dark green), 10 sc (green), 2 sc (dark green), 5 sc (green), 2 sc (dark green), 10 sc (green), 17 sc (dark green) [64]

Rnd 24 :

15 sc (dark green), 13 sc (green), 9 sc (dark green), 13 sc (green), 14 sc (dark green) [64]

Rnd 25 :

15 sc (dark green), 13 sc (green), 9 sc (dark green), 27 sc (green) [64]

Info :

Finish the head as for Steve (Rnds 26-32) but in green color.

Info :

Arms for Zombie: I crocheted without the palms. Rounds 1-8 are the same as for Steve (but in green color), then work Rnds 9-13 (5 rounds): 16 sc [16]. Change color to turquoise and work Rnds 14-19 as for Steve (Rnds 9-14).

Info :

Crochet the legs and body of Zombie in the same way as for Steve, but replace the beige color with green. Optionally, embroider highlights in front of the eyes with a white thread. Fasten the arms, finish them and sew the head in the same way as we did when assembling Steve.

Assembly Instructions

  • Insert safety eyes into the body between rounds 18 and 19 symmetrically on both sides; pass these eyes through the arms (move 2 rounds down from the edge) and secure with washers so the arms can move.
  • Place the legs as shown and sew up 6 sc on the right and 6 sc on the left leg before continuing to crochet the body; align the base squares and sew the stitches together along the side.
  • After completing the body, stuff the legs, body and arms tightly with fiberfill, then finish the arms with Rnd 15 (1 sc, sc3tog)*4 [8], sl st and stuff the upper part before closing.
  • Sew the head to the last round of the body around the perimeter using the long yarn tail left from the body; check alignment and stitch evenly to avoid gaps.
  • Insert the sword blade into the grip, sew the last round of the grip with the blade and embroider any desired stripes on the blade before fastening off.
  • When attaching arms, make sure fingers point backward and pin parts in place before final sewing; use washers on safety eyes legs to secure joints and check movement.

Important Notes

  • ๐Ÿ’กUse stitch markers to mark the beginning of each round and special joining points to avoid losing your place in colorwork sections.
  • ๐Ÿ’กWork in consistent tension and use the recommended 2.0 mm hook to achieve the correct size and neat pixel-style colorwork on the head.
  • ๐Ÿ’กStuff pieces gradually and evenly; overstuffing can distort the shape while under-stuffing will make sewing and assembly difficult.
  • ๐Ÿ’กWhen changing colors frequently on the head, carry yarn or weave ends neatly to keep the inside tidy and reduce finishing work.
  • ๐Ÿ’กCut a small piece of thick plastic to insert in the soles of the legs to keep them flat after stuffing, as shown in the photos.

Thank you for making Steve & Zombie with this pattern โ€” I hope they bring a smile to your crafting table and your shelf. ๐Ÿงถ These little pixel pals are perfect for gifting or keeping as a fun collectible and are full of handmade charm. ๐Ÿงต Happy crocheting and enjoy customizing colors and expressions to make each character your own! โœจ

You ask,

we answer.

FAQs

What size will the finished piece be?

The finished amigurumi measures approximately 12-15 cm tall when using the recommended 4ply yarn and a 2.0 mm hook; exact size depends on your tension.

Can I use different yarn weights for this pattern?

Yes, you can use different yarn weights but the final size will change; if you use a heavier yarn, choose a larger hook and adjust stuffing and safety eye size.

Do I need prior crochet experience for this pattern?

This pattern is rated intermediate and requires experience with amigurumi basics, color changes, increases, decreases and sewing pieces together.

How long does this project typically take to complete?

Most crocheters finish both characters in about 5-7 hours total, depending on experience, colorwork speed and assembly time.

How do I make the arms movable?

Insert safety eyes through the body between rounds 18 and 19, pass them through the arms (two rounds down from the edge), and secure with washers; this acts as a removable joint.