๐Ÿงถ Beautiful โœจ Detailed ๐Ÿ’ Adorable

Snail Amigurumi Pattern

Snail Amigurumi Pattern
4.4โ˜… Rating
5-7 Hours Time Needed
2.9K Made This
โœ‚๏ธ

Intermediate Level

Ideal for those with basic crochet experience, featuring slightly more advanced stitches and techniques to expand your skills.

โฑ๏ธ

Weekend Treat

Takes 5-7 hours, making it an enjoyable project to finish over a couple of days.

๐Ÿงธ

Cute Companion

An adorable friend to cherish, handcrafted with love to bring comfort and joy for years to come.

About This Snail Amigurumi Pattern

This pattern creates a whimsical crocheted snail with large, expressive eyes and a curled shell. Youll crochet the shell, eyelids, jaws, a poseable eye stalk using wire, and a decorative mantle. Clear row-by-row instructions and photographic references help you at key assembly steps.

Snail Amigurumi Pattern crochet pattern - detailed view of completed project

The design uses light fingering/sock weight yarn and a small steel hook for neat stitches and fine detail. The finished snail stands about 13.5 cm tall, but size may vary with yarn and hook.

Why You'll Love This Snail Amigurumi Pattern

I absolutely love this pattern because it combines playful character with small, satisfying crochet pieces. I enjoy how the wired eye stalks let you pose the snail and give it personality. The shell spiral and mantle add a fun finishing touch that makes each snail unique. Sewing the parts together is relaxing and the step-by-step photos make assembly straightforward.

Snail Amigurumi Pattern step 1 - construction progress Snail Amigurumi Pattern step 2 - assembly progress Snail Amigurumi Pattern step 3 - details and accessories Snail Amigurumi Pattern step 4 - final assembly and finishing

Switch Things Up

I love how easy it is to customize this snail by changing yarn colors โ€” try muted earth tones for a realistic snail or bright neons for a playful toy.

I often change the eye size and shape: smaller eyes make it look more realistic, while larger eyes create a whimsical characterful expression.

If you want a larger snail, I suggest switching to a sport or DK weight yarn and a larger hook, and using thicker wire for the eye stalks.

You can embroider eyelashes or a smile to give each snail a unique personality; embroidery is an easy way to customize expression without changing the pattern.

For a more portable keychain version, use thinner yarn and a 2.0 mm hook, make the body shorter, and replace glass eyes with embroidered pupils for safety.

I sometimes add tiny accessories like a crochet flower on the shell or a removable felt scarf to create seasonal or themed snails.

If you prefer no wire, I recommend stuffing the stalks firmly and crocheting them slightly thicker so they hold shape without posing, perfect for younger children.

I like to mix yarn textures โ€” cotton for the shell and acrylic for the body โ€” to create contrast in shine and drape that looks lovely in photos.

Try adding surface slip stitch ridges on the shell to imitate spiral texture or to make an accent color pop along the spiral lines for extra detail.

I also play with different stuffing densities: firmer stuffing for a more robust toy or softer stuffing for a cuddly, squishy feel depending on how the snail will be used.

Common Mistakes & How to Fix Them

โœ— Crocheting with loose tension creates gaps and visible stuffing; use a smaller hook and maintain consistent, tight stitches to avoid holes. โœ— Forgetting to stuff gradually causes lumps and misshapen sections; add fiberfill little by little, shaping as you go for an even profile. โœ— Not securing or wrapping the wire ends properly can damage yarn or come loose; bend wire ends and wrap them with a textile band-aid before inserting into the jaws to protect and secure. โœ— Skipping stitch counts during increases or decreases leads to uneven shaping; count stitches every few rounds and mark the start of the round carefully to stay accurate.

Snail Amigurumi Pattern

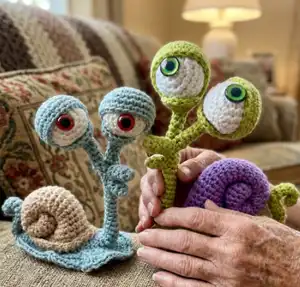
Make a charming crochet snail with expressive eyes and a curled shell. This pattern guides you step-by-step through crocheting the shell, eyes, eyelids, jaws, body and decorative mantle. Youll learn how to add wire for poseable eye stalks and assemble the toy for a tidy, professional finish. Perfect as a handmade gift or a cute shelf companion.

Intermediate 5-7 Hours

Materials Needed for Snail Amigurumi Pattern

โ€” Main Fabric

  • 01
    YarnArt Jeans 160 m (174 yds) in 50 g skeins; light green (color 29) - 14 g
  • 02
    YarnArt Jeans 160 m (174 yds) in 50 g skeins; purple (color 72) - 7 g
  • 03
    YarnArt Jeans 160 m (174 yds) in 50 g skeins; white (color 62) - 3 g
  • 04
    Small amounts of contrast or body color yarn as needed for details
  • 05
    Fiberfill for stuffing (small amount)
  • 06
    Craft wire (aluminum or copper) 0.75-1 mm thick, approximately 115 cm total for two eye stalks

โ€” Tools Required

  • 01
    Steel crochet hook size 1.75 mm (#4 US)
  • 02
    Scissors
  • 03
    Gypsy needle (darning/sewing needle)
  • 04
    Wooden skewer and a toothpick with a broken tip for stuffing
  • 05
    2 glass eyes 14 mm (0.55 inch)
  • 06
    Glue Moment Crystal (clear craft glue)
  • 07
    Craft wire (aluminum or copper) 0.75-1 mm thick - 115 cm (45.28 inch)
  • 08
    Round pliers and wire cutters
  • 09
    Textile band-aid (for wrapping wire)
  • 10
    Stitch markers (recommended)

Progress Tracker

0% Complete

โ€” Shell :

Info :

We knit in a spiral.

Round 1 :

6 sc in MC

Round 2 :

6 inc = 12

Round 3-12 :

12 sc

Round 13 :

inc, 11 sc = 13 (photo 1)

Round 14-23 :

13 sc

Round 24 :

inc, 12 sc = 14

Round 25-29 :

14 sc

Round 30 :

3 sc in 1, 13 sc = 16

Round 31 :

sc, 3 sc in 1, 14 sc = 18

Round 32 :

2 sc, 3 sc in 1, 15 sc = 20

Round 33 :

3 sc, 3 sc in 1, 16 sc = 22

Round 34 :

4 sc, 3 sc in 1, 17 sc = 24 (photo 2)

Round 35 :

5 ps, 3 ps in 1, 18 ps = 26 (photo 3-4), fasten off, hide the tip of the thread. Fill the shell with fiberfill lightly.

Info :

Make a tie from the narrow part of the shell and fix it at the first round (photo 5-6).

Info :

Fold the second round and stretch the ends of the pulling thread through the tip of the shell, make a knot on the inside of the shell (photo 1-2). Bend the side (photo 3).

โ€” Eye :

Info :

We knit in a spiral with white yarn.

Round 1 :

6 sc in MC

Round 2 :

6 inc = 12

Round 3 :

(sc, inc) * 6 = 18

Round 4 :

(2 sc, inc) * 6 = 24

Round 5-7 :

24 sc

Round 8 :

(2 sc, dec) * 6 = 18

Round 9 :

(sc, dec) * 6 = 12, fill with fiberfill.

Round 10 :

6 dec = 6, pull the hole by the front loops. Hide the tip of the thread inside the ball (photo 4).

Info :

Pick up the eye in the 7th row for 2 columns on a long wire. Align the ends of the wire and twist it under the eye (photo 1-2). Bend the ends of the wire.

Info :

Stretch the ends of the wire through the tube of the lower eyelid, thereby inserting the eye into the socket (photo 3-5). The eye does not need to be sewn in any way. It is remarkably fixed between the eyelids (photo 6).

โ€” Upper eyelid :

Info :

We knit in a spiral with light green yarn.

Round 1 :

6 sc in MC

Round 2 :

6 inc = 12

Round 3 :

(sc, inc) * 6 = 18

Round 4 :

(2 sc, inc) * 6 = 24

Round 5-8 :

24 sc, fasten off, hide the tip of the thread (photo 1).

โ€” Lower eyelid :

Info :

We knit in a spiral with light green yarn. Immediately leave the tip for sewing 20 cm (8 inch).

Round 1 :

5 sc in MC, we do not tighten the ring tightly - there should be a hole for the frame (photo 2-3).

Round 2-6 :

5 sc

Round 7 :

7 inc = 12 (the marker of the beginning of the row will shift by 2 loops)

Round 8 :

(sc, inc) * 6 = 18, sl st. Cut the yarn leaving a tail for sewing (photo 4).

Info :

Fold the upper and lower eyelid and combine 8 sc in pairs (photo 5).

โ€” Upper jaw :

Info :

We knit in a spiral with light green yarn.

Round 1 :

6 sc in MC

Round 2 :

6 sc

Round 3 :

inc, 5 sc = 7

Round 4 :

7 sc

Round 5 :

inc, 6 sc = 8

Round 6 :

8 sc

Round 7 :

3 sl st, sc, 4 hdc = 8 (photo 1), finish, hide the tip of the thread. Fold the wire with a loop (photo 2), wrap it with a textile band-aid (photo 3). Insert it into the upper jaw. To add volume, fill it slightly (photo 4).

โ€” Lower jaw :

Info :

We knit in a spiral with light green yarn.

Round 1 :

4 sc in MC

Round 2 :

(inc, sc) * 2 = 6

Round 3 :

6 sc, sl st. Do not fill.

Round 4 :

ch, rotate, 3 join sc with upper jaw on sl st (photo 1-2), when knit on upper jaw: sc, 3 hdc, sc, on lower jaw: 3 sl st = 8 (photo 3)

Info :

Insert the eye wires at the base of the first and last half double crochet of the 7th row of the upper jaw (photo 4). Stretch the frame into the neck (photo 5-6). Wrap the wires with a textile band-aid.

โ€” Body :

Info :

We continue to knit from the united jaws in a spiral around the frame.

Round 1-2 :

8 sc

Round 3 :

dec, 6 sc = 7

Round 4 :

dec, 5 sc = 6

Round 5-7 :

6 sc

Round 8 :

inc, 5 sc = 7

Round 9 :

7 sc

Round 10 :

inc, 6 sc = 8

Round 11 :

8 sc

Round 12 :

inc, 7 sc = 9 (photo 1)

Round 13 :

inc, 8 sc = 10

Round 14 :

(inc, 4 sc) * 2 = 12

Round 15 :

(3 sc, inc) * 3 = 15

Round 16 :

(4 sc, inc) * 3 = 18

Round 17-19 :

18 sc

Round 20 :

dec, 16 sc = 17

Round 21-23 :

17 sc

Round 24 :

dec, 15 sc = 16

Round 25-27 :

16 sc

Round 28 :

dec, 14 sc = 15

Round 29 :

15 sc

Round 30 :

dec, 13 sc = 14

Round 31 :

dec, 12 sc = 13

Round 32 :

dec, 11 sc = 12 Fill the body with fiberfill lightly.

Round 33 :

dec, 10 sc = 11

Round 34 :

dec, 9 sc = 10

Round 35 :

dec, 8 sc = 9

Round 36 :

dec, 7 sc = 8

Round 37 :

dec, 6 sc = 7

Round 38-51 :

7 sc, cut off the excess tip of the frame (photo 2), complete, pull the hole by the front loops, hide the tip (photo 3-4).

โ€” Mantle :

Info :

Make 47 loops on the body. To do this, it is convenient to mark 3 columns on the chest (photo 3) and count another 22 rows on the sides of them. For each row and for each single crochet, make 1 loop. The mantle line should be in 2 loops below the shell. The line does not have to be flat. The curves of the line will create the illusion of mobility of the mantle (photo 4-5).

Round 1 :

rotate, 10 sc, 7 hdc, 5 dc, 3 inc dc, 5 dc, 7 hdc, 10 sc = 50

Round 2 :

sl st on the body, rotate, skip 1, 10 inc, 7 inc hdc, 16 inc dc, 7 inc hdc, 10 inc, sl st, fasten off, hide the tip of the thread (photo 1).

โ€” Assembly and design of the toy :

Item Name (P1) :

Press a recess on the abdomen with your finger (photo 2) and sew it around the perimeter so that the snail stands more stable (photo 3).

Item Name (P2) :

Glue the eyes (photo 4-5).

Item Name (P3) :

Sew the shell to the body with invisible stitches, picking up the border between 34 and 35 rows. The stitch length is 1 column or 1 row. Bend 35 Row up and fix the shell position (photo 1-2).

Info :

Wrap wires with textile band-aid and hide tips inside jaws or body. Fasten glued eyes and hide thread tips. Complete all finishing and hide loose ends.

Assembly Instructions

  • Sew the shell to the body with invisible stitches, picking up the border between rows 34 and 35; use a stitch length of one column or row and bend row 35 up to secure the shell (photo references).
  • Press a shallow recess on the abdomen and sew around the perimeter so the snail stands more stably and the base sits flat.
  • Glue the glass eyes into the eye sockets after inserting and twisting the wire frame through the lower eyelid tube; ensure glue is fully dry before handling.
  • Insert the eye wires through the 7th row of the eye (two columns), align and twist them under the eye, then thread and secure the wire through the eyelid and upper jaw frames, wrapping exposed wire with textile band-aid.

Important Notes

  • ๐Ÿ’กThe toy must be crocheted with tight stitches to avoid visible holes; use a smaller hook if you see gaps.
  • ๐Ÿ’กStuff the body gradually while crocheting so that the shape remains smooth and even; avoid under- or over-stuffing.
  • ๐Ÿ’กIf the toy is for a toddler under the age of three, use safety eyes and avoid buttons or removable parts for safety.

This adorable snail amigurumi brings a touch of whimsy to any shelf or gift box. It combines fine stitchwork with a poseable eye stalk frame and a curled shell for delightful character. Make one in bright or pastel colors to match your style and give it as a handmade keepsake. ๐ŸŒ๐Ÿงถ

You ask,

we answer.

FAQs

What size will the finished piece be?

The finished snail measures approximately 13.5 cm tall by 11.5 cm long when using the recommended YarnArt Jeans yarn and a 1.75 mm steel hook.

Can I use different yarn weights for this pattern?

Yes, you can use different yarn weights, but this will change the final size and may require adjusting the wire thickness and eye size; choose an appropriate hook for your yarn.

Do I need prior crochet experience for this pattern?

This pattern is rated intermediate; you should be comfortable with single crochet, increases, decreases, and basic shaping, plus simple wire work for the eye stalks.

How long does this project typically take to complete?

Most crocheters complete this snail in about 5-7 hours, depending on experience, finishing choices, and assembly time.

What tools are needed to make the eye stalks safe and secure?

Youll need craft wire (0.75-1 mm), round pliers, wire cutters and textile band-aid to wrap and protect wire ends before inserting into the jaws for a safe, stable frame.