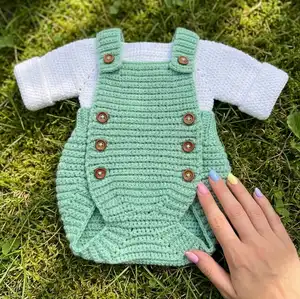
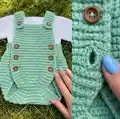
This charming baby romper pattern guides you step-by-step to create a comfy, ribbed romper perfect for newborns through 12 months. You will enjoy working the sport-weight yarn and creating neat buttonholes and straps. The pattern includes clear row-by-row instructions for multiple sizes and a ribbed border for a professional finish. Suitable for crocheters looking to expand shaping and garment skills.
Progress Tracker
0% Complete
— Notes :
Info :
How to decrease: sc2tog - 2 single crochets are joined into one loop. Insert the hook in back loop of next stitch and pull the yarn through, then pull the yarn through the 2sd from the hook stitch. Now you have 3 loops on your hook. Yarn over and pull it through all loops.
Info :
Main pattern: All the rows are worked in sc into blo.
Info :
Gauge: work 23sts and 26 rows in sc working blo to measure 10x10 cm (4x4 inch) using a 3.5mm crochet hook, or size required to obtain the gauge. Please check the gauge before you start!
— Bib part :
Note :
Note: at the end of each row, the Ch1 made does not count as a stitch.
Row 1 :
ch27(29, 31, 33, 35) sc into the 2nd ch from your hook. Sc into each chain, ch1 and turn. =26(28, 30, 32, 34)sts.
Row 2 :
sc into each stitch, ch1 and turn. =26(28, 30, 32, 34)sts.
Row 3 (inc) :
sc in the next 6sts, 2sc into the next st, sc in the next 12(14, 16, 18, 20)sts, 2sc into the next st, sc in the next 6sts, ch1 and turn. =28(30, 32, 34, 36)sts.
Row 4 :
sc into each stitch, ch1 and turn. =28(30, 32, 34, 36)sts.
Row 5 :
sc into each stitch, ch1 and turn. =28(30, 32, 34, 36)sts.
Row 6 (inc) :
sc in the next 6sts, 2sc into the next st, sc in the next 14(16,18,20,22)sts, 2sc into the next st, sc in the next 6sts, ch1 and turn. =30(32,34,36,38)sts.
Info :
For size 6-9 m, 9-12 m continue increase.
Row 7-8 :
sc into each stitch, ch1 and turn. =36(38)sts.
Row 9 (inc) :
sc in the next 6sts, 2sc into the next st, sc in the next 22 (24) sts, 2sc into the next st, sc in the next 6sts, ch1 and turn. =38(40)sts.
Info :
For newborn size continue as follows.
Row 7-19 :
sc into each stitch, ch1 and turn. =30sts.
Info :
For size 0-3 m, 3-6 m continue as follows.
Row 7-21 :
sc into each stitch, ch1 and turn. =32,34sts.
Info :
For size 6-9 m continue as follows.
Row 10-26 :
sc into each stitch, ch1 and turn. =38sts.
Info :
For size 9-12 m continue as follows.
Row 10-29 :
sc into each stitch, ch1 and turn. =40sts.
— Front part with button holes :
Info :
Note: in rows 20 (22, 22, 27, 30), 28 (31,31,36,39), 36(40,40,45,48) - that is, after every 7 (8,8,8,8) rows to make two holes for buttons.
For newborn size - Row 20 :
sc in the next 3sts, 2ch, skip 2sts, sc in the next 20sts, 2ch, skip 2sts, sc in the next 3sts, ch1 and turn. = 30sts.
Rows 21-27 :
sc into each stitch, ch1 and turn. =30sts.
Row 28 (holes) :
repeat Row 20.
Rows 29-35 :
sc into each stitch, ch1 and turn. =30sts.
Row 36 (holes) :
repeat Row 20.
For size 0-3 m, 3-6 m - Row 22 (holes) :
sc in the next 3sts, 2ch, skip 2sts, sc in the next 22, 24, sts, 2ch, skip 2sts, sc in the next 3sts, ch1 and turn. =32,34sts.
Rows 23-30 :
sc into each stitch, ch1 and turn. =32,34sts.
Row 31 (holes) :
repeat Row 22.
Rows 32-39 :
sc into each stitch, ch1 and turn. =32,34sts.
Row 40 (holes) :
repeat Row 22.
For size 0-3 m - Rows 41-47 :
sc into each stitch, ch1 and turn. =32sts.
For size 3-6 m - Rows 41-49 :
sc into each stitch, ch1 and turn. =34sts.
For size 6-9 m - Row 27 (holes) :
sc in the next 3sts, 2ch, skip 2sts, sc in the next 28 sts, 2ch, skip 2sts, sc in the next 3sts, ch1 and turn. = 38sts.
Rows 28-35 :
sc into each stitch, ch1 and turn. =38sts.
Row 36 (holes) :
repeat Row 27.
Rows 37-44 :
sc into each stitch, ch1 and turn. =38sts.
Row 45 (holes) :
repeat Row 27.
Rows 46-54 :
sc into each stitch, ch1 and turn. =38sts.
For size 9-12 m - Row 30 (holes) :
sc in the next 3sts, 2ch, skip 2sts, sc in the next 30 sts, 2ch, skip 2sts, sc in the next 3sts, ch1 and turn. =40sts.
Rows 31-38 :
sc into each stitch, ch1 and turn. =40sts.
Row 39 (holes) :
repeat Row 30.
Rows 40-47 :
sc into each stitch, ch1 and turn. =40sts.
Row 48 (holes) :
repeat Row 30.
Rows 49-60 :
sc into each stitch, ch1 and turn. =40sts.
— The front part with the decrease a stitches :
Info :
Now start decreasing the stitches the stitches to form the leg openings.
Row with decreases :
sc in the next 6sts, sc2tog, work sc into each stitch along the row until you have 8sts remaining and then sc2tog, sc in the next 6sts, ch1 and turn.
For newborn size :
To sum up, decrease 12 stitches evenly: 2 stitches in each row 6 times.
Rows 43-48 :
repeat row with decreases until 18sts are left.
Row 49-51 :
sc into each stitch, ch1 and turn. =18sts.
For size 0-3 m :
To sum up, decrease 14 stitches evenly: 2 stitches in each row 7 times.
Rows 48-54 :
repeat row with decreases until 18sts are left.
Row 55-56 :
sc into each stitch, ch1 and turn. =18sts.
For size 3-6 m :
To sum up, decrease 16 stitches evenly: 2 stitches in each row 8 times.
Rows 50-57 :
repeat row with decreases until 18sts are left.
For size 6-9 m :
Rows 58-60: sc into each stitch, ch1 and turn. =18sts.
Info :
To sum up, decrease 16 stitches evenly: 2 stitches in each row 8 times. Rows 55-62: repeat row with decreases until 22sts are left. Row 63-65: sc into each stitch, ch1 and turn. =22sts.
For size 9-12 m :
To sum up, decrease 18 stitches evenly: 2 stitches in each row 9 times. Rows 61-69: repeat row with decreases until 22sts are left. Row 70-72: sc into each stitch, ch1 and turn. =22sts.
— Front part with the increase a stitches :
Info :
Then do the rows with increase again.
Row with increase :
sc in the next 6sts, 2 sc in the next st, work sc into each stitch along the row until you have 7 sts remaining, 2 sc in next st, sc in next 6sts, ch1 and turn.
For newborn size - Rows 52-60 :
repeat row with increase for the front until there are 36 stitches.
Info :
All told, we've done 60 rows for the front. That's a total of 23 cm (9 inches).
For sizes 0-3 m - Rows 57-65 :
repeat row with increase for the front until there are 36 stitches.
Info :
All told, we've done 60 rows for the front. That's a total of 25 cm (10 inches).
For size 3-6 m - Rows 61-70 :
repeat row with increase for the front until there are 38 stitches. All told, we've done 70 rows for the front. That's a total of 27 cm (11 inches).
For size 6-9 m - Rows 66-75 :
repeat row with increase for the front until there are 42 stitches. All told, we've done 75 rows for the front. That's a total of 29 cm (12 inches).
For size 9-12 m - Rows 73-85 :
repeat row with increase for the front until there are 48 stitches. All told, we've done 85 rows for the front. That's a total of 33 cm (13 inches).
— Back part :
Info :
For the back part, continue to increase 2 sts each row till the number obtain 76 (88, 92, 92, 98)sts.
For newborn size :
work Rows 61-80 (inc). Next Rows 81-92: sc into each stitch, ch1 and turn. =76sts.
For size 0-3 m :
work Rows 66-91 (inc). Next Rows 92-100: sc into each stitch, ch1 and turn. =88sts.
For size 3-6 m :
work Rows 71-97 (inc). Next Rows 98-110: sc into each stitch, ch1 and turn. =92sts.
For size 6-9 m :
work Rows 76-100 (inc). Next Rows 101-115: sc into each stitch, ch1 and turn. =92sts.
For size 9-12 m :
work Rows 86-110 (inc). Next Rows 111-134: sc into each stitch, ch1 and turn. =98sts. Then, evenly decrease 10 (8, 10, 8, 10) stitches in every second row twice.
For newborn size - Row 93 (dec) :
sc in the next 10 sts, repeat (sc2tog, sc in next 4sts) 9 more times, sc2tog, sc in the next 10 sts, ch1 and turn. =66 sts.
Row 94 :
sc into each stitch, ch1 and turn. =66sts.
Row 95 (dec) :
sc in the next 10 sts, repeat (sc2tog, sc in next 3sts) 9 more times, sc2tog, sc in the next 9 sts, ch1 and turn. =56 sts.
Row 96 :
sc into each stitch, ch1 and turn.
Info :
You have 96 rows worked in total. Do no fasten off.
For size 0-3 m - Row 101 (dec) :
sc in the next 8 sts, repeat (sc2tog, sc in next 8sts) 8 more times, ch1 and turn. =80sts.
Row 102 :
sc into each stitch, ch1 and turn. (80sts)
Row 103 (dec) :
sc in the next 8 sts, repeat (sc2tog, sc in next 7sts) 8 more times, ch1 and turn. =72sts.
Row 104 :
sc into each stitch, ch1 and turn. =72 sts.
Info :
You have 104 rows worked in total. Do no fasten off.
For size 3-6 m - Row 111 (dec) :
sc in the next 9 sts, repeat (sc2tog, sc in next 6sts) 9 more times, sc2tog, sc in the next 9 sts, ch1 and turn. =82 sts.
Row 112 :
sc into each stitch, ch1 and turn. =82sts.
Row 113 (dec) :
sc in the next 9 sts, repeat (sc2tog, sc in next 5sts) 9 more times, sc2tog, sc in the next 8 sts ch1 and turn. =72 sts.
Info :
Continue decreasing as instructed for your size following the row numbers provided until total rows are reached.
For size 6-9 m - Row 116 (dec) :
sc in the next 10 sts, repeat (sc2tog, sc in next 8sts) 7 more times, sc2tog, sc in the next 10 sts, ch1 and turn. =84 sts.
Row 117 :
sc into each stitch, ch1 and turn. =84sts.
Row 118 (dec) :
sc in the next 10 sts, repeat (sc2tog, sc in next 7sts) 7 more times, sc2tog, sc in the next 9 sts ch1 and turn. =76 sts.
Row 119 :
sc into each stitch, ch1 and turn. =76sts. You have 119 rows worked in total. Do no fasten off.
For size 9-12 m - Row 135 (dec) :
sc in the next 7 sts, repeat (sc2tog, sc in next 8sts) 9 more times, ch1 and turn. =88sts.
Row 135 :
sc into each stitch, ch1 and turn. =88sts.
— Ribbed border :
Info :
Work with the hook of smaller size – 3mm.
Row 1 :
ch9, into the 2nd chain from your hook, sc into each chain. Join to the back with a sl st stitch's: do sl st in the next 2 sts, turn without ch.
Row 2 :
skip two sl st, sc in the next 8 sts, ch1 and turn.
Row 3 :
sc into each chain. Join to the back with a sl st stitch's: do sl st in the next 2 sts, turn without ch.
Info :
Repeat Row 2 and 3 until you work 56 (72, 72, 76, 88) rows.
Info :
Fasten off. You could leave your yarn longer to use it when sewing on a button on this side.
— Straps :
Info :
Use the smaller hook 3mm again to make the straps tighter than the main pattern.
Info :
Count the central 17 (17, 17, 21, 21)sts on the back and mark it with stitch markers. One row count as a one stitch.
Row 1 :
join with a sl st to the first marked st, ch1, sc in each of next 17 (17, 17, 21, 21)sts, ch1 and turn. =17 (17, 17, 21, 21)sts.
Row 2 :
sc in each stitch, ch1 and turn. =17(17,17,21,21)sts.
Info :
Repeat Row 2 until you work 14 (14, 16,20, 22) rows.
Info :
Do not fasten off. Continue to work one of the narrower straps.
Narrow strap Row 1 :
sc in each stitch, ch1 and turn. =8sts.
Info :
Repeat Row 1 until you work 33 (41, 38, 41, 45) rows.
Info :
In Row 34 (42, 39, 42, 46) make button holes: sc in the next 3 sts, ch2, skip 2sts, sc in next 3 sts.
Rows 35-37 :
(43-45, 40-42, 43-45, 47-49): repeat Row 1. Work the second strap in the same way. Weave in all the ends and sew on the buttons. The romper is ready. Congratulations!
This Tiny Tot romper pattern is crafted to make sweet, wearable baby pieces with a textured ribbed finish and neat button details. 🧶
The design grows with the baby thanks to clear size options from newborn to 9-12 months and adjustable straps. 🧵
Enjoy making a handmade keepsake that looks polished and feels cozy for little ones. ✨