🧶 Beautiful ✨ Detailed 💝 Adorable

Reversible Cat Amigurumi Pattern

Reversible Cat Amigurumi Pattern
4.3★ Rating
1-2 Hours Time Needed
1.3K Made This
✂️

Intermediate Level

Ideal for those with basic crochet experience, featuring slightly more advanced stitches and techniques to expand your skills.

⏱️

Quick Make

Complete in under 2 hours—lightning fast fun for instant gratification and quick gifts.

🧸

Cute Companion

An adorable friend to cherish, handcrafted with love to bring comfort and joy for years to come.

About This Reversible Cat Amigurumi Pattern

This instruction sheet explains how to join two chibi cat amigurumis to make a single reversible cat. It focuses on the finishing and joining steps — knotting the magic rings, turning pieces, and sewing through back loops. The method keeps both faces aligned and avoids extra stuffing, giving you a clean reversible finish.

Reversible Cat Amigurumi Pattern crochet pattern - detailed view of completed project

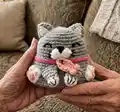
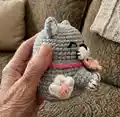
You will need two finished cats: Cat A with a short tail and Cat B with a long tail used for sewing. The steps are visual and written so you can complete the join smoothly and securely.

Why You'll Love This Reversible Cat Amigurumi Pattern

I absolutely love this pattern because it turns two separate amigurumis into a clever reversible companion that doubles the fun. I enjoy how the simple knot-and-sew technique creates a professional, hidden seam without needing extra stuffing. I also love that the method is quick—perfect for finishing projects and making charming gifts. The approach encourages consistency in tension and yarn choice, which helps you practice precise finishing skills.

Reversible Cat Amigurumi Pattern step 1 - construction progress Reversible Cat Amigurumi Pattern step 2 - assembly progress Reversible Cat Amigurumi Pattern step 3 - details and accessories Reversible Cat Amigurumi Pattern step 4 - final assembly and finishing

Switch Things Up

I love experimenting with color placement—try making the two cats in contrasting color palettes so the reversible effect is more dramatic and playful.

You can change the size by adjusting yarn weight and hook size; use bulky yarn for a chunky reversible cat or fingering yarn for a tiny keychain-sized version.

I often add a small bell or charm to the collar area of one cat for extra personality and sound when flipped.

Try embroidering different facial expressions on each cat so they have distinct moods when reversed; moving the eye placement slightly changes expression a lot.

For a sturdier join, I sometimes reinforce the seam with an invisible whipping stitch through the back loops, but be careful not to make the seam too stiff.

I like to swap yarn colors on the last round of one cat to create a decorative edge that peeks out when reversed—this adds a nice finishing touch.

Consider adding tiny crocheted accessories (a fish, bow, or mini hat) that tuck inside so each side can be accessorized differently.

If you want posable ears or tail, try inserting a thin wire inside those parts before joining to keep them shapeable.

For gifting, I personalize one side with an embroidered initial or small heart; it makes the reversible cat feel bespoke and special.

When teaching this join, I recommend making a demo set with high-contrast yarns so students can clearly see the knotting and back-loop sewing technique.

Common Mistakes & How to Fix Them

✗ Using different yarn weights for the two cats makes them uneven in size and difficult to align; always use the same weight yarn and hook size for both cats to maintain matching dimensions. ✗ Leaving too-short yarn tails prevents secure joining and makes finishing tricky; ensure Cat B has a long yarn tail from the last stitch to sew through back loops and tie knots. ✗ Not keeping a small gap when initially knotting the magic rings can prevent proper alignment later; leave about 1-2 cm between the knots so you can reposition faces before final sewing. ✗ Sewing through the wrong loops will create a bulky or twisted seam; sew through the back loops of the last rounds of both cats as instructed for a neat, reversible join. ✗ Overstuffing either cat before joining makes the pieces hard to fit inside one another; follow the instructions and avoid adding fiberfill when assembling to preserve reversibility.

Reversible Cat Amigurumi Pattern

Create a charming reversible cat by joining two chibi cat amigurumis into one playful, double-sided toy. This guide walks you through the exact steps to align, knot, and sew the last rounds so both faces sit perfectly. You only need two finished cats (one with a long tail) and simple hand-sewing tools to complete the reversible assembly. Enjoy a quick, satisfying finishing technique that transforms two separate pieces into one delightful reversible companion.

Intermediate 1-2 Hours

Materials Needed for Reversible Cat Amigurumi Pattern

— Main Fabric

  • 01
    Two finished chibi cat amigurumis (Cat A and Cat B) made from the same weight yarn and same hook size
  • 02
    Cat A - finished cat with a short yarn tail from the last stitch of its body
  • 03
    Cat B - finished cat with a long yarn tail from the last stitch of its body (this long tail will be used to join both cats)
  • 04
    Note: The instruction sheet does not specify a yarn brand or exact weight; use the same yarn type and quantities used to create each cat

— Tools Required

  • 01
    Tapestry needle / yarn needle for sewing
  • 02
    Scissors
  • 03
    Long yarn tail from Cat B to use as sewing thread
  • 04
    Pins (optional) to hold alignment while sewing

Progress Tracker

0% Complete

— Tips :

Infos :

Each cat amigurumi should be worked using the same weight of yarn, same hook size, and same stitch tension to maintain their similarities in size. It is highly recommended that you read through the pattern completely before beginning to make your reversible amigurumi.

— Material :

Infos :

Tapestry needle. Scissors. 2 chibiscraft's cat amigurumies: Cat A has short yarn tail from the last stitch of its body. Cat B has long yarn tail from the last stitch of its body. This tail will be used to join both cats.

— Procedure to Join Both Cats :

Step 1 :

Turn both cats inside out with the wrong/ugly sides facing you. Tie a knot with the yarn tails from the magic rings of both of them, leaving a space between them (about 1-2 cm).

Step 2 :

Turn the cat B back with the right/good side facing you, and leave the cat A intact at the wrong/ugly side. No need to stuff with fiberfill. Push the cat A inside the cat B. Since there is not any shared part between them, you have the option to line up both faces.

Step 3 :

Join the last rounds of both cats. Sew them together with yarn tail of cat B through the back loops of each piece. To finish, make a knot and hide the tail.

— Finishing :

Info :

After sewing through the back loops and securing the seam with a knot, hide the yarn tail inside the seam and trim any excess. Turn the cat so the right/good side is showing and check alignment of faces. Adjust as needed then secure final knot and weave in ends.

— Congratulations :

Info :

Congratulations! Your reversible cat amigurumi is ready.

Assembly Instructions

  • Turn both cats inside out so the wrong/ugly sides face you, then tie a knot with the yarn tails from their magic rings leaving about 1-2 cm of space between the knots.
  • Turn Cat B (the one with the long tail) back to the right/good side while keeping Cat A inside-out; push Cat A into Cat B and align both faces before sewing.
  • Sew the last rounds of both cats together using the long yarn tail of Cat B, working through the back loops of each piece for a neat reversible seam.
  • Make a secure knot at the end of your sewing and hide the tail inside the seam by weaving it through a few stitches before trimming.
  • Double-check face alignment and symmetry, and make any small adjustments before finishing the final knot and weaving in ends.

Important Notes

  • 💡Work both cats with the same yarn weight, hook size, and tension to ensure they match in size and fit together correctly.
  • 💡Leave a small space of about 1-2 cm when tying the initial knot between magic rings to allow repositioning and alignment.
  • 💡Sew through the back loops of the last rounds of both cats for a tidy join that keeps the seam reversible and flexible.
  • 💡No additional fiberfill is required during joining—avoid stuffing at the join to preserve the reversible function and clean fit.

This reversible cat joining guide helps you create a delightful double-sided amigurumi using two finished chibi cats. It is a quick finishing technique that yields a polished, reversible seam and beautiful alignment. Perfect for gifting or making a playful display piece that sparks joy. 🧶🐱✨

You ask,

we answer.

FAQs

What size will the finished piece be?

The finished reversible cat size depends on the original cats you made; both cats should be the same size when made with the same yarn and hook. The joining process itself does not significantly change overall dimensions.

Can I use different yarn weights for this pattern?

No; using different yarn weights will make the two cats different sizes and difficult to align. Use the same yarn weight and hook size for both cats to ensure an even join.

Do I need to stuff the cats before joining them?

No, the instructions specifically say no need to stuff with fiberfill during the joining step. Avoid adding stuffing at the join to allow the reversible fit to work properly.

How long does this joining process typically take?

The joining process is quick; most crafters can complete the knotting, alignment, sewing through back loops, and finishing in under 2 hours.