🧢 Beautiful ✨ Detailed πŸ’ Adorable

Red Fox Amigurumi Pattern

Red Fox Amigurumi Pattern
4.4β˜… Rating
5-7 Hours Time Needed
2.1K Made This
βœ‚οΈ

Intermediate Level

Ideal for those with basic crochet experience, featuring slightly more advanced stitches and techniques to expand your skills.

⏱️

Weekend Treat

Takes 5-7 hours, making it an enjoyable project to finish over a couple of days.

🧸

Cute Companion

An adorable friend to cherish, handcrafted with love to bring comfort and joy for years to come.

About This Red Fox Amigurumi Pattern

This pattern teaches you how to crochet a sweet red fox amigurumi with detailed round-by-round instructions. The design uses DK weight alpaca-wool blend yarn and includes color changes and simple shaping. Clear assembly guidance, joint options and finishing techniques are provided to help you create a professional result.

Red Fox Amigurumi Pattern crochet pattern - detailed view of completed project

Includes full materials and tools list, stitch abbreviations and amigurumi essentials like magic ring and invisible decrease. Photographic step-by-step instructions make sewing and finishing easy to follow.

Why You'll Love This Red Fox Amigurumi Pattern

I absolutely love this pattern because it balances charming design with clear construction steps so the fox always turns out cute and well-shaped. I designed the color changes and facial placement to give the fox a friendly, expressive face that looks great on shelves or in small hands. I enjoy the mix of simple shaping and small details like the white muzzle and tipped paws that make a big visual difference. I also appreciate that the pattern includes options for joint types so you can make a poseable or permanently sewn version depending on your preference.

Red Fox Amigurumi Pattern step 1 - construction progress Red Fox Amigurumi Pattern step 2 - assembly progress Red Fox Amigurumi Pattern step 3 - details and accessories Red Fox Amigurumi Pattern step 4 - final assembly and finishing

Switch Things Up

I love customizing this pattern with color variations β€” try pale greys or soft pastels instead of orange for a woodland friend with a different vibe.

You can make the fox larger or smaller by changing yarn weight and hook size; chunky yarn with a larger hook gives a cuddly big fox while thinner yarn makes a tiny keyring fox.

I often swap safety eyes for embroidered eyes on toys for babies to make them fully soft and washable; just embroider the eyes and nose instead of using safety hardware.

Try adding tiny felt or crocheted accessories like a scarf, bow or little hat to give your fox extra personality and make it gift-ready.

For a poseable figure, use plastic or metal doll joints and position them during assembly; otherwise sew limbs firmly for a sturdier toy for small hands.

If you like a different facial expression, move the eye placement slightly and alter the muzzle size to make the fox look curious, sleepy or surprised.

I sometimes embroider simple whiskers or a little smile to give the face more character β€” a few stitches go a long way.

To make a collection, change one color (paws, muzzle or tail tip) per fox so each has its own identity while using the same pattern.

If you want a softer texture, try alternative yarn blends (cotton-wool or acrylic-alpaca) and adjust hook size slightly to keep the gauge and stuffing effect similar.

I recommend experimenting on a small swatch before committing to color changes to ensure the contrast and stitch definition match what you want.

Common Mistakes & How to Fix Them

βœ— Not placing safety eyes at the correct rounds can make the face look uneven; attach the safety eyes between the specified rounds and count stitches carefully before fastening the washers. βœ— Forgetting to stuff gradually results in lumps or a misshapen body; add fiberfill a bit at a time after every few rounds and shape as you go. βœ— Changing yarns incorrectly can leave bulky knots at the edges; when changing yarns pick up the new yarn and weave tails to the wrong side, do not tie ends together in the working area. βœ— Skipping stitch counts during increases and decreases causes uneven shaping; count stitches after each round, especially after increase or decrease rounds, to keep the shape accurate.

Red Fox Amigurumi Pattern

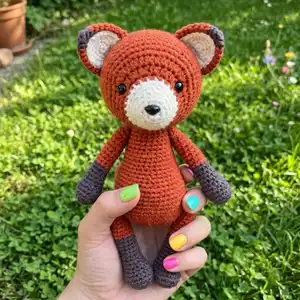
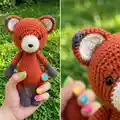
Make a charming handmade Red Fox amigurumi using this detailed intermediate crochet pattern. You will find full round-by-round instructions, clear assembly photos and helpful tips to guide you from start to finish. Perfect for gifting or adding a delightful touch to your handmade toy collection. Follow the step-by-step rounds and finishing techniques to create a sweet fox with character.

Intermediate 5-7 Hours

Materials Needed for Red Fox Amigurumi Pattern

β€” Main Fabric

  • 01
    DROPS 'Lima' DK weight alpaca and wool blend, 100 m = 50 g / 8 ply / light DK
  • 02
    Orange (0707 rust) - approximately 75 g
  • 03
    Brown (5610 deep taupe) - approximately 15 g
  • 04
    White (0100 off white) - approximately 15 g
  • 05
    Polyester fiberfill or wool/wadding for stuffing

β€” Tools Required

  • 01
    Crochet hook size 2.50 - 3.00 mm (US size 2/C - 3/D)
  • 02
    9 mm (3/8") safety eyes (2 pieces)
  • 03
    12 mm (1/2") safety nose or button (optional)
  • 04
    Plastic doll joints: two 20 mm (4/5") and two 15 mm (3/5") or alternative attachment hardware
  • 05
    Yarn needle for sewing
  • 06
    Scissors
  • 07
    Stitch marker
  • 08
    Pins for assembly (optional)

Progress Tracker

0% Complete

β€” Head :

Info :

With white yarn:

Round 1 :

mr, sc 6 (6)

Round 2 :

inc x 6 (12)

Round 3 :

(sc3, inc) x 3 (15)

Round 4 :

sc in each st (15)

Round 5 :

(inc, sc 2) x 5 (20)

Round 6 :

sc in each st (20)

Round 7 :

(sc 3, inc) x 5 (25)

Info :

With orange yarn:

Round 8 :

sc in each st (25)

Round 9 :

(inc, sc) x 3, hdc, hdc-inc x 8, hdc, (sc, inc) x 4, sc (40)

Round 10 :

sc 11, hdc, (hdc-inc, hdc) x 7, sc 14 (47)

Round 11 :

sc 8, inc, (sc 6, inc) x 4, sc 10 (52)

Round 12 :

sc 22, inc, sc 5, inc, sc 23 (54)

Round 13 :

sc, inc, sc 49, inc, sc 2 (56)

Info :

Attach safety eyes between rounds 9 and 10, leaving 13 stitches (count 12 holes) between them, and the nose between the first two rounds (see page 7).

Round 14-21 :

sc in each st (56)

Round 22 :

sc 5, dec, (sc 12, dec) x 3, sc 7 (52)

Round 23 :

(sc 11, dec) x 4 (48)

Round 24 :

sc 4, dec, (sc 10, dec) x 3, sc 6 (44)

Round 25 :

(sc 9, dec) x 4 (40)

Round 26 :

sc 3, dec, (sc 8, dec) x 3, sc 5 (36)

Info :

Start stuffing the head. Keep adding a bit of fiberfill after every few rounds, stuffing the head firmly.

Round 27 :

(sc 7, dec) x 4 (32)

Round 28 :

sc 2, dec, (sc 6, dec) x 3, sc 4 (28)

Round 29 :

(sc 5, dec) x 4 (24)

Round 30 :

(dec, sc 2) x 6 (18)

Round 31 :

(sc, dec) x 6 (12)

Round 32 :

dec x 6 (6)

Info :

Finish stuffing. Cut the yarn, leaving a long yarn tail, fasten off and close the opening (see page 7).

β€” Ears (make 2) :

Info :

Make one with white and one with orange yarn:

Round 1 :

mr, sc 6 (6)

Round 2 :

(sc, inc3) x 3 (12)

Round 3 :

sc 2, inc3, (sc 3, inc3) x 2, sc (18)

Round 4 :

sc 3, inc3, (sc 5, inc3) x 2, sc 2 (24)

Info :

Sl st in next stitch and fasten off.

Info :

Align a white and orange piece, wrong sides facing. Crochet over the edge with single crochet stitches, inserting the hook through both layers (see page 8-9).

Info :

When you change yarns on row 5, do not tie the yarn ends together, just pick up the yarn, leaving a short tail.

Info :

Locate the middle stitch of the first inc3 and attach the orange yarn with sl st. Starting in the same stitch:

Round 5 :

sc 7, switch to brown yarn, sc, inc3, sc, switch to orange yarn, sc 6, sc + sl st

Info :

Cut the yarn, leaving a long yarn tail for sewing, and fasten off. Bring all other yarn tails to the wrong side and knot them together inside the ear (see page 8-9).

β€” Left Arm :

Info :

With brown yarn:

Round 1 :

mr, sc 6 (6)

Round 2 :

(inc3 x 2, sc) x 2 (14)

Round 3-5 :

sc in each st (14)

Round 6 :

sc 3, inc, sc 5, dec x 2, sc (13)

Round 7 :

sc 4, inc, sc 5, dec, sc (13)

Round 8 :

sc 10, dec, sc (12)

Info :

Stuff the hands firmly. Keep adding a bit of fiberfill after every few rounds, stuffing the arms firmly.

Round 9 :

sc 10, dec (11)

Round 10 :

sc 9, dec (10)

Round 11 :

sc in each st (10)

Info :

With orange yarn:

Round 12-23 :

sc in each st (10)

Info :

Attach the disk with a stem between rows 20 and 21, placing it so the stem is facing straight towards the body.

Round 24 :

dec x 5 (5)

Info :

Finish stuffing. Cut the yarn, leaving a long yarn tail, fasten off and close the opening (see page 7).

β€” Right Arm :

Info :

With brown yarn:

Round 1 :

mr, sc 6 (6)

Round 2 :

(inc3 x 2, sc) x 2 (14)

Round 3-5 :

sc in each st (14)

Round 6 :

sc 2, dec x 2, sc 5, inc, sc 2 (13)

Round 7 :

sc 2, dec, sc 5, inc, sc 3 (13)

Round 8 :

sc 2, dec, sc 9 (12)

Info :

Stuff the hands firmly. Keep adding a bit of fiberfill after every few rounds, stuffing the arms firmly.

Round 9 :

sc, dec, sc 9 (11)

Round 10 :

sc, dec, sc 8 (10)

Round 11 :

sc in each st (10)

Info :

With orange yarn:

Round 12-22 :

sc in each st (10)

Round 23 :

sc 6, dec x 2 (8)

Info :

Attach the disk with a stem between rows 20 and 21, placing it so the stem is facing straight towards the body.

Round 24 :

dec x 3, leave rest of the sts unworked (5)

Info :

Finish stuffing. Cut the yarn, leaving a long yarn tail, fasten off and close the opening (see page 7).

β€” Legs (make 2) :

Info :

With brown yarn:

Round 1 :

mr, sc 6 (6)

Round 2 :

inc x 6 (12)

Round 3 :

(sc, inc) x 6 (18)

Round 4 :

(sc 3, inc, sc 4, inc) x 2 (22)

Round 5 :

sc in each st (22)

Round 6 :

sc 7, dec, sc 2, dec, sc 9 (20)

Round 7 :

sc 5, dec, (sc, dec) x 2, sc 7 (17)

Round 8 :

sc 5, dec, sc 2, dec, sc 6 (15)

Round 9 :

sc 6, dec, sc 7 (14)

Info :

Stuff the feet firmly. Keep adding a bit of fiberfill after every few rounds, stuffing the legs firmly.

Round 10 :

sc in each st (14)

Round 11 :

sc 6, dec, sc 6 (13)

Round 12-16 :

sc in each st (13)

Info :

With orange yarn:

Round 17-26 :

sc in each st (13)

Info :

On the left leg only, sc in next 6 sts. Count the last sc as the end of the round from now on.

Info :

Attach the disk with a stem between rounds 25 and 26, placing it so the stem is facing straight towards the body.

Round 27 :

dec, sc 6, dec, sc 3 (11)

Round 28 :

sc, dec x 5 (6)

Info :

Finish stuffing. Cut the yarn, leaving a long yarn tail, fasten off and close the opening (see page 7).

β€” Body :

Info :

With orange yarn:

Round 1 :

mr, sc 6 (6)

Round 2 :

inc x 6 (12)

Round 3 :

(sc, inc) x 6 (18)

Round 4 :

(inc, sc 2) x 6 (24)

Round 5 :

(sc 3, inc) x 6 (30)

Round 6 :

sc, inc, (sc 4, inc) x 5, sc 3 (36)

Round 7 :

sc 3, inc, (sc 8, inc) x 3, sc 5 (40)

Round 8 :

(sc 9, inc) x 4 (44)

Round 9-16 :

sc in each st (44)

Info :

Turn the body so the end of the round is at the center of the back. Attach the legs to the sides of the body, between rounds 9 and 10 (see page 10).

Round 17 :

(sc 9, dec) x 4 (40)

Round 18 :

sc 3, dec, (sc 8, dec) x 3, sc 5 (36)

Round 19 :

(sc 7, dec) x 4 (32)

Round 20 :

sc in each st (32)

Info :

Start stuffing the body. Keep adding a bit of fiberfill after every few rounds, stuffing the body firmly.

Round 21 :

(dec, sc 14) x 2 (30)

Round 22 :

sc in each st (30)

Round 23 :

sc 12, dec, sc 4, dec, sc 10 (28)

Round 24 :

sc in each st (28)

Round 25 :

(dec, sc 5) x 4 (24)

Round 26 :

sc in each st (24)

Round 27 :

sc 9, dec, sc 4, dec, sc 7 (22)

Round 28 :

sc in each st (22)

Round 29 :

sc 5, dec, sc 9, dec, sc 4 (20)

Round 30-31 :

sc in each st (20)

Round 32 :

sc 5, leave rest of the sts unworked (20)

Info :

Sl st in next stitch. Cut the yarn, leaving a long yarn tail for sewing, and fasten off. Attach the arms to the sides of the body, between rounds 27 and 28 (see page 10). Finish stuffing the body.

β€” Tail :

Info :

With white yarn:

Round 1 :

mr, 6 (6)

Round 2 :

(sc, inc) x 3 (9)

Round 3 :

(inc, sc 2) x 3 (12)

Round 4 :

(sc 2, inc) x 4 (16)

Round 5 :

sc, inc, (sc 3, inc) x 3, sc 2 (20)

Info :

With orange yarn:

Round 6-9 :

sc in each st (20)

Round 10 :

(dec, sc 8) x 2 (18)

Info :

Start stuffing the tail. Keep adding a bit of fiberfill after every few rounds, stuffing the tail firmly.

Round 11 :

sc in each st (18)

Round 12 :

sc 4, dec, sc 7, dec, sc 3 (16)

Round 13 :

sc in each st (16)

Round 14 :

sc 7, dec, sc 7 (15)

Round 15 :

sc in each st (15)

Round 16 :

sc 7, dec, sc 6 (14)

Round 17-18 :

sc in each st (14)

Round 19 :

sc 7, dec, sc 5 (13)

Round 20-21 :

sc in each st (13)

Round 22 :

sc 7, dec, sc 4 (12)

Info :

Finish stuffing the tail. Sl st in next stitch. Cut the yarn, leaving a long yarn tail for sewing, and fasten off. Finish stuffing the tail.

Assembly Instructions

  • Place the ears just behind round 17 of the head, leaving 7–8 stitches between them, then sew the ears to the head through both layers so they sit securely.
  • Turn the body so the end of the round is at the center back and attach the legs to either side of the body between rounds 9 and 10, matching spacing and symmetry.
  • Attach the arms to either side of the body between rounds 27 and 28, pinning them in place and sewing with a yarn needle for a neat seam.
  • Sew the head to the body placing the front edge just behind round 13 of the head; add a little extra stuffing before closing the seam for a smooth join.
  • Place the tail just above round 8 of the body and sew it securely in place, reinforcing with additional stitches so it sits flat against the body.

Important Notes

  • πŸ’‘Work in a continuous spiral; do not join rounds or turn your work unless instructed otherwise in the pattern.
  • πŸ’‘Use a stitch marker or a piece of yarn to mark the beginning of each round and move the marker up after completing each round.
  • πŸ’‘Work all stitches in both loops unless instructed otherwise for shaping or special effects.
  • πŸ’‘Stuff gradually and evenly, adding small amounts of fiberfill after several rounds to avoid lumps and keep the shape controlled.

This Red Fox amigurumi pattern guides you step-by-step to create a lovable handmade toy full of personality. The pattern includes materials, round-by-round instructions and finishing techniques for professional results. Happy crocheting and enjoy bringing this little fox to life! 🧢🧸

You ask,

we answer.

FAQs

What size will the finished piece be?

The finished amigurumi measures approximately 27 cm (10 2/3") from head to toe when crocheted with the recommended DK weight yarn and a 2.50 mm hook.

Can I use different yarn weights for this pattern?

Yes, you can use different yarn weights, but this will change the final size; use an appropriate hook for your yarn and adjust stuffing and joint placement as needed.

Do I need prior crochet experience for this pattern?

This pattern is rated intermediate and assumes you are comfortable with crochet in the round, increases, decreases, working in FLO/BLO when instructed, and basic finishing techniques like invisible decrease and sewing pieces together.

How long does this project typically take to complete?

Most crocheters finish this project in 5-7 hours spread over a couple of sessions, depending on experience and assembly time.