๐Ÿงถ Beautiful โœจ Detailed ๐Ÿ’ Adorable

Plush Bonanza Beechcraft V-tail Amigurumi Pattern

Plush Bonanza Beechcraft V-tail Amigurumi Pattern
4.8โ˜… Rating
5-7 Hours Time Needed
1.9K Made This
โœ‚๏ธ

Intermediate Level

Ideal for those with basic crochet experience, featuring slightly more advanced stitches and techniques to expand your skills.

โฑ๏ธ

Weekend Treat

Takes 5-7 hours, making it an enjoyable project to finish over a couple of days.

๐Ÿงธ

Cute Companion

An adorable friend to cherish, handcrafted with love to bring comfort and joy for years to come.

About This Plush Bonanza Beechcraft V-tail Amigurumi Pattern

This pattern creates a plush Beechcraft-style V-tail airplane using plush and thin yarns. You will crochet the fuselage, wings, tail, engines, propeller and add felt windows to finish a realistic toy. The pattern includes step-by-step rounds and clear assembly guidance for a secure, durable finish. Note: basic crochet knowledge is assumed.

Plush Bonanza Beechcraft V-tail Amigurumi Pattern crochet pattern - detailed view of completed project

Worked mostly in single crochet and turning rows with simple increases and decreases. Photos and templates are provided for windows and placement to make finishing straightforward.

Why You'll Love This Plush Bonanza Beechcraft V-tail Amigurumi Pattern

I absolutely love this pattern because it turns soft plush yarn into a realistic, huggable airplane that children adore. I enjoy combining plush and thinner threads to create strong details like the propeller holder and windows. The construction is clever โ€” making flat parts and sewing them together creates sturdy wings and tail pieces that hold shape. Seeing the final stitched windows and propeller come together always makes me smile and feel proud of the finished toy.

Plush Bonanza Beechcraft V-tail Amigurumi Pattern step 1 - construction progress Plush Bonanza Beechcraft V-tail Amigurumi Pattern step 2 - assembly progress Plush Bonanza Beechcraft V-tail Amigurumi Pattern step 3 - details and accessories Plush Bonanza Beechcraft V-tail Amigurumi Pattern step 4 - final assembly and finishing

Switch Things Up

I love customizing this pattern in color and texture; try a two-tone fuselage or contrasting wing edges for a bold look.

You can change yarn weight and hook size to make a mini keychain version or a jumbo cuddle plane; adjust stuffing amount accordingly.

I often embroider small details or add tiny crocheted badges on the wings to personalize each plane.

Swap felt windows for stitched details or safety eyes if making a character-style plane; always avoid small parts for toys for young children.

If you want a more rigid propeller, use a strip of thin plastic or cardboard inside the crocheted cord before closing.

Make the tail or wings removable by sewing on snaps or buttons so the toy packs flat for travel or storage.

I sometimes add a loop at the top for hanging as a mobile; use strong thread and reinforce the area with extra stitching.

For a vintage look, pick warm neutrals and use a thinner hook for the windows so felt pieces sit flatter and neater.

I enjoy combining plush yarn with denim-style Jeans yarn for contrast on details like propeller holder and engine trims.

Try using safety stuffing beads in the nose to weigh the plane down slightly so it sits well on a shelf โ€” I test placement before fully closing seams.

Common Mistakes & How to Fix Them

โœ— Skipping stitch markers during rounds can cause misaligned wings and windows; place a marker at the start of important rounds and when marking centers. โœ— Forgetting to stuff gradually leads to lumps or flattened shapes; add filler during crocheting and shape as you go for smooth contours. โœ— Cutting threads too early when assembling tail or wings may make sewing the perimeter harder; leave the thread on the second piece and sew the perimeter as instructed. โœ— Not counting increases in the triangle fuselage causes incorrect stitch counts; find the triangle center and count stitches at each increase to match the pattern.

Plush Bonanza Beechcraft V-tail Amigurumi Pattern

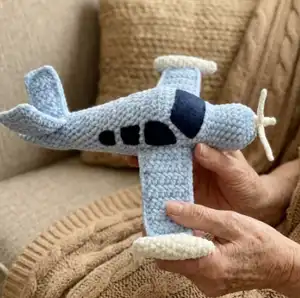
Make a soft, cuddly Beechcraft-style V-tail plush plane using plush yarn and simple crochet techniques. This pattern guides you step-by-step through the fuselage, tail, wings, engines, propeller and finishing details. Perfect for gifting or nursery decor, the finished toy is durable and great for imaginative play. Follow the clear photos and instructions for a charming handmade airplane you'll love to make and display.

Intermediate 5-7 Hours

Materials Needed for Plush Bonanza Beechcraft V-tail Amigurumi Pattern

โ€” Main Fabric

  • 01
    Plush yarn YarnArt Dolce or analog (100 g / 120 m) - blue - 1 skein (main body)
  • 02
    Plush yarn YarnArt Dolce or analog (100 g / 120 m) - milky/off-white - small amount (engines/propeller edges)
  • 03
    Thin strong yarn YarnArt Jeans or similar (50 g / 160 m) - blue - small amount (propeller and sewing reinforcement)
  • 04
    Thin strong yarn YarnArt Jeans or similar (50 g / 160 m) - milky - small amount (propeller and sewing reinforcement)
  • 05
    Blue or black felt - small pieces for windows (central window 1 pc, side windows 2 pcs each)
  • 06
    Cotton yarn or similar (approx. 50 g / 160 m) - for propeller holder

โ€” Tools Required

  • 01
    Crochet hook 4 mm
  • 02
    Crochet hook 1.5 mm (for thin yarn details)
  • 03
    Scissors
  • 04
    Yarn needle for sewing and hiding ends
  • 05
    Stitch markers
  • 06
    Pins for assembly
  • 07
    Hollofiber filler (polyester stuffing)
  • 08
    Black sewing thread for windows (or glue if not for a child)
  • 09
    Paper or cardboard for window templates

Progress Tracker

0% Complete

โ€” Fuselage :

Info :

Blue plush yarn. You need to make a triangle shape. This will work if we make 3 stitches in one loop.

Round 1 :

9 sc in MR (9)

Round 2 :

(2 sc, 3 sc in 1 loop) * 3 (15)

Round 3 :

(4 sc, 3 sc in 1 loop) * 3 (21)

Round 4 :

21 sc for the back half of the loop (21)

Round 5-10 :

21 sc (21)

Round 11 :

You need to make 6 increases exactly in the middle of the triangle. I have it: 7 sc, 6 inc, 8 sc (27)

Info :

Find your center of the triangle and crochet the required number of stitches.

Round 12-13 :

27 sc (27)

Info :

In the next row, the increase should also be in the middle. If, due to the peculiarities of crocheting, your beginning of the row has shifted differently from mine, find the center of the upper part and count the required number of stitches. The increase should be in the center and 2 sc and 1 inc from it to the left and right.

Round 14 :

11 sc, inc, 2 sc, inc, 2 sc, inc, 9 sc (30)

Round 15-16 :

30 sc (30)

Round 17 :

(4 sc, inc) * 6 (36)

Round 18-20 :

36 sc (36)

Round 21 :

(10 sc, dec) * 3 (33)

Round 22 :

33 sc (33)

Round 23 :

(9 sc, dec) * 3 (30)

Round 24-25 :

30 sc (30)

Info :

Fill the fuselage with filler and add it during crocheting.

Round 26 :

(8 sc, dec) * 3 (27)

Round 27-28 :

27 sc (27)

Round 29 :

(7 sc, dec) * 3 (24)

Round 30-31 :

24 sc (24)

Round 32 :

(6 sc, dec) * 3 (21)

Round 33-34 :

21 sc (21)

Round 35 :

19 sc, dec (20)

Round 36 :

9 sc, dec, 9 sc (19)

Round 37 :

17 sc, dec (18)

Round 38 :

8 sc, dec, 8 sc (17)

Round 39 :

17 sc (17)

Round 40 :

15 sc, dec (16)

Round 41 :

16 sc (16)

Round 42 :

14 sc, dec (15)

Round 43 :

6 sc, dec, 7 sc (14)

Round 44 :

12 sc, dec (13)

Round 45 :

5 sc, dec, 6 sc (12)

Round 46 :

10 sc, dec (11)

Round 47 :

4 sc, dec, 5 sc (10)

Round 48 :

8 sc, dec (9)

Round 49 :

7 sc, dec (8)

Round 50 :

6 sc, dec (7)

Round 51 :

5 sc, dec (6) + sl st

Info :

Fasten the thread, cut and tighten the hole.

โ€” Tail :

Info :

Blue plush yarn. You need to make 4 identical parts. Then we will combine them two pieces into one. You will get 2 strong parts of the V-tail. Crochet in turning rows. Each new row starts with 1 chain.

Info :

For each pair, cut the thread on one part, but do not cut on the second and continue to crochet around the perimeter of the parts to "sew" them together with a hook.

Round 1 :

6 chains. Starting from the second loop from the hook, crochet in a chain: 5 sc (5)

Round 2-9 :

Turn, 1 chain, 5 sc (5)

Info :

Fasten the thread to one part and cut it off. On the second, make one chain, do not cut the thread.

Info :

Fold the two pieces flat and crochet on three sides. Thus, we will connect two parts into one strong. Crochet 1 sc in each stitch. In each corner, crochet in one loop (1 sc + 1 hdc + 1 sc). This is necessary so that the angle is more pronounced and does not twist.

Info :

Fasten the thread at the end with a chain and cut off. Make another one part of the same.

โ€” Wings :

Info :

Blue plush yarn. You also need to crochet 4 parts and then connect them two into one, just like the tail. Crochet in turning rows. Each new row starts with 1 chain.

Info :

For each pair, cut the thread on one part, but do not cut on the second and continue to crochet around the perimeter of the parts to "sew" them together with a hook.

Round 1 :

8 chains. Starting from the second loop from the hook, crochet in a chain: 7 sc (7)

Round 2-14 :

Turn, 1 chain, 7 sc (7)

Info :

Fasten the thread to one part and cut it off. On the second, make one chain, do not cut the thread. Fold the two pieces flat and crochet on three sides. Crochet 1 sc in each stitch. In each corner, crochet in one loop (1 sc + 1 hdc + 1 sc). Fasten the thread at the end with a chain and cut off. Make another one part of the same.

โ€” Engines (2 pcs) :

Info :

Plush yarn, I used milky color. Make 2 identical engines.

Round 1 :

5 sc in MR (5)

Round 2 :

2 sc, inc, 2 sc (6)

Round 3 :

inc, 5 sc (7)

Round 4 :

3 sc, inc, 3 sc (8)

Round 5 :

7 sc, inc (9)

Round 6 :

4 sc, inc, 4 sc (10)

Round 7-10 :

10 sc (10)

Info :

Fill the part with filler and add it during crocheting.

Round 11 :

8 sc, dec (9)

Round 12 :

7 sc, dec (8)

Round 13 :

6 sc, dec (7)

Round 14 :

5 sc, dec (6)

Round 15 :

4 sc, dec (5)

Info :

Fasten the thread with sl st and cut off. Hide the end of the thread inside the engine.

โ€” Propeller holder :

Info :

Cotton yarn or any other yarn of approximately the same yardage (50 g / 160 m).

Round 1 :

5 sc in MR (5)

Round 2 :

4 sc, inc (6)

Round 3 :

5 sc, inc (7)

Round 4 :

6 sc, inc (8)

Round 5 :

(3 sc, inc) * 2 (10)

Round 6 :

(4 sc, inc) * 2 (12)

Round 7 :

(5 sc, inc) * 2 (14)

Info :

Fasten the thread with the sl st, leave a long end for sewing and cut off.

โ€” Propellers (3 pcs) :

Info :

I make them on the principle of crocheting a cord. First leave the thread about 60 cm (23 inches). Then fold it in half to form a thicker double thread.

Info :

Make a chain, but not on the edge, but in the middle of the thread. We crochet each stitch according to this principle: There is a loop on the hook, we make the yarn over on the hook from the leaving thread, we crochet sc with a working thread through two loops. Then again we make a yarn over from the leaving thread and crochet sc. You need to make 9 such stitches. Then we fasten the thread and cut it off.

Info :

Place the parts of the propeller in correct position, pull the ends of the threads into the inside of the holder and tie each pair of threads into 2 knots. Cut off the long tails and hide short tails inside the holder, so we use the tails of the threads instead of the filler.
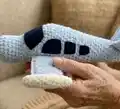
โ€” Windows :

Info :

You need to draw a template for windows and cut them out of paper or cardboard, or print my file and cut out the templates. Then take thin black or blue felt and cut out all the windows using templates. The central window is 1 pc, and the side windows are all 2 pcs.

โ€” Assembly :

Info :

Find the center of the toy. To do this, I find the center between the increments in the 11th row and then follow it.

Step :

Place the wings between rows 14 and 22 at a distance of 9 sc from the center of the toy. That is, the wings are 18 sc from each other. Fix it with pins and sew along the perimeter with a strong thin thread to the tone of the main yarn. I use Yarnart Jeans in blue (50g/160m). I bring all the ends of plush and thin threads to one point and tie them into 2 knots. I hide extra tails inside the toy. This is necessary so that the details are sewn more securely and do not tear during the game.

Step :

Fasten the engines with pins at the ends of the wings and sew them around the perimeter with a thin thread to the tone of the plush yarn. I also use Yarnart Jeans (50g/160m) milky. Pull the ends of the threads through one hole, tie into 2 knots and hide the excess inside the wing or engine.

Step :

Place the tail pieces about 4-5 rows from the edge of the fuselage at an angle so as to form a V-shape. In the middle they should touch. Secure with pins and sew along the perimeter with a thin, strong thread. Tie all the tails of the threads together and hide inside the toy.

Step :

Place the propeller at the center point of the front fuselage. It's between rows 2 and 3. Fasten with pins and sew around the entire circumference with the thread that we left.

Step :

Place the windows so that there is approximately the same distance between them. First, fix the front window and from it to the left and right continue to place all the others. The front window is above 11 row. Sew the windows with regular sewing thread or glue them if the toy is not for the child.

Assembly Instructions

  • Find the center of the toy by locating the center between the increments in the 11th row; use this to orient wings and windows precisely.
  • Place wings between rows 14 and 22, with 9 sc from the center to each wing edge (wings are 18 sc apart); pin and sew around the perimeter with a strong thin thread matching the yarn.
  • Fasten engines to the ends of the wings with pins and sew them around the perimeter; pull ends of threads through one hole, tie into two knots and hide the excess inside the wing or engine.
  • Position tail pieces about 4-5 rows from the fuselage edge at an angle to form a V; pin, sew around the edges with a thin strong thread, tie tails together and hide inside the fuselage.
  • Attach the propeller at the front center point between rows 2 and 3; fasten with pins and sew around the circumference using the propeller holder thread.
  • Place and secure felt windows using the front window above row 11 as a reference; sew with regular sewing thread or glue if toy is decorative only.

Important Notes

  • ๐Ÿ’กUse stitch markers to identify centers and the start of rounds, especially for aligning wings and tail correctly.
  • ๐Ÿ’กStuff parts gradually while crocheting to maintain smooth, even shaping rather than large lumps of filler.
  • ๐Ÿ’กFold flat parts and crochet around three sides to join them for stronger, non-twisting wings and tail angles.
  • ๐Ÿ’กHide and tie all extra tails inside the toy in two knots to secure details and prevent tearing during play.

This plush Beechcraft V-tail airplane is a delightful project that turns plush yarn into a sturdy, huggable toy. I designed it to be both playful and durable, with strong sewn seams and felt windows for character. Whether for play or display, this little plane brings joy and handmade charm to any room. ๐Ÿงตโœˆ๏ธ

You ask,

we answer.

FAQs

What size will the finished piece be?

The finished toy measures approximately 30 cm long (11.8 in) with wing edges about 30 cm across when using the recommended plush yarn and hook.

Can I use different yarn weights for this pattern?

Yes, but changing yarn weight will affect the final size and texture; use an appropriate hook and expect differences in fit for windows and templates.

Do I need prior crochet experience for this pattern?

This pattern is rated intermediate; you should be comfortable with single crochet, increases, decreases, magic ring and working in turning rows.

How long does this project typically take to complete?

Most crocheters complete this project in 5-7 hours, though actual time will vary based on experience and how many details you add.