🧢 Beautiful ✨ Detailed πŸ’ Adorable

Pillow Bunny Amigurumi Pattern

Pillow Bunny Amigurumi Pattern
4.5β˜… Rating
5-7 Hours Time Needed
4.0K Made This
βœ‚οΈ

Intermediate Level

Ideal for those with basic crochet experience, featuring slightly more advanced stitches and techniques to expand your skills.

⏱️

Weekend Treat

Takes 5-7 hours, making it an enjoyable project to finish over a couple of days.

🧸

Cute Companion

An adorable friend to cherish, handcrafted with love to bring comfort and joy for years to come.

About This Pillow Bunny Amigurumi Pattern

This pattern creates a soft, square Bunny Pillow with floppy ears, embroidered eyelids and a plush nose. Youll crochet the pillow body in one piece and make small stuffed details (nose, ears, arms, legs) to sew on. The design uses plush baby yarn for a soft, cozy finish and clear step-by-step photographs are included in the original.

Pillow Bunny Amigurumi Pattern crochet pattern - detailed view of completed project

The instructions list every row for each piece and give exact placement notes for eyes and details. Ideal as a handmade gift or a charming home accessory, with options for slight size changes by adjusting yarn and hook.

Why You'll Love This Pillow Bunny Amigurumi Pattern

I absolutely love this pattern because it transforms simple stitches into a characterful pillow that feels like a hug. I enjoy how the plush yarn creates a cozy, tactile surface that children and adults both adore. I also love that each small detail (nose, ears, arms, legs) is quick to make and makes a big visual impact when attached. Sewing the pieces on and embroidering the eyebrows gives me a relaxing finishing step that really personalizes the pillow.

Pillow Bunny Amigurumi Pattern step 1 - construction progress Pillow Bunny Amigurumi Pattern step 2 - assembly progress Pillow Bunny Amigurumi Pattern step 3 - details and accessories Pillow Bunny Amigurumi Pattern step 4 - final assembly and finishing

Switch Things Up

I love how easy it is to customize this Bunny Pillow by changing colors β€” try pastel shades for a nursery or bold hues for a playful statement.

You can make the pillow larger or smaller by swapping yarn weight and hook size; bulky yarn with a larger hook yields a chunky cuddly pillow, while sport or fingering weight gives a mini version.

I often add small accessories like a crocheted bow, tiny heart, or scarf to personalize each pillow for a gift recipient.

Try alternative facial expressions by adjusting eye placement, embroidering a smile, or using different nose shapes to change the character completely.

For baby-safe toys, replace safety eyes with embroidered eyes and secure all threads and seams thoroughly.

If you want a firmer pillow, use denser stuffing and tighten tension slightly; for a squishier feel leave stuffing a bit looser.

I sometimes add a removable inner cushion (a small pillow insert) so the crochet cover can be washed separately.

Consider making matching sets β€” a larger cushion and a mini keychain bunny using the same color palette.

Try mixing yarn types: plush for the body and standard acrylic for small details to save on specialty yarn while keeping the soft surface where it matters.

I recommend experimenting on a small probe square first to match gauge and final size, then adjust hook and yarn until the feel is just right.

Common Mistakes & How to Fix Them

βœ— Skipping the stitch marker or counting on the rectangular pillow edge will cause uneven sides; mark your start of row and check stitch counts every few rows to keep the square even. βœ— Overstuffing the pillow makes corners and seams bulge awkwardly; stuff slowly, focusing on corners last and using small amounts for a smooth, even shape. βœ— Not leaving long yarn tails when finishing details prevents neat sewing placement; always leave long ends for secure attachment and hiding inside the pillow. βœ— Using very loose tension with plush yarn results in gaps and squishy shape; maintain consistent, slightly firm tension for stable fabric and to hide stuffing. βœ— Placing eyes without checking row placement can misalign the face; measure and place safety eyes between the exact rows specified and check distance in single crochet counts before securing.

Pillow Bunny Amigurumi Pattern

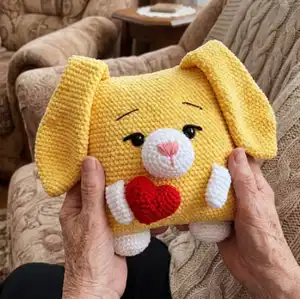
Make a cuddly Bunny Pillow that doubles as a decorative cushion and a soft toy. This pattern guides you step-by-step through crocheting the square pillow body, a cute nose, ears, arms, legs and optional tail using plush yarn. Youll enjoy clear row-by-row instructions and helpful assembly notes so your finished bunny looks polished and huggable. Perfect for gifting or brightening any room with a handmade touch.

Intermediate 5-7 Hours

Materials Needed for Pillow Bunny Amigurumi Pattern

β€” Main Fabric

  • 01
    Himalaya Dolphin Baby (or YarnArt Dolce) plush yarn - Yellow: 3 skeins
  • 02
    Himalaya Dolphin Baby (or YarnArt Dolce) plush yarn - White: less than half a skein
  • 03
    Small amount of pink plush or semi-cotton yarn for nose
  • 04
    Small amount of black plush or semi-cotton yarn for eyelids and eyebrows
  • 05
    Optional: red yarn for heart detail (small amount)

β€” Tools Required

  • 01
    Crochet hook No.3.5 (you can use No.4)
  • 02
    Needle with a large eye for sewing
  • 03
    Safety eyes 22-24mm (2 pieces)
  • 04
    Transparent glue (optional for eyelids)
  • 05
    Scissors
  • 06
    Stitch markers (recommended)
  • 07
    Polyester stuffing (holofiber filler)

Progress Tracker

0% Complete

β€” Symbols :

Infos :

Crochet in spiral. sc - single crochet. inc - increase. dec - decrease. ch - chain. sl st - slip stitch. {} - in brackets there is the number of the resulting loops.

β€” Pillow :

Row 1 :

90 ch

Row 2 :

connect with the first loop crocheting 1 sc (it will be the first sc of the second row) and crochet 89 sc {90}

Rows 3 – 40 :

90 sc {90}

Info :

In the end of the last row crochet 10-11 sc more to the edge of the pillow.

Info :

Tighten the thread, leave the long end for sewing. Sew the top of the pillow using a needle.

β€” Nose :

Note :

Crochet with white yarn.

Row 1 :

4 ch

Row 2 :

from the second loop from the hook: 2 sc, 3 sc in one loop. On the other side of the chain: 2 sc, 3 sc in one loop {10}

Row 3 :

2 sc, inc, inc, inc, 2 sc, inc, inc, inc {16}

Row 4 :

(3 sc, inc) –repeat 4 times {20}

Row 5 :

(4 sc, inc) – repeat 4 times {24}

Row 6 :

(4 sc, inc) – repeat 5 times {30}

Row 7 :

(5 sc, inc) – repeat 5 times {35}

Row 8 :

35 sc

Info :

Tighten the loop, leave the long thread for sewing. Embroider the nose with pink plush (or semi-cotton) thread. Tie a knot and hide the thread inside.

Info :

Fill the detail and sew on it between the rows 16 and 26, counting from the bottom of the pillow. Secure the thread, hide it inside the pillow.

Info :

Insert the safety eyes (or sew on them if you have buttons) between the rows 24 and 25. The distance between the eyes is 9 sc.

Info :

Embroider the eyelids with black plush yarn. Secure the thread inside the pillow. Optional you can glue the eyelids to the pillow.

β€” Ears (2 details) :

Note :

Crochet with yellow yarn.

Row 1 :

6 sc in magic ring {6}

Row 2 :

(inc) – repeat 6 times {12}

Row 3 :

(5 sc, inc) – repeat 2 times {14}

Row 4 :

(6 sc, inc) – repeat 2 times {16}

Row 5 :

(7 sc, inc) – repeat 2 times {18}

Row 6 :

(8 sc, inc) – repeat 3 times {20}

Row 7 :

inc, 8 sc, inc, inc, 8 sc, inc {24}

Row 8 :

inc, 9 sc, inc, inc, 10 sc, inc, inc {29}

Row 9 :

12 sc, inc, inc, 15 sc {31}

Rows 10 – 15 :

31 sc (6 rows)

Row 16 :

14 sc, dec, 13 sc, dec {29}

Row 17 :

29 sc

Row 18 :

13 sc, dec, 12 sc, dec {27}

Rows 19 – 20 :

27 sc (2 rows)

Row 21 :

12 sc, dec, 11 sc, dec {25}

Row 22 :

25 sc

Row 23 :

1 sc, dec, 11 sc, dec, 9 sc {23}

Row 24 :

23 sc

Row 25 :

1 sc, dec, 10 sc, dec, 8 sc {21}

Row 26 :

21 sc

Row 27 :

2 sc, dec, 8 sc, dec, 7 sc {19}

Rows 28 – 38 :

19 sc (11 rows)

Info :

Tighten the thread, leave the long thread for sewing.

β€” Arms (2 details) :

Note :

Crochet with white yarn.

Row 1 :

6 sc in magic ring {6}

Row 2 :

(inc) – repeat 6 times {12}

Rows 3 – 9 :

12 sc {14} (7 rows)

Info :

Do not fill the arms. Sew two halves, crocheting 6 sc. Leave the long thread for sewing.

β€” Legs (2 details) :

Note :

Crochet with white yarn.

Row 1 :

6 sc in magic ring {6}

Row 2 :

(inc) – repeat 6 times {12}

Row 3 :

(1 sc, inc) – repeat 6 times {18}

Row 4 :

(2 sc, inc) – repeat 6 times {24}

Row 5 :

(11 sc, inc) – repeat 2 times {26}

Row 6 :

26 sc

Row 7 :

(11 sc, dec) – repeat 2 times {24}

Row 8 :

24 sc

Info :

Fill the leg a little, not tightly. Sew two halves crocheting 12 sc. Leave the long thread for sewing.

β€” Assembling of the pillow :

Info :

Fill the pillow evenly (slowly, fill the corners especially well) and sew the bottom of the pillow using the needle. Give an even shape.

Info :

Sew on the ears to the top of the pillow (count 3-4 sc from the edge of the pillow).

Info :

Sew on the arms a little diagonally between rows 14 and 17. The distance between the arms is about 18-19 sc.

Info :

Sew on the legs to the bottom of the pillow, counting 2-3 sc from the edge of the pillow.

Info :

Take the black semi-cotton thread and embroider the eyebrows. Secure the thread inside the pillow.

β€” Tail :

Note :

Optional you can crochet the tail.

Row 1 :

6 sc in magic ring {6}

Row 2 :

(inc) – repeat 6 times {12}

Row 3 :

(1 sc, inc) – repeat 6 times {18}

Row 4 :

(2 sc, inc) – repeat 6 times {24}

Row 5 :

(3 sc, inc) – repeat 6 times {30}

Row 6 :

30 sc

Row 7 :

(3 sc, dec) – repeat 6 times {24}

Info :

Leave the long thread for sewing. Fill the tail and sew on it to the pillow from behind. Secure the thread, hide it inside.

Assembly Instructions

  • Fill the pillow evenly, working slowly and stuffing the corners well before closing the bottom seam.
  • Sew the top of the pillow closed after making the square piece, leaving a long tail as you finish, then use that tail to close neatly with a needle.
  • Position and sew the nose detail between rows 16 and 26 of the pillow (counting from the bottom), secure the thread and hide inside the pillow.
  • Insert safety eyes between rows 24 and 25 with a distance of 9 sc between eyes; embroider eyelids with black yarn and secure the threads inside.
  • Sew the ears to the top edge of the pillow counting about 3-4 sc from the edge, and sew the arms diagonally between rows 14 and 17, spacing them about 18-19 sc apart.

Important Notes

  • πŸ’‘Use stitch markers or a marked first stitch to keep track of rounds and avoid miscounting on the square pillow.
  • πŸ’‘Leave long yarn tails when finishing each detail so you have enough length to sew pieces securely and hide ends inside the pillow.
  • πŸ’‘Stuff the pillow gradually and focus on corners last to achieve a neat square shape without overfilling.
  • πŸ’‘Secure safety eyes properly and consider gluing eyelid details if you want extra reinforcement for small children.

This Bunny Pillow pattern brings a smile wherever it goes β€” soft, squishy and full of personality. Make one as a special handmade present or a cozy accent for your home. Enjoy the simple, satisfying process of turning plush yarn into a cuddly companion. 🧢🐰

You ask,

we answer.

FAQs

What size will the finished piece be?

The size of the pillow is approximately height 34 cm and width 42 cm (not counting the full length of the ears), but final size varies with yarn and hook used.

What yarn and hook are recommended?

Use plush yarn such as Himalaya Dolphin Baby (or YarnArt Dolce) with hook No.3.5 (you may use No.4 if needed). Adjust hook size for your tension and yarn choice.

Can I substitute different yarns or change the size?

Yes, changing yarn weight or hook will change the finished size; use thicker yarn and a larger hook for a chunkier version or thinner yarn for a smaller pillow, and adjust stuffing accordingly.

Is this pattern suitable for beginners?

This pattern is rated Intermediate due to multiple small stuffed pieces and assembly work; a crocheter with basic amigurumi experience will be comfortable following it.