🧢 Beautiful ✨ Detailed πŸ’ Adorable

No 4 Sun Star Snowflake Pattern

No 4 Sun Star Snowflake Pattern
4.9β˜… Rating
2-3 Hours Time Needed
1.4K Made This
βœ‚οΈ

Intermediate Level

Ideal for those with basic crochet experience, featuring slightly more advanced stitches and techniques to expand your skills.

⏱️

Bite-Sized Project

Finishes in 2-4 hoursβ€”perfect for an afternoon of creative relaxation.

πŸŽ„

Holiday Cheer

Festive fun for the season, bringing handmade magic to celebrations and creating new family traditions.

About This No 4 Sun Star Snowflake Pattern

This pattern creates a lacy Sun Star Snowflake suitable for ornaments, mobiles, garlands or gift tags. It uses fine thread and a small crochet hook to produce a crisp, textured star with front and back post stitches for a raised effect. The pattern includes a crochet chart, written rounds in US terms, and a photo-tutorial for the BPhdc 2tog special stitch.

No 4 Sun Star Snowflake Pattern crochet pattern - detailed view of completed project

You'll also find blocking and finishing tips to get a flat, symmetrical snowflake and suggestions for hanging. Suitable for using glitter thread or cotton thread to add sparkle.

Why You'll Love This No 4 Sun Star Snowflake Pattern

I absolutely love this pattern because it combines delicate lacework with textured post stitches that really pop. I enjoy the contrast between the airy star points and the raised relief created by front and back post stitches. The chart plus written instructions and photo-tutorial make it satisfying to follow and easy to learn a new technique. Making a set in different colors is one of my favorite ways to create a festive display.

No 4 Sun Star Snowflake Pattern step 1 - construction progress No 4 Sun Star Snowflake Pattern step 2 - assembly progress No 4 Sun Star Snowflake Pattern step 3 - details and accessories No 4 Sun Star Snowflake Pattern step 4 - final assembly and finishing

Switch Things Up

I love how easy it is to customise this snowflake by changing yarn and hook size; try metallic thread for sparkle or cotton for a classic, matte look.

You can make the star larger by using a thicker thread or yarn and a bigger hook, or make tiny versions with thinner thread for delicate garlands.

I often vary the color palette to match holiday decor β€” gold and silver look elegant, while pastels make whimsical gifts.

Try embroidering a small bead or sequin in the center before blocking for extra shine and dimension.

You can create layered stars by making two different sizes and stitching them together offset to create depth.

I sometimes add a small tassel or pompom to the hanging loop to personalise each ornament.

To make a mobile, attach several stars to different length threads and hang from an embroidery hoop for a drifting star display.

If you want more texture, replace some of the FP or BP stitches with taller post stitches or vary the spacing for a different point shape.

For a rustic look, use natural linen thread and a jute hanging loop instead of ribbon.

I recommend trying one snowflake in a test color to dial in blocking and tension before making a whole set; that saves time and gives consistent results.

Common Mistakes & How to Fix Them

βœ— Working with too-large a hook makes the snowflake lose its crispness and definition; use the recommended 1.75 mm or 2 mm hook and adjust only if your tension is very tight. βœ— Skipping the blocking and stiffening step can leave your snowflake floppy and uneven; soak in starch or water, pin carefully on a blocking board and let it dry fully to set the shape. βœ— Not practising the BPhdc 2tog before attempting the round can cause confusion and incorrect stitch counts; follow the photo-tutorial and practice the sequence on a small swatch first. βœ— Pulling post stitches too tight will distort the relief and make joining rounds difficult; keep a consistent, moderate tension when working front and back post stitches and BPhdc 2tog. βœ— Ignoring the crochet chart leads to misplacement of complex stitch groups; use the chart as a visual guide alongside the written rounds for correct placement and symmetry.

No 4 Sun Star Snowflake Pattern

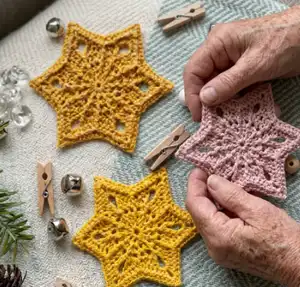
Make a delicate Sun Star Snowflake to brighten your holidays or decorate a mobile. This detailed pattern uses thread-weight yarn and small hooks to create a crisp, lacy star with beautiful post-stitch texture. You will find written rounds, a crochet chart, photo-tutorials and blocking tips to get professional results. Perfect for gifting, ornaments, or a sparkling garland.

Intermediate 2-3 Hours

Materials Needed for No 4 Sun Star Snowflake Pattern

β€” Main Fabric

  • 01
    Scheepjes Maxi Sweet Treat (BonBon) - 140 meters per 25g (use approx 20 m thread for one snowflake)
  • 02
    Drops Glitter Silver - 700 meters per 10g (small quantity for sparkle, approx 10-20 m used per star)
  • 03
    You can use any similar thread-weight yarn (approx 140m/25g) or glitter thread for a sparkly finish

β€” Tools Required

  • 01
    Crochet hook size 1.75 mm (or 2 mm depending on your tension)
  • 02
    Scissors
  • 03
    Tapestry needle for weaving in ends
  • 04
    Pins and blocking board for shaping
  • 05
    Starch or liquid laundry starch for stiffening
  • 06
    Optional: stitch markers
  • 07
    Optional: thread or thin ribbon to hang snowflake

Progress Tracker

0% Complete

β€” Materials :

Info :

Yarn: Scheepjes Maxi Sweet Treat (BonBon): 140 meters 25g. Drops Glitter Silver: 700 meters 10g. Hook: 1.75 mm or 2 mm (depending from your tension). Scissors, tapestry needle to weave in ends.

β€” Finished size :

Info :

The size of the finished snowflake depends on the yarn and hook you use. My snowflake is approx. 10 cm in diameter after blocking using thread 140m/25g and 2 mm hook. I used approximately 20 m thread and glitter yarn.

β€” Blocking and Finishing :

Infos :

It is optional but most snowflakes need to be blocked and (lightly) stiffened. Blocking will make your snowflake flat, neat and symmetrical. You can use laundry starch. Soak the snowflake with some liquid starch or just water (which ever do you prefer). Gently squeeze out any excess liquid and press the snowflake approximately to shape. Lay the snowflake flat on the blocking board and pin the snowflake from the center out to the edges. Let it dry completely before removing the pins.

Info :

This starflake is only blocked and slightly stretched out. Next step is pinning it down on a blocking board and spraying with some water. Let the snowflake dry and do not iron as ironing can damage the relief structure of the star. To hang the snowflake, attach a piece of thread, yarn, ribbon, invisible thread or wire.

β€” Charts & Stitch Legend :

Info :

Charts are created using internationally recognized symbols that correspond to each stitch and instruction. They enable you to crochet in any language. Stitch legend (US terms) is provided with symbols for ch, sl st; hdc, dc; BPsc, BPhdc, BPdc; FPhdc, FPdc, FPtr; BPhdc 2tog.

β€” Notes :

Info :

You may need to go up a hook size for best results if your tension is tight; otherwise you can have a problem with so much back and post stitches in this pattern. If you have problems where you should place stitches, please take a look at the chart (diagram).

Info :

BPhdc 2tog: Yarn over the crochet hook, insert the hook around the next BPhdc, yarn over the hook again. Pull the yarn through the stitch on your crochet hook. You should now have three loops on your hook. Skip the next FPhdc. Insert the hook around the next BPhdc; yarn over the hook again. Pull the yarn through the loop on your hook. You should now have five loops on your hook. Yarn over the hook one last time. Pull the yarn through all five loops on your hook.

β€” Sun Star Snowflake :

Round 1 :

Foundation ring: ch6; join with sl st in 1st chain. Ch3 (counts as 1st dc), 11 dc in ring. Join with a sl st in 3rd chain of initial ch3. (12 dc)

Round 2 :

sl st between two dc, ch3 (counting as 1st dc), FPdc around 1st dc. *dc in space between two dc, FPdc around next dc* Repeat from * around; sl st in 3rd chain of initial ch3. (12 dc, 12 FPdc)

Round 3 :

BPsc ch2 (counting as BPdc) around 1st dc (initial ch3), ch1, FPdc around FPdc, ch1. *BPdc around dc, ch1, FPdc around FPdc, ch1* Repeat from * around; sl st into the 2nd chain of initital BPsc ch2. (12 BPdc, 12 FPdc, 24 ch1 spaces)

Round 4 :

Ch2 (counting as hdc), dc in ch1 space, [FPtr, ch4, FPtr] around next FPdc; dc in ch1 space, hdc in BPdc, hdc in ch1 space, FPhdc around FPdc *hdc in ch1 space, hdc in BPdc, dc in ch1 space, [FPtr, ch4, FPtr] around next FPdc; dc in ch1 space, hdc in BPdc, hdc in ch1 space, FPhdc around FPdc* Repeat from * around; hdc in ch1 space, sl st into the 2nd chain initial ch2. (24 hdc, 12 dc, 12 FPtr, 6 ch4 spaces, 6 FPhdc)

Round 5 :

Ch2 (counting as hdc), hdc in dc, dc in FPtr; [3dc, ch2, 3dc] in ch4 space, dc in FPtr, hdc in dc, hdc in hdc, skip hdc, FPhdc around FPhdc. *skip next hdc, hdc in hdc, hdc in dc, dc in FPtr; [3dc, ch2, 3dc] in ch4 space, dc in FPtr, hdc in dc, hdc in hdc, skip hdc, FPhdc around FPhdc* Repeat from * around; skip hdc and join with a sl st into the 2nd ch of initial ch 2. (36 hdc, 36 dc, 6 ch2 spaces, 6 FPhdc)

Round 6 :

(check the phototutorial BPhdc 2tog on page 4) Ch1 (doesn't count as a stitch), BPhdc around next 5 stitches (hdc and 4dc); [2hdc, ch2, 2 hdc] in ch2 space; BPhdc around next 5 stitches (4dc and hdc); work BPhdc 2tog around the next 2 hdc (skip the FPhdc between 2hdc sts). *BPhdc around next 5 stitches (hdc and 4dc); [2hdc, ch2, 2 hdc] in ch2 space; BPhdc around next 5 stitches (4dc and hdc); work BPhdc 2tog around the next 2 hdc (skip the FPhdc between 2hdc sts)* Repeat from * around; sl st in initial ch1. Finish off, weave in the ends. (60 BPhdc, 24 hdc, 6 ch2 spaces, 6 BPhdc 2tog)

Assembly Instructions

  • Block and stiffen the snowflake by soaking in liquid starch or water, gently squeeze out excess and pin to a blocking board from the center out to the edges until dry.
  • Attach a small loop of thread, invisible thread, ribbon or thin wire to one point of the star for hanging or joining into a mobile.
  • Weave in all ends securely using a tapestry needle and trim flush so ends are hidden after blocking.
  • Pin multiple snowflakes in the desired arrangement when assembling a mobile or garland, spacing evenly and connecting with matching thread or thin ribbon.

Important Notes

  • πŸ’‘You may need to go up a hook size for best results if your tension is tight to avoid difficulty with many post stitches.
  • πŸ’‘Use the provided chart alongside the written rounds to confirm proper placement of post stitches and stitch groups.
  • πŸ’‘Block and lightly stiffen the snowflake for a flat, neat and symmetrical finish and let it dry completely before removing pins.

This Sun Star Snowflake pattern makes elegant, lacy stars perfect for holiday decor or thoughtful handmade gifts. Use glitter thread for a shimmering finish or classic cotton for a vintage look. Create a set of stars in varying colors and sizes to decorate your tree or make a delicate mobile. πŸŒŸπŸŽ„πŸ§Ά

You ask,

we answer.

FAQs

What size will the finished piece be?

The finished snowflake measures approximately 10 cm in diameter when using 140m/25g thread and a 2 mm hook, after blocking.

Can I use different yarn weights for this pattern?

Yes, you can use different thread weights, but the final size and look will change; use a suitable hook for your chosen yarn and expect a larger or smaller snowflake.

Do I need prior crochet experience for this pattern?

This pattern is rated intermediate due to post stitches and the BPhdc 2tog technique, so basic crochet experience and familiarity with front/back post stitches are recommended.

How long does this project typically take to complete?

Most crocheters complete a single snowflake in about 2-3 hours, including blocking and finishing, though time will vary with experience and yarn choice.