🧢 Beautiful ✨ Detailed πŸ’ Adorable

Mr. Pistachio The Dinosaur Amigurumi Pattern

Mr. Pistachio The Dinosaur Amigurumi Pattern
4.5β˜… Rating
5-7 Hours Time Needed
2.3K Made This
βœ‚οΈ

Intermediate Level

Ideal for those with basic crochet experience, featuring slightly more advanced stitches and techniques to expand your skills.

⏱️

Weekend Treat

Takes 5-7 hours, making it an enjoyable project to finish over a couple of days.

🧸

Cute Companion

An adorable friend to cherish, handcrafted with love to bring comfort and joy for years to come.

About This Mr. Pistachio The Dinosaur Amigurumi Pattern

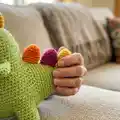
This pattern creates Mr. Pistachio, a charming small dinosaur amigurumi with colorful spikes and tiny decorative dots. The design uses DK cotton yarn and a 3.0 mm hook to achieve a firm, neat texture. It includes full rounds for legs, joined body, tail, arms and all accessories, plus finishing instructions.

Mr. Pistachio The Dinosaur Amigurumi Pattern crochet pattern - detailed view of completed project

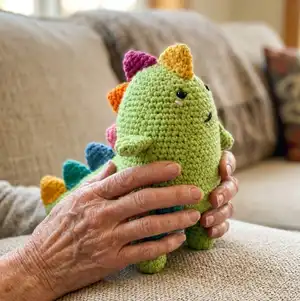
Photos and clear step-by-step rounds help you place safety eyes and sew the pieces in the right positions. Perfect as a handmade gift or a playful addition to your amigurumi collection.

Why You'll Love This Mr. Pistachio The Dinosaur Amigurumi Pattern

I absolutely love this pattern because Mr. Pistachio has so much personality packed into a small, simple shape. I enjoy how the joined-leg body construction creates a seamless, rounded silhouette that is satisfying to shape. The colorful spikes let me play with tiny pops of color without overwhelming the main body. I also appreciate that the pattern is compact yet detailed, so finishing and assembly feel rewarding and quick.

Mr. Pistachio The Dinosaur Amigurumi Pattern step 1 - construction progress Mr. Pistachio The Dinosaur Amigurumi Pattern step 2 - assembly progress Mr. Pistachio The Dinosaur Amigurumi Pattern step 3 - details and accessories Mr. Pistachio The Dinosaur Amigurumi Pattern step 4 - final assembly and finishing

Switch Things Up

I love customizing Mr. Pistachio by swapping the spike colors for a pastel palette to create a softer look.

I sometimes use a bulkier yarn and larger hook to make a chubby, cuddly version that is great for babies or toddlers.

I often replace safety eyes with embroidered eyes for a fully washable toy and a gentler look for small children.

I like adding wire inside the limbs for posability, which lets me pose Mr. Pistachio sitting or standing.

You can make a keychain by using thinner yarn and a smaller hook to create a mini version with a keyring attached.

Try embroidering different mouth shapes to change his expression from surprised to cheerful or sleepy.

Mix and match yarn textures β€” cotton for a neat look or acrylic for a softer, fuzzier finish.

Personalize dots and spikes by embroidering initials or small motifs onto the body as a custom gift idea.

If you want a sturdier toy, use a tighter tension and smaller hook than recommended to reduce gaps for stuffing.

I often make a set of several dinosaurs using contrasting colors to create a playful collection perfect for playtime decor.

Common Mistakes & How to Fix Them

βœ— Placing safety eyes too high or too low can change the expression of the dinosaur; mark and check placement between rounds 34 and 35 before securing the eyes. βœ— Forgetting to stuff gradually leads to lumps and odd shaping; stuff little by little while crocheting and shape the legs and body as you go. βœ— Cutting the yarn after the first leg will prevent joining the legs correctly; do not cut the yarn on the second leg so you can chain and join as instructed. βœ— Skipping stitch counts during increases and decreases will make the body uneven; count stitches every round, especially during the joining round and decrease rounds. βœ— Pulling stitches too tightly when making spikes and dots can distort their shape; maintain even tension and leave a long tail for sewing without stretching the crochet fabric.

Mr. Pistachio The Dinosaur Amigurumi Pattern

Create Mr. Pistachio, a tiny pistachio-colored dinosaur with colorful spikes and sweet details. This pattern guides you step-by-step through crocheting legs, body, tail, arms, spikes and finishing touches. Ideal for gifting or keeping as a handmade companion, the instructions are clear and photo-referenced for accurate assembly.

Intermediate 5-7 Hours

Materials Needed for Mr. Pistachio The Dinosaur Amigurumi Pattern

β€” Main Fabric

  • 01
    Paintbox DK cotton lime green 429 - 50 gr
  • 02
    Paintbox DK cotton seville orange 419 - small amount (approx 2 gr)
  • 03
    Paintbox DK cotton bubblegum pink 451 - small amount
  • 04
    Paintbox DK cotton slate green 427 - small amount
  • 05
    Paintbox DK cotton raspberry pink 444 - small amount
  • 06
    Paintbox DK cotton dolphin blue 437 - small amount
  • 07
    Paintbox DK cotton mustard yellow 424 - small amount

β€” Tools Required

  • 01
    Crochet hook 3.00 mm
  • 02
    Safety eyes 7 mm (2 pieces)
  • 03
    Polyester fiberfill stuffing
  • 04
    Tapestry needle
  • 05
    Scissors
  • 06
    Stitch markers (optional)
  • 07
    Pins for positioning (optional)

Progress Tracker

0% Complete

β€” LEGS, BOSY AND HEAD :

First Leg :

Start with lime green colour and make a magic ring

Round 1 :

6 sc

Round 2 :

inc in all stitches (12)

Round 3 - 7 :

sc in all stitches (12)

Info :

Fasten off, leaving a long tail for sewing

Second leg and body :

Start with a magic ring

Round 1 :

6 sc

Round 2 :

inc all stitches (12)

Round 3 - 7 :

sc in all stitches (12)

Info :

Don’t cut the yarn, we will join the legs.

Round 8 :

after finishing the last sc of second leg, crochet 12 chains and connect another leg with slip stitch. Make a sc in same stitch and and continue crocheting around two legs and chain. 12 sc second leg, 12 sc over the 12 ch, 12 sc first leg, 12 sc back side of the 12 ch = so you will have 48 sc

Round 9 - 31 :

48 sc (23 rnds)

Info :

Start stuffing legs and continue stuffing while you go

Round 32 :

6 sc, dec (42)

Round 33 - 34 :

sc in all stitches (42)

Round 35 :

5 sc, dec (36)

Round 36 :

sc in all stitches (36)

Info :

Place safety eyes between 34. - 35. rounds and continue to stuffing. Embroider the cheeks and the mouth (see the photo)

Round 37 :

4 sc, dec (30)

Round 38 :

3 sc, dec (24)

Round 39 :

2 sc, dec (18)

Round 40 :

1 sc, dec (12)

Round 41 :

dec (6)

Info :

Leave a long tail, cut the yarn, weave the end

β€” TAIL :

Info :

Start with lime green colour and make a magic ring

Round 1 :

6 sc

Round 2 :

sc in all stitches (6)

Round 3 :

inc, 1 sc (9)

Round 4 :

sc in all stitches (9)

Round 5 :

inc, 2 sc (12)

Round 6 :

sc in all stitches (12)

Round 7 :

inc, 3 sc (15)

Round 8 :

sc in all stitches (15)

Round 9 :

inc, 4 sc (18)

Round 10 :

sc in all stitches (18)

Round 11 :

inc, 5 sc (21)

Round 12 :

sc in all stitches (21)

Round 13 :

inc, 6 sc (24)

Round 14 :

sc in all stitches (24)

Round 15 :

inc, 7 sc (27)

Round 16 :

sc in all stitches (27)

Round 17 :

inc, 8 sc (30)

Round 18 :

sc in all stitches (30)

Round 19 :

inc, 9 sc (33)

Round 20 :

sc in all stitches (33)

Round 21 :

inc, 10 sc (36)

Round 22 :

sc in all stitches (36)

Round 23 :

inc, 11 sc (39)

Round 24 :

sc in all stitches (39)

Round 25 :

inc, 12 sc (42)

Round 26 :

inc, 13 sc (45)

Info :

Leave a long tail, cut the yarn, weave the end

β€” ARMS : (make 2) :

Info :

Start with a magic circle

Round 1 :

8 sc

Round 2 - 8 :

sc in all stitches (8)

Info :

Leave a long tail, cut the yarn, weave the end

β€” SPIKES ( make 7 ) :

Info :

Start with a magic ring

Round 1 :

5 sc

Round 2 :

sc in all stitches (5)

Round 3 :

inc (10)

Round 4 :

sc in all stitches (10)

Round 5 :

1 sc, inc (15)

Round 6 :

sc in all stitches (15)

Info :

Leave a long tail, cut the yarn, weave the end

β€” DINOSAUR DOTS :

Info :

With slate green colour make a magic ring

1. dot :

6 sc in magic ring

2. dot :

8 hdc in magic ring

3. dot :

10 hdc in magic ring

β€” FINISHING :

Step 1 :

Sew the arms between the rounds 25 - 26

Step 2 :

Sew the tail back of the body between to legs.

Step 3 :

Sew the spikes as seen in the photo.

Step 4 :

Sew the dots on the body

Info :

Mr. Pistacio is ready for new adventures.

Assembly Instructions

  • Sew the arms between the rounds 25 - 26, positioning them symmetrically and securing with a whipstitch for stability.
  • Sew the tail to the back of the body between the two legs so it sits centered and secure at the lower back.
  • Sew the spikes along the top/back of the body as seen in the photo, arranging colors and spacing evenly before stitching.
  • Sew the dinosaur dots onto the body in a pleasing arrangement using the slate green dots made earlier.
  • Place safety eyes between rounds 34 and 35, continue stuffing to shape the head, then embroider cheeks and mouth.

Important Notes

  • πŸ’‘Place safety eyes between rounds 34 and 35 and check placement before securing to avoid repositioning later.
  • πŸ’‘Do not cut the yarn after making the first leg β€” you need the working yarn to join the legs with chains and continue the body.
  • πŸ’‘Stuff gradually while you crochet, especially when joining legs and shaping the body, to maintain smooth contours and avoid lumps.
  • πŸ’‘Leave long tails on small pieces (arms, spikes, tail) to make sewing them securely to the body easier.
  • πŸ’‘Weave in ends neatly after assembly and use pins to position pieces before sewing for best alignment.

This delightful Mr. Pistachio dinosaur is a tiny handmade friend full of character and colorful spikes. Create one as a thoughtful gift or keep it as a cozy, adorable companion. Happy crocheting and may your Mr. Pistachio find many adventures! 🧢🧡

You ask,

we answer.

FAQs

What size will the finished piece be?

The finished amigurumi measures approximately 12-15 cm tall depending on your tension and exact yarn/hook combination.

Can I use different yarn weights for this pattern?

Yes, you can use different yarn weights, but that will change the final size; use an appropriate hook for the weight and adjust stuffing accordingly.

Do I need prior crochet experience for this pattern?

This pattern is rated intermediate, so basic knowledge of magic ring, single crochet, increases and decreases is recommended.

How long does this project typically take to complete?

Most crocheters complete this project in 5-7 hours, though time may vary based on experience level and working pace.