🧢 Beautiful ✨ Detailed πŸ’ Adorable

Molly Boho Bag Pattern

Molly Boho Bag Pattern
4.6β˜… Rating
5-7 Hours Time Needed
3.1K Made This
βœ‚οΈ

Intermediate Level

Ideal for those with basic crochet experience, featuring slightly more advanced stitches and techniques to expand your skills.

⏱️

Weekend Treat

Takes 5-7 hours, making it an enjoyable project to finish over a couple of days.

✨

Stylish Touch

An elegant detail to elevate any look, combining traditional techniques with contemporary design sensibilities.

About This Molly Boho Bag Pattern

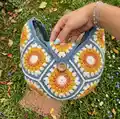
This pattern creates a boho-style shoulder bag made from 5-row decorative squares joined to form a rounded 3D shape. You will make 11 squares, join them, add edging, a button flap and a comfortable strap with hardware. The design uses DK yarn, cluster and puff-style stitches to give a richly textured finish.

Molly Boho Bag Pattern crochet pattern - detailed view of completed project

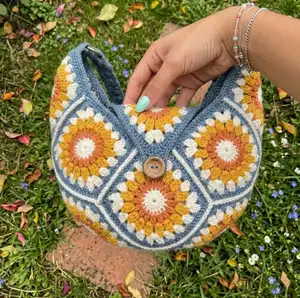
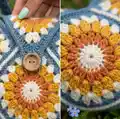
Photo steps and clear row-by-row instructions show how to make the squares, join them, and assemble the bag. The strap pattern includes a bead/puff stitch row and instructions for attaching bag hooks.

Why You'll Love This Molly Boho Bag Pattern

I absolutely love this pattern because it combines classic granny-squared charm with modern boho styling that looks great in any yarn colourway. I enjoy how the cluster and puff stitches create lovely texture and depth, making each square feel like a small piece of art. The assembly turns flat squares into a beautiful 3D bag β€” that transformation always feels magical to me. I also love that the strap is customizable in length and finish, so you can tailor the bag to your style and needs.

Molly Boho Bag Pattern step 1 - construction progress Molly Boho Bag Pattern step 2 - assembly progress Molly Boho Bag Pattern step 3 - details and accessories Molly Boho Bag Pattern step 4 - final assembly and finishing

Switch Things Up

I love how easy it is to customise this bag: change the yarn colours for a subtler or bolder look to suit your wardrobe.

I often swap DK for a slightly thicker yarn to create a chunkier, more structured bag β€” just increase hook size accordingly.

I sometimes make a mini version for a keychain using finer yarn and a small hook; reduce the foundation chain for a smaller strap.

I like to add embroidered details to the flap for a personalised finish β€” a simple initial or small floral motif works beautifully.

Try different edge treatments: replace the final single crochet round with a picot or crab stitch for a decorative border.

Make the strap detachable by adding swivel hooks so you can swap straps to create different looks quickly.

I sometimes line the bag with fabric to protect the interior and give extra stability β€” choose a light cotton lining and slipstitch it in place.

For a boho festival version, add tassels or pom-poms to the corners and use multi-coloured yarn for the strap.

If you want a more polished finish, use matching yarn for joining so the seams are less visible and the bag looks seamless.

I recommend experimenting with button styles β€” wooden, vintage metal or bright resin buttons each change the bag's personality.

Common Mistakes & How to Fix Them

βœ— Skipping the stitch count on the circle centre can throw off later rounds; always count your stitches after completing Row 1 and before moving on. βœ— Pulling the magic ring too tight or too loose affects the shape of the first round; close the ring snugly but leave a little give so the first round sits flat. βœ— Rushing cluster stitches can make uneven clusters and gaps; form each cluster carefully following the pull-through steps and chain spacing exactly. βœ— Joining squares without lining up corners will twist the layout and shape; lay out squares as shown, match corner-to-corner and pin before single crocheting them together.

Molly Boho Bag Pattern

Make a charming Molly Boho Bag using granny-style squares, cluster and puff stitches. This pattern guides you through making the decorative 5-row squares, joining them into a 3D bag shape, and creating a neat strap with a bead stitch finish. Ideal for makers who love boho textures and colourful yarn play, the instructions are photo-supported and easy to follow.

Intermediate 5-7 Hours

Materials Needed for Molly Boho Bag Pattern

β€” Main Fabric

  • 01
    DK weight yarn (1-5 colours) - use one to five colours according to preference (pattern photograph uses 4 colours with cream repeated twice)
  • 02
    Contrasting colour for joining and edging - small amount
  • 03
    Small amount of yarn for strap (same or contrasting colour)

β€” Tools Required

  • 01
    Crochet hook size 6.0mm (J) for main work
  • 02
    Crochet hook size 5.0mm (H) for the strap foundation row
  • 03
    Tapestry/yard needle for sewing and weaving ends
  • 04
    Scissors
  • 05
    Bag hooks/clips (hardware) for strap ends
  • 06
    Stitch markers
  • 07
    Buttons for flap closure (1)
  • 08
    Pins for blocking and assembly (optional)

Progress Tracker

0% Complete

β€” Square :

Row 1 :

Using the 6mm J hook Magic Ring, Chain 3 (counts as first stitch) Double crochet 15 stitches more (16 stitches total) Pull magic circle closed, slip stitch into first stitch,

Row 2 :

Change Colour Chain 2 (counts as first stitch) Cluster stitch into each stitch (16 total) Slip stitch closed

Info :

Cluster stitch... Start a Double crochet but only pull through the first loop leaving the second loop on the hook, yarn over and double crochet into same stitch and only pull through the first loops ending up with 3 loops on the hook (for the first cluster, the following clusters will have 4 loops on the hook), pull through all 3 loops and chain 1. 3 stitches per cluster, 16 clusters total

Row 3 :

Change colour, Chain 2, As before cluster stitches but this time its 4 stitches per cluster and chain 2 between each. Slip stitch closed

Row 4 :

Change Colour, Chain 2 (counts as first Double), 1. Double crochet 3 times into the same stitch. 2. Half Double crochet 3 times into the next stitch. 3. Double crochet 3 times into the next stitch. 4. Treble crochet 3 times into the next stitch 5. Chain 1 Treble crochet 3 times into the same stitch as the first set of trebles creating a corner. Repeat 1-5 all around.

Row 5 :

Change Colour, Chain 2 (counts as first Double stitch), Double crochet 3 times into each stitch. Once you get to the corner Double crochet 3 times, chain 1, Double crochet 3 times again into the same corner stitch, continue round.

Info :

You need to make 11 of these squares

β€” Joining & Layout :

Info :

Start with 8 of the 11 squares and lay them out as shown in the photograph to form the main body of the bag.

Joining :

Its time to start to stitch the squares together. Using Single crochet in the back stitch only of the squares. I find placing the squares back to back helps this. I have used a contrasting colour but you can use the same colour if you don't want it to be as visible.

Folding :

Fold in half. You now need to stitch the bag along these lines. The bag will start to take on its 3D shape and not sit flat anymore.

Top Corners :

Now you add 2 more squares at the top corners, these will be folded in half.

Final Square :

The last Square will need a little manipulation again adding to the 3D shape of the final bag, Stitch it to the back of the bag so it can be folded over the front.

β€” Edge, Flap & Buttonhole :

Edging :

Now all the squares are joined Single crochet around the whole of the edge of the bag. Once your reach the point of the flap chain 8 and slip stitch back into the same stitch. Continue Single crochet around until you reach each corner (marked with yellow stars on the picture above) Chain 5 and slip stitch into the same stitch.

Buttonhole :

Single crochet around again and add 8 stitches into the chain loop for the button hole and 5 stitches into the chain loops at the sides of the bag

Closure :

Choose your button and pick the best spot to place it on you bag, stitch it on.

β€” Strap (foundation to finish) :

Strap Start :

Using a size 5mm H hook Start by making a row of Single crochet foundation chain. Make this row as long as you like in multiples of 2, I have done 100 stitches. Going down a hook size for the foundation row helps to keep it neat and tidy.

Row 1 :

Going back to the 6mm J hook, chain 1, Turn work, Single crochet along the whole row. Chain 4 , turn work

Bead Stitch Row :

Skip 1 stitch and Double crochet. This row is a bead stitch row so you are going to essentially be doing a sideways puff stitch onto the Double crochet you have just made. Loop over the hook 4 times before pulling the working yarn through and chain 1, Skip 1, Double crochet, Bead stitch, Skip 1.... cont On the last stitch leave it as a Double

Turn & SC Row :

Chain 1, Turn work Single crochet into each stitch along. One on top of each bead and one between as shown below

Finishing Rows :

Single crochet twice into the last stitch space, chain 1 and turn work. Single crochet along every stitch, chain 1 and turn work, repeat for a third time. Cut and weave in your ends

β€” Strap Finishing & Hardware :

Sewing Clips :

Take a needle and length of yarn and simply sew your bag clips to the ends of your strap

Attach :

Clip it to your bag and wear with pride!

Assembly Instructions

  • Lay out 8 of the 11 squares in the layout shown in the photos to form the main body of the bag, aligning corners carefully before joining.
  • Using single crochet in the back loop only, join adjacent squares together, placing squares back-to-back to help alignment as you work.
  • Fold the joined panel in half and stitch along marked lines to form the 3D curved base of the bag, then add the two top corner squares folded in half.
  • Join the final square to the back of the bag so it can be folded over the front as a flap, then single crochet around the entire edge to form the edging and buttonhole.
  • Create the strap using a single crochet foundation chain, work the bead/puff row, return rows of single crochet and sew bag clips to each strap end with a needle and yarn.

Important Notes

  • πŸ’‘This bag is made of squares with 5 rows; you can use from 1-5 colours to make these bags so experiment with colourways.
  • πŸ’‘Place squares back to back when single crocheting to join as it helps keep edges neat and aligned.
  • πŸ’‘Going down a hook size for the strap foundation row helps keep the foundation neat and tidy before switching to the larger hook.

This gorgeous Molly Boho Bag pattern turns colourful granny-style squares into a wearable statement piece, perfect for gifting or everyday use. The textured cluster and puff details add delightful depth that stands out in any yarn palette. Have fun mixing colours and make it uniquely yours! 🧢✨

You ask,

we answer.

FAQs

What size will the finished piece be?

The finished bag size will vary with yarn and hook choice; using DK yarn and the recommended hooks will result in a medium sized shoulder bag similar to the photos.

Can I use different yarn weights for this pattern?

Yes, different yarn weights can be used, but this will change the scale of the squares and finished bag so adjust the number of squares or strap length as needed.

Do I need prior crochet experience for this pattern?

This pattern is rated intermediate; familiarity with double crochet, cluster/puff techniques, and joining squares is recommended for best results.

How long does this project typically take to complete?

Most makers complete this project in 5-7 hours, depending on experience and whether you make the strap longer or adjust colours.

How many squares do I need to make?

You need to make 11 squares in total: 8 to form the main body, plus 2 top corner squares folded in half, and 1 final flap square.