🧢 Beautiful ✨ Detailed πŸ’ Adorable

Minecraft Amigurumi Pattern

Minecraft Amigurumi Pattern
4.2β˜… Rating
5-7 Hours Time Needed
2.8K Made This
βœ‚οΈ

Intermediate Level

Ideal for those with basic crochet experience, featuring slightly more advanced stitches and techniques to expand your skills.

⏱️

Weekend Treat

Takes 5-7 hours, making it an enjoyable project to finish over a couple of days.

🧸

Cute Companion

An adorable friend to cherish, handcrafted with love to bring comfort and joy for years to come.

About This Minecraft Amigurumi Pattern

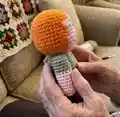
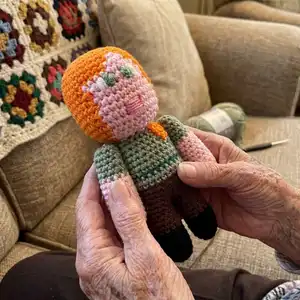
This pattern collection creates a set of small Minecraft-inspired amigurumi characters including Alex, Creeper, Enderman, Ghast and Guardian. Each character is worked mostly in the round with clear step-by-step shaping, color changes and finishing notes. The designs use DK yarn and a 3.5mm hook and include tips for joining legs, closing square tops and sewing facial details for cohesive results. Ideal if you enjoy making slightly shaped toy figures with characterful faces and small accessories.

Minecraft Amigurumi Pattern crochet pattern - detailed view of completed project

Follow the detailed rounds, marker placement and decrease instructions to form square tops and cubic-like bodies for each character. Photo cues and clear assembly notes make finishing and detailing straightforward.

Why You'll Love This Minecraft Amigurumi Pattern

I absolutely love this pattern because it captures the blocky charm of Minecraft characters in a soft, handmade form. I enjoy how each figure uses simple shaping and clever decrease placement to create square tops and defined silhouettes. The patterns let me practice consistent tension and finishing while still being fast enough to finish in a weekend. I also love adding embroidered faces and small details β€” they really bring each character to life.

Minecraft Amigurumi Pattern step 1 - construction progress Minecraft Amigurumi Pattern step 2 - assembly progress Minecraft Amigurumi Pattern step 3 - details and accessories Minecraft Amigurumi Pattern step 4 - final assembly and finishing

Switch Things Up

I love how versatile these Minecraft patterns are for customization; you can change colours to create alternate skins or original characters.

Want a softer version? Use a bulky yarn and a larger hook to make a chunky, huggable character that keeps the same shaping.

To make mini keychain pals, use fingering weight yarn and a 2.5mm hook to scale down the pattern proportionally.

I often add embroidered details like freckles, scars, or pixel-style shirts to personalize each character uniquely.

Try alternating stripe patterns on shirts by switching colours every two rounds for a fun banded effect.

You can add wire to arms or legs for posability, inserting it before closing and stuffing to keep limbs adjustable.

Use safety eyes for a more finished look or embroider eyes for a fully child-safe toy β€” both give different expressions.

Mix yarn textures (sparkly, boucle) for accessories or hair to give one-of-a-kind finishes to each amigurumi.

Make a full set and display them together or package them as themed gifts for Minecraft fans at parties.

I recommend practicing the decreases on a spare swatch to keep square tops neat before working them on the final piece.

Common Mistakes & How to Fix Them

βœ— Skipping stitch markers when joining legs or identifying corners leads to misplaced decreases; place clip markers at the four corners before decreasing and replace them after each row to keep shaping accurate. βœ— Not stuffing as you go can create lumps and make closing the top difficult; stuff gradually while shaping so the piece holds its intended form without bulging. βœ— Pulling yarn too tight when doing invisible decreases will distort the square top shape; use a consistent gentle tension and the invisible decrease method when possible to keep seams neat. βœ— Forgetting to count stitches after rounds results in incorrect stitch counts later; count stitches inside the curly braces or parentheses at the end of each round to confirm your stitch total before proceeding.

Minecraft Amigurumi Pattern

Make a charming set of Minecraft-inspired amigurumi characters with clear, photo-assisted instructions. This pattern pack guides you through crocheting Alex, Creeper, Enderman, Ghast, Guardian and more using DK yarn and a 3.5mm hook. Youll learn shaping techniques, how to join legs and bodies, and how to sew details for a professional finish. Perfect for gifting or building a collectible set of handmade game-themed pals.

Intermediate 5-7 Hours

Materials Needed for Minecraft Amigurumi Pattern

β€” Main Fabric

  • 01
    DK weight yarn (light worsted) - Alex: black, brown, green, dark green, pink, dark pink, orange, and white
  • 02
    DK weight yarn - Creeper: green and dark green
  • 03
    DK weight yarn - Enderman: black and white
  • 04
    DK weight yarn - Ghast: white, red, black and grey
  • 05
    DK weight yarn - Guardian: teal, orange, white and brown

β€” Tools Required

  • 01
    3.5mm crochet hook
  • 02
    Embroidery needle and scissors
  • 03
    Toy stuffing (polyester fibrefill)
  • 04
    4 x clip markers (or stitch markers)
  • 05
    Stitch markers (additional)
  • 06
    Yarn needle for sewing pieces
  • 07
    Pins for positioning pieces during assembly

Progress Tracker

0% Complete

β€” Alex :

Feet and Legs - Round 1 :

4SC into a magic loop (4)

Feet and Legs - Round 2 :

3SC into each ST around (12)

Feet and Legs - Round 3-5 :

SC around (12)

Info :

Change to brown yarn.

Feet and Legs - Round 6-10 :

SC around (12)

Info :

Join and FO. Stuff leg.

Info :

Repeat rows 1 - 10 to make second leg, do not fasten off. CH1 and SL ST into the first leg you made. This is to join the two legs; we will now continue to crochet around both legs and the CH1 to make the body.

Continuing :

Continuing from the SL ST in the 2nd leg....

Body - Round 11 :

SC11 (around the leg not including the stitch we SL ST into) SC1 into the chain we made, SC11 (around second leg not including the stitch we CH1 from, SC1 into the opposite side of the chain space we made (24)

Body - Round 12-14 :

SC around (24)

Info :

Change to light green.

Body - Round 15-17 :

SC around (24)

Info :

Change to dark green.

Body - Round 18 :

SC around (24)

Info :

Change to light green.

Body - Round 19-25 :

SC around (24)

Info :

You now want to decrease and close the top of Alex's body in a rectangular shape. To do this press your work flat front to back and find the front 8 stitches, place a marker either side of these stitches. Now count 2 stitches away from the marker and put another clip into the next stitch. You now have 4 clip markers to help us identify where we are going to do our decrease stitches.

Body - Round 26 :

(SC to stitch before marker SC3TOG) repeat 4 times, SC to end (24)

Info :

Stuff body. Join and FO. Using mattress stitch sew the top of Alex closed. With orange yarn sew hair detail onto Alex's left shoulder.

β€” Alex - Arms :

Round 1 :

4SC into a magic loop (4)

Round 2 :

3SC into each ST around (12)

Round 3-11 :

SC around (12)

Info :

Change to light green yarn.

Round 12-15 :

SC around (12)

Info :

Join and FO. Stuff arms.

Info :

With yarn tail pick up the back loop only of the remaining 12 stitches in order, then pull tight to close.

Info :

Pin and sew arms into place on either side of Alex.

β€” Alex - Head :

Round 1 :

8SC into a magic loop (8)

Round 2 :

(SC1, 3SC into the next ST) 4 times (16)

Round 3 :

SC2, 3SC into the next ST, (SC3, 3SC into the next ST) 3 times, SC1 (24)

Round 4 :

SC3, 3SC into the next ST, (SC5, 3SC into the next ST) 3 times, SC2 (32)

Round 5 :

SC4, 3SC into the next ST, (SC7, 3SC into the next ST) 3 times, SC3 (40)

Round 6-7 :

SC around (40)

Info :

With clip markers you are now going to identify the 10 stitches where you want Alex's face to be. Put a marker in the 1st and 10th stitch. Move the markers up into the same stitches on each round.

Round 8 :

SC to first marker in orange, including the stitch with the marker in, in pink SC8, in orange SC to end (40)

Round 9 :

SC to first marker in orange, including the stitch with the marker in, SC3, in pink SC4, in orange SC to end (40)

Round 10-13 :

SC to stitch before marker in orange, in pink SC10, in orange SC to end (40)

Round 14-16 :

SC to 2 stitches before marker in orange, in pink SC12, in orange SC to end (40)

Info :

Continue the rest of head with pink yarn only. You now want to decrease and close the bottom of Alex's head in a square shape. To do this add a clip marker into the 4 corners of his head where you want the decreases to be. There should be 9 stitches between every 2 stitches. To make this easier identify the front 9 stitches of his face first and put a marker either side of these stitches. Move markers into decreased stitches after each row.

Round 17 :

(SC to stitch before marker SC3TOG) 4 times, SC to end (32)

Round 18 :

(SC to stitch before marker SC3TOG) 4 times, SC to end (24)

Round 19 :

(SC to stitch before marker SC3TOG) 4 times, SC to end (16)

Info :

Stuff Head.

Round 20 :

(SC to stitch before marker SC3TOG) 4 times, SC to end (8) - Remove markers

Info :

Join and FO. With yarn tail pick up the front loop only of the remaining 8 stitches in order, then pull tight to close. Sew head onto body.

Info :

Face Detail. With different colour yarns sew on Alex's face details. I found the easiest way to do this was to sew the shape first, and then fill in with colour.

β€” Creeper :

Materials Info :

DK yarn in green and dark green. 3.5mm crochet hook. Embroidery needle and scissors. Toy stuffing. 4 x clip markers.

Head - Round 1 :

8SC into a magic loop (8)

Head - Round 2 :

(SC1, 3SC into the next ST) 4 times (16)

Head - Round 3 :

SC2, 3SC into the next ST, (SC3, 3SC into the next ST) 3 times, SC1 (24)

Head - Round 4 :

SC3, 3SC into the next ST, (SC5, 3SC into the next ST) 3 times, SC2 (32)

Head - Round 5-14 :

SC around (32)

Info :

You now want to decrease and close the top of the head in a square shape. To do this add a clip marker into the 4 corners of the head where you want the decreases to be. There should be 7 stitches between every 2 stitches. Replace markers after each row.

Head - Round 15 :

(SC to stitch before marker SC3TOG) 4 times, SC to end (24)

Head - Round 16 :

(SC to stitch before marker SC3TOG) 4 times, SC to end (16)

Info :

Stuff Head.

Head - Round 17 :

(SC to stitch before marker SC3TOG) 4 times, SC to end (8) - Remove markers

Info :

Join and FO. With yarn tail pick up the front loop only of the remaining 8 stitches in order, then pull tight to close. Sew head onto body.

β€” Creeper - Body :

Body - Round 1 :

8SC into a magic loop (8)

Body - Round 2 :

(SC1, 3SC into the next ST) 4 times (16)

Body - Round 3 :

SC2, 3SC into the next ST, (SC3, 3SC into the next ST) 3 times, SC1 (24)

Body - Round 4-18 :

SC around (24)

Body - Round 19 :

(SC to stitch before marker SC3TOG) 4 times, SC to end (16)

Body - Round 20 :

(SC to stitch before marker SC3TOG) 4 times, SC to end (8) - Remove markers

Info :

Join and FO. With yarn tail pick up the front loop only of the remaining 8 stitches in order, then pull tight to close.

β€” Creeper - Legs :

Legs - Round 1 :

8SC into a magic loop (8)

Legs - Round 2 :

(SC1, 3SC into the next ST) 4 times (16)

Legs - Round 3-7 :

SC around (16)

Legs - Round 8 :

(SC1, SC3TOG) 4 times (8)

Info :

Join and FO. Stuff Legs. With yarn tail pick up the front loop only of the remaining 8 stitches in order, then pull tight to close. Sew feet onto the bottom of Creeper two at the front and two at the back.

Info :

Face and Body Detail. With dark green yarn sew eyes nose and mouth onto Creepers head. I found the easiest way to do this was to sew the square shape's first and then fill in with colour.

β€” Enderman :

Materials Info :

DK yarn in black and white. 3.5mm crochet hook. Embroidery needle and scissors. Toy stuffing. 4 x clip markers.

Legs & Body - Round 1 :

CH2, 5SC into the 2nd CH from hook (5)

Legs & Body - Round 2 :

2SC into every ST around (10)

Legs & Body - Round 3-27 :

SC around (10)

Info :

Join and FO. Stuff Leg. Repeat rows 1 - 27 to make second leg, do not fasten off. CH3 and SL ST into the first leg you made. This is to join the two legs; we will now continue to crochet around both legs and the CH3 to make the body.

Continuing :

Continuing from the SL ST in the 2nd leg....

Body - Round 28 :

SC9 (around the leg not including the stitch we SL ST into) SC into one side of each of the CH3 we made, SC9 (around second leg not including the stitch we CH1 from, SC into the opposite side of the CH3 space's we made (24)

Body - Round 29-43 :

SC around (24)

Body - Round 44 :

(SC to stitch before marker SC3TOG) repeat 4 times, SC to end (24)

Info :

Stuff body. Join and FO. Using mattress stitch sew the top of Enderman's body closed.

β€” Enderman - Head :

Head - Round 1 :

8SC into a magic loop (8)

Head - Round 2 :

(SC1, 3SC into the next ST) 4 times (16)

Head - Round 3 :

SC2, 3SC into the next ST, (SC3, 3SC into the next ST) 3 times, SC1 (24)

Head - Round 4 :

SC3, 3SC into the next ST, (SC5, 3SC into the next ST) 3 times, SC2 (32)

Head - Round 5 :

SC4, 3SC into the next ST, (SC6, 3SC into the next ST) 3 times, SC2 (40)

Head - Round 6-13 :

SC around (40)

Head - Round 14 :

(SC to stitch before marker SC3TOG) 4 times, SC to end (32)

Head - Round 15 :

(SC to stitch before marker SC3TOG) 4 times, SC to end (24)

Head - Round 16 :

(SC to stitch before marker SC3TOG) 4 times, SC to end (16)

Info :

Stuff Head.

Head - Round 17 :

(SC to stitch before marker SC3TOG) 4 times, SC to end (8) - Remove markers

Info :

Join and FO. With yarn tail pick up the front loop only of the remaining 8 stitches in order, then pull tight to close. Sew head onto body.

β€” Enderman - Arms :

Arms - Round 1 :

CH2, 6SC into the 2nd CH from hook (6)

Arms - Round 2 :

(SC1, 2SC into the next ST) 3 times (9)

Arms - Round 3-29 :

SC around (9)

Info :

Join and FO. Stuff Arms. Pin and sew into place on either side of Enderman.

Info :

Face Detail. With white yarn sew on Enderman's eyes. I found the easiest way to do this was to sew the shape first, and then fill in with colour.

β€” Ghast :

Materials Info :

DK yarn in black, red, white, and grey. 3.5mm crochet hook. Embroidery needle and scissors. Toy stuffing. 4 xc markers.

Body - Round 1 :

8SC into a magic loop (8)

Body - Round 2 :

(SC1, 3SC into the next ST) 4 times (16)

Body - Round 3 :

SC2, 3SC into the next ST, (SC3, 3SC into the next ST) 3 times, SC1 (24)

Body - Round 4 :

SC3, 3SC into the next ST, (SC5, 3SC into the next ST) 3 times, SC3 (40)

Body - Round 5 :

SC4, 3SC into the next ST, (SC7, 3SC into the next ST) 3 times, SC3 (40)

Body - Round 6-18 :

SC around (40)

Body - Round 19 :

(SC to stitch before marker SC3TOG) 4 times, SC to end (32)

Body - Round 20 :

(SC to stitch before marker SC3TOG) 4 times, SC to end (24)

Body - Round 21 :

(SC to stitch before marker SC3TOG) 4 times, SC to end (16)

Info :

Stuff Ghast.

Body - Round 22 :

(SC to stitch before marker SC3TOG) 4 times, SC to end (8) - Remove markers

Info :

Join and FO. With yarn tail pick up the front loop only of the remaining 8 stitches in order, then pull tight to close.

β€” Ghast - Legs :

Legs - Round 1 :

CH2, 6SC into the 2nd CH from hook (6)

Legs - Round 2 :

(SC1, 2SC into the next ST) 3 times (9)

Legs - Round 3-9 :

SC around (9)

Info :

Join and FO. Sew legs onto the bottom of Ghast evenly.

Info :

Face Detail. With white, red, black, and grey yarn sew on Ghast's face detail. I found the easiest way to do this was to sew the shape first, and then fill in with colour.

β€” Guardian :

Materials Info :

DK yarn teal, orange, white and brown. 3.5mm crochet hook. Embroidery needle and scissors. Toy stuffing. 4 x clip markers.

Assembly Instructions

  • Sew the head to the body by aligning the square bottom of the head with the top opening of the body, using a mattress stitch and the yarn tail left after closing the head to secure it firmly.
  • Attach arms on either side of the body by pinning them level with the shoulder rounds and sewing with a whipstitch or mattress stitch for a neat finish.
  • Position legs evenly across the base; for characters joined from two legs, ensure the seam and chain join are centered before sewing the joined body closed.
  • Place clip markers for facial features and sew facial details (eyes, mouth, nose) using contrasting yarn, sewing the shape outline first and then filling in with colour.
  • For square tops: after decreasing to the remaining 8 stitches, pick up only the front loop of each remaining stitch, pull tight to close and weave in the tail securely before finishing.
  • Pin all parts in place before final sewing to ensure symmetry, then tack pieces lightly and stitch securely using a yarn needle and matching yarn.

Important Notes

  • πŸ’‘Do not join the yarn at the end of rounds unless stated; work in a continuous spiral and place a stitch marker at the start of rounds if you struggle with stitch counts.
  • πŸ’‘Numbers written inside { } (or parentheses here) state the number of stitches at the end of the round; always check this to confirm your stitch count.
  • πŸ’‘When decreasing use the invisible decrease method when possible and use the invisible colour change method for neat colour transitions.
  • πŸ’‘Always pin your work into place before you sew together and stuff as you go to maintain shape and make joining easier.

This Minecraft amigurumi collection brings your favorite blocky characters to life with DK yarn and friendly shaping techniques. Create a squad of collectible pals for gifts, decor, or playtime and enjoy the crafting journey. Happy crocheting and sharing smiles with your handmade Minecraft crew! 🧢🧸

You ask,

we answer.

FAQs

What size will the finished piece be?

Finished sizes vary by character but each amigurumi measures approximately 10-15 cm tall when using DK yarn and a 3.5mm hook.

Can I use different yarn weights for this pattern?

Yes, you can use different yarn weights but this will change the final size; adjust your hook accordingly to maintain fabric density and shaping.

Do I need prior crochet experience for this pattern?

This pattern is rated intermediate, so basic knowledge of crochet stitches (SC, increases, decreases) and working in the round is recommended.

How long does this project typically take to complete?

Most crocheters complete an individual character in about 5-7 hours, while a whole set may take longer based on detail and assembly time.