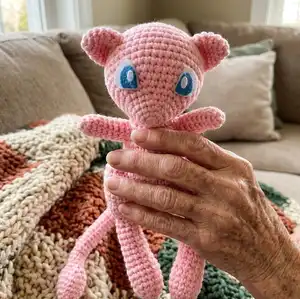
Make your own adorable Mew plushie with this complete crochet pattern. This pattern guides you through each round and assembly step so you can create a cuddly, poseable Pokemon-inspired friend. Suitable for crafters who enjoy shaping and simple assembly, the pattern uses worsted weight yarn and felt eyes for a soft finish. Follow the step-by-step rounds and recommendations to get a neat, tight stitch and a charming finished plushie.
Progress Tracker
0% Complete
— Materials :
Info :
WW yarn pink. G Hook. Pieces of white and blue felt (for eyes). Yarn Needle. Fiberfill.
— Notes :
Infos :
Gauge isn't really important, as long as your hook and yarn combination results in a fairly tight stitch to prevent fiberfill from coming through. Numbers in ( ) at the end of each round/row indicate the total number of stitches in that rnd/row.
— Head :
Round 1 :
6 sc in Magic Ring (6)
Round 2 :
sc in next sc, 2 sc in next sc around (9)
Round 3 :
sc in next 2 sc, 2 sc in next sc around (12)
Round 4 :
sc in next sc, 2 sc in next sc around (18)
Round 5 :
sc in each sc around (18)
Round 6 :
sc in next 2 sc, 2 sc in next sc around (24)
Round 7 :
sc in next 3 sc, 2 sc in next sc around (30)
Round 8 :
sc in next 4 sc, 2 sc in next sc around (36)
Round 9 :
sc in next 5 sc, 2 sc in next sc around (42)
Round 10-16 :
sc in each sc around (42)
Round 17 :
sc next 19 sc, dec over next 2 sc around (40)
Info :
You will likely want to begin stuffing at this point and continue as work progresses. Stuff fairly firmly, shaping the head as you go.
Round 18 :
sc next 2 sc, dec over next 2 sc around (30)
Round 19 :
sc next sc, dec over next 2 sc around (20)
Round 20 :
dec over next 2 sc around (10)
Info :
F/O leaving tail. Add any stuffing you need to in order to finish shaping the head. Weave the tail into the final round of sc, and pull to close. Weave in end.
— Body :
Round 1 :
8 sc in Magic Ring (8)
Round 2 :
2 sc in each sc around (16)
Round 3 :
sc in next sc, 2 sc in next sc around (24)
Round 4 :
sc in next 2 sc, 2 sc in next sc around (32)
Round 5-14 :
sc in each sc around (32)
Round 15 :
sc in next 6 sc, dec over next 2 sc around (28)
Round 16 :
sc in each sc around (28)
Round 17 :
sc in next 5 sc, dec over next 2 sc around (24)
Info :
Begin stuffing at this point if you haven't already, and continue stuffing as work progresses. Stuff fairly firmly, shaping the body as you add stuffing.
Round 18 :
repeat Rnd 16 (24)
Round 19 :
sc in next 4 sc, dec over next 2 sc around (20)
Round 20-21 :
repeat Rnd 16 (20)
Info :
Begin forming nape of neck:
Row 22 :
sc next 9 sc leaving remaining stitches unworked, do not ch 1 TURN (9)
Row 23 :
skip first sc, sc each sc across to end, do not ch 1, turn (8)
Row 24 :
skip first sc, sc each sc across to last 2 sc, dec over last 2 sc (6)
Info :
F/O leaving tail. Finish adding any stuffing needed to shape the body. Do not close up neck opening.
— Legs (make 2) :
Round 1 :
8 sc in Magic Ring (8)
Round 2 :
sc in next sc, 2 sc in next sc around (12)
Round 3 :
sc in next 2 sc, 2 sc in next sc around (16)
Round 4-8 :
sc in each sc around (16)
Round 9 :
sc in next 2 sc, dec over next 2 sc around (12)
Round 10 :
sc in each sc around (12)
Round 11 :
sc in next 4 sc, dec over next 2 sc around (10)
Round 12 :
sc in each sc around (10)
Round 13 :
Stuff leg. Don't stuff too firmly, but enough to give definition to the leg. Flatten the opening and working through both layers of stitches, sl st together.
Info :
F/O, weave in end thru the last row of sl st and pull very slightly to tighten the end of the leg. Tie off.
— Feet (make 2) :
Round 1 :
6 sc in Magic Ring (6)
Round 2 :
sc in next sc, 2 sc in next sc around (9)
Round 3 :
sc next 2 sc, 2 sc in next sc around (12)
Round 4-7 :
sc in each sc around (12)
Round 8 :
sc next 4 sc, dec over next 2 sc around (10)
Round 9-11 :
sc in each sc around (10)
Info :
Begin stuffing here and continue as you go. Stuff feet VERY lightly (you can skip stuffing the feet if you want, depending on how heavy the yarn is that you used)
Round 12 :
sc in next 3 sc, dec over next 2 sc around (8)
Round 13-15 :
sc in each sc around (8)
Info :
Flatten the final row and working through both layers, sl st together (4 sl sts)
Info :
Sew the last round of the feet (the flattened end) to the flattened end of the legs. Weave in ends.
— Arms (make 2) :
Round 1 :
4 sc in Magic Ring (4)
Round 2 :
sc in next sc, 2 sc in next sc around (6)
Round 3 :
sc in each sc around (6)
Round 4 :
sc in each sc around to last sc, 2 sc in last sc (7)
Round 5 :
sc in each sc around (7)
Round 6 :
sc in each sc around to last sc, 2 sc in last sc (8)
Round 7-9 :
sc in each sc around (8)
Info :
F/O Stuff arms lightly to desired shape.
— Ears (make 2) :
Round 1 :
4 sc in Magic Ring (4)
Round 2 :
2 sc in each sc around (8)
Round 3 :
sc in next sc, 2 sc in next sc around (12)
Round 4 :
sc in next 2 sc, 2 sc in next sc around (16)
Round 5 :
sc in next 3 sc, 2 sc in next sc around (20)
Round 6 :
sc in each sc around (20)
Info :
F/O Flatten ears to shape (do not stuff).
— Tail :
Round 1 :
4 sc in Magic Ring (4)
Round 2 :
sc in next sc, 2 sc in next sc around (6)
Round 3 :
sc in next 2 sc, 2 sc in next sc around (8)
Round 4 :
sc in next 3 sc, 2 sc in next sc around (10)
Round 5 :
sc in next 4 sc, 2 sc in next sc around (12)
Round 6 :
sc in next 2 sc, 2 sc in next sc around (16)
Round 7-8 :
sc in each sc around (16)
Round 9 :
sc in next 2 sc, dec over next 2 sc around (12)
Round 10 :
sc next sc, dec over next 2 sc around (8)
Info :
Stuff tail very lightly just to shape.
Round 11 :
sc next 2 sc, dec over next 2 sc around (6)
Round 12-55 :
sc in each sc around (6)
Info :
Continue stuffing the tail as you progress every few rounds. How stiffly you stuff the tail is up to you. I stuffed the long portion of the tail only moderately, to allow for some movement, but still maintain the overall roundness.
Info :
After Rnd 55: Flatten the end and working thru both layers, sc across. F/O (3 sc)
Info :
(NOTE: If you like, you can add a long piece of medium gauge wire in the tail to allow it to be fully poseable. Be sure to securely tape any sharp points before adding though, to prevent them from poking through and damaging the stitches.)
— Final Assembly :
Info :
I highly recommend that you pin ALL the pieces together before sewing together. This will allow you to make changes and adjustments to get the overall look you want.
Info :
Sew head to neck with the 'nape' of the neck in the back. The head should be tilted downward (as shown in the pictures). If you like, you can tilt the head a little to the side, as Mew is cutest when it has that 'curious' head tilt.
Info :
Sew arms to body as shown. Sew the legs to either side of the lower body as shown. Position them so that the 'flattened' joint between legs and feet is slightly lower than the body, to allow for freer movement of the feet.
Info :
Sew Ears to top of head positioned as shown. Curve the flattened ears slightly to give the shape desired (use pictures for help in placement)
Info :
Sew Tail to lower part of body on the back centered between the legs. (see pictures)
— Eyes & Finishing :
Info :
For the eyes, I recommend cutting shapes from paper first and pinning in place to ensure that you have the size and shape desired. Mew's eyes can be a little difficult to get the right shape and size, so working with paper first will save you 'alot' of headaches with the felt. Cut two shapes in white felt, and then two inner pieces from blue felt (using picture as a guide for shapes) Sew in place after pinning first to ensure proper placement.
Info :
Cut two more very small white circles for 'catch lights' in the eyes, and sew (or glue) to the black felt in the positions shown.
This delightful Mew plushie combines classic amigurumi shaping with a long, expressive tail for play and display. The pattern includes detailed round-by-round instructions and helpful assembly notes to guide you from start to finish. Make one for yourself or as a special handmade gift to delight any Pokemon fan. 🧶✨