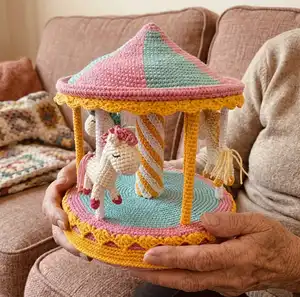
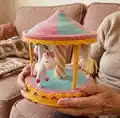
Create a delightful crocheted merry-go-round complete with three tiny horses and a rotating carousel frame. This pattern walks you through materials, step-by-step crochet rounds, and assembly using simple hardware pieces for a sturdy finish. You'll love the combination of amigurumi techniques and basic woodworking to make a keepsake toy. Perfect as a detailed gift or a special addition to your handmade collection.
Progress Tracker
0% Complete
— Materials :
Info :
Yarn Yarn Art Jeans (55% cotton, 45% acrylic, 160 m/50 g) turquoise (76), pink (78), white (62), yellow (35). Also for the manes and hooves of horses, you will need a small amount of any dark turquoise, light pink and light yellow yarn. Alize Cotton Gold Hobby (55% cotton, 45% acrylic, 165 m/50 g) ivory (01) for horse bodies. Thin black yarn for embroidering eyes. For the frame, you will need 2 round plywood blanks for clocks with a diameter of 20 cm. Also in the craft store grab wooden beads with a diameter of 1 cm, you will need 8 pcs. Screw 8 mm*100 mm, 3 nuts suitable for it (8 mm), 2 large washers and 1 small one. Plastic pipe couplings 5 pcs*20 mm (inner diameter) or alternative cardboard tube kitchen stretch film (outer diameter ~28 mm, length ~17 mm per coupling). Synthetic fiberfill, adhesive tape, wooden sticks for manicure 15 cm long 6 pcs, fishing line diameter 1 mm. Tools: 2.25 mm crochet hook, big eyed needle, sewing pins, lighter, glue gun, superglue, pruner.
— Stitch Key :
Infos :
AR – Adjustable Ring (Magic Ring). sc – single crochet. sl st – slip stitch. dc – double crochet. ch – chain. inc – increase. dec – decrease. ( )*n – repeat combination in brackets n times.
— Horses :
Round 3 :
(1 sc, inc)*6 = 18 sc
Round 4-6 :
3 rounds of 18 sc. Finish with a sl st, leave a long end. Set aside the detail (this is the muzzle of a horse).
Info :
Chain 7 with ivory yarn.
Round 1 :
3 sc in the second loop from the hook, 4 sc along the chain, 3 sc in the last loop of the chain. Turn the work and crochet along the bottom side of the chain 4 sc = 14 sc around.
Round 2 :
inc*3, 4 sc, inc*3, 4 sc = 20 sc
Round 3 :
(1 sc, inc)*3, 4 sc, (1 sc, inc)*3, 4 sc = 26 sc
Round 4 :
(1 sc, inc, 1 sc)*3, 4 sc, (1 sc, inc, 1 sc)*3, 4 sc = 32 sc
Round 5-8 :
4 rounds of 32 sc
Round 10-12 :
Do not continue the round, but go right to the first st of the round (the first one after the marker) and work spiral rounds of the 14 sc. Sc 3 rounds up - it should be the neck.
Info :
Thread the end of the yarn from the muzzle into the needle and sew to the neck. To do this sew together 2 sc of the neck (right in the center of the neck front) and 2 sc of the muzzle. It should look like this.
Round 13 :
Work around both parts 28 sc.
Round 14 :
Make a decrease at the junction of the neck with the muzzle on both sides, it turns out 26 sc.
Round 15 :
Make 1 more decrease on both sides in the same place, 24 sc remain.
Round 17 :
(2 sc, dec)*6 = 18 sc. Stuff the neck and the muzzle of the horse.
Round 18 :
(1 sc, dec)*6 = 12 sc
Round 19 :
Dec every st until the opening closes, adding fiberfill if necessary. Cut the yarn and hide the end.
Info :
Stuff the body and sew the opening on the back.
— Legs :
Info :
Start crocheting with colored yarn: 6 sc in AR, then sc one more round of 6 sc with colored yarn and 4 rounds of ivory yarn. Finish with a sl st. Do not stuff, leave a long end. Make 4 pcs. Sew the legs to the body.
— Ears :
Info :
For ears crochet small triangles with ivory yarn. Chain 5.
Round 2 :
Do not make a turning ch, insert the hook right into the second st = 3 sc
Round 3 :
Do not make a turning ch, insert the hook right into the second st = 2 sc
Round 4 :
Do not make a turning ch, insert the hook right into the second st = 1 sc. Leave a long end.
Info :
Thread the end of the yarn into the needle and sew together the 2 corners of the triangle. Sew the ear to the horse head. Crochet and sew the second ear in the same way.
— Mane and Tail & Finishing :
Info :
Crochet the mane with yarn a little lighter than the hooves. Attach the yarn to the forehead of the horse, crochet 3 ch and 2 dc in the same point. Next, crochet along the neck for 3 dc from each point. The hook is simply inserted under the posts along an imaginary line. At the end, crochet 2 dc and 3 ch, finish with a sl st. Cut the yarn and hide the end.
Info :
For the tail, cut 4 pieces of yarn 10 cm each. Fasten one thread at a time. Embroider eyes with thin black yarn.
Info :
Crochet 2 more horses in other colors following the same steps for body, muzzle, legs, ears, mane and tail.
— Carousel Frame & Base :
Info :
Glue 5 plastic sleeves together with ordinary tape or cut a cardboard tube/plastic pipe with a diameter of 28 mm and a length of about 17.5 cm. Glue 4 beads on one of the wooden circles at the same distance. Glue 4 more beads between them on the other side. Insert the screw into the hole and fix it with a nut on the reverse side, applying a drop of superglue under the nut. Put washers on the screw in this order: large, small, large. Put a second wooden circle on the screw. Check that it should spin freely without touching the beads. The beads will prevent it from falling sideways.
Info :
Let's start crocheting the base. Work spiral rounds with turquoise yarn using a marker. Use a contrasting color piece of yarn as a marker.
Round 1 :
Chain 12, sl st in the 1st loop.
Round 2 :
(1 sc, inc)*6 = 18 sc
Round 3 :
1 sc, inc, (2 sc, inc)*5, 1 sc = 24 sc
Round 4 :
(3 sc, inc)*6 = 30 sc
Round 5 :
2 sc, inc, (4 sc, inc)*5, 2 sc = 36 sc
Round 6 :
(5 sc, inc)*6 = 42 sc
Round 7 :
3 sc, inc, (6 sc, inc)*5, 3 sc = 48 sc
Round 8 :
(7 sc, inc)*6 = 54 sc
Round 9 :
4 sc, inc, (8 sc, inc)*5, 4 sc = 60 sc
Round 10 :
(9 sc, inc)*6 = 66 sc
Round 11 :
5 sc, inc, (10 sc, inc)*5, 5 sc = 72 sc
Round 12 :
(11 sc, inc)*6 = 78 sc
Round 13 :
6 sc, inc, (12 sc, inc)*5, 6 sc = 84 sc
Round 14 :
(13 sc, inc)*6 = 90 sc
Round 15 :
7 sc, inc, (14 sc, inc)*5, 7 sc = 96 sc
Round 16 :
(15 sc, inc)*6 = 102 sc
Round 17 :
8 sc, inc, (16 sc, inc)*5, 8 sc = 108 sc
Round 18 :
(17 sc, inc)*6 = 114 sc
Round 19 :
9 sc, inc, (18 sc, inc)*5, 9 sc = 120 sc
Round 20 :
(19 sc, inc)*6 = 126 sc
Round 21 :
10 sc, inc, (20 sc, inc)*5, 10 sc = 132 sc
Info :
Change yarn to the pink and continue crocheting to the edge of the wooden circle. Keep in mind that due to varying gauges, you may need more or fewer rounds in the base circle.
Round 22 :
(21 sc, inc)*6 = 138 sc
Round 23 :
11 sc, inc, (22 sc, inc)*5, 11 sc = 144 sc
Round 24 :
(23 sc, inc)*6 = 150 sc
Round 25 :
12 sc, inc, (24 sc, inc)*5, 12 sc = 156 sc. Finish with a sl st. Do not fasten off.
Round 26 :
156 sc through the back loops.
Round 27-31 :
3 rounds of 156 sc through the both loops. Finish with a sl st. Cut the yarn.
Info :
Join yellow yarn to the 25th round and work through the front loops: skip 2 st, (3 dc, 1 ch, 3 dc) in the third st. Skip 2 st, 1 sc in the 6th st. Repeat around. Cut the yarn and fix the end.
Info :
Join yellow yarn to the end of the last pink round and sc in the pink st capturing the ch loop on the top of the yellow corners. At these points, crochet 2 sc in 1 st. It turns out alternation (5 sc, inc)* until the end of the round.
Info :
Crochet 3 more rounds without inc. Put the crocheted canvas on the base, gluing it to the plywood around the screw by about half the radius.
Info :
Tighten the 2 nuts in such a way that there is a gap of about 1-2 mm between the floor and the lower nut so that the top circle can rotate. Glue nuts with superglue.
— Central Post :
Info :
Crochet the central post with yellow and white colors. Chain as long as necessary to wrap around the pipe. Sl st in the 1st loop. I got 24 loops. Now we need to calculate the stripes pattern. I will have an alternation of 2 yellow and 3 white sc. For even stripes, 25 sc in a round will need. In order for the strips to twist, we need 1 loop less, that is, just 24. If you got a different amount of ch, try another pattern, for example 2 yellow and 2 white sc. Then the number of loops should be a multiple of 4 minus 1 (23 or 27). Or 3 yellow and 3 white, then the number of loops should be a multiple of 6 minus 1 (23 or 29).
Info :
Crochet 2 yellow sc, 3 white sc. Change the yarn color in this order: leave the second yellow sc incompleted (2 loops on the hook). Finish the yellow st with white yarn and continue crocheting with white.
Info :
Due to the lack of one loop, the colored stripes will shift and spiral. Crochet as high as the pipe is, insert the pipe inside. Cut the yarn and hide the ends.
Info :
Glue the lower edge of the pipe to the base with a glue gun. Be careful not to get glue on the screw and nuts, otherwise it will interfere with the rotation of the carousel. For reliability, also sew the bottom of the pipe to the base, using white and yellow yarn alternately.
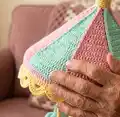
— Roof (roof canvas with fishing line) :
Info :
To keep the roof in shape, we will crochet it with fishing line. Need an ordinary fishing line with a diameter of 1 mm. Clamp the skein with such a hairpin to prevent tangling. Melt the tip of the fishing line with a lighter to form a ball at the end so it will not slip out of crocheting.
Round 1 :
Start crocheting with pink yarn. 6 sc in AR
Round 2 :
inc*6 = 12 sc. Starting from the second round, apply the fishing line to the previous round and crochet so that it passes under the stitches.
Round 3 :
(1 sc, inc)*6 = 18 sc
Round 4 :
Join turquoise yarn and crochet in this order: (pink 2 sc, inc, turq 2 sc, inc)*3 = 24 sc. Do not forget to change the yarn color correctly.
Round 5 :
(pink 3 sc, inc, turq 3 sc, inc)*3 = 30 sc
Round 6 :
(pink 4 sc, inc, turq 4 sc, inc)*3 = 36 sc
Round 7 :
(pink 5 sc, inc, turq 5 sc, inc)*3 = 42 sc
Round 8 :
(pink 6 sc, inc, turq 6 sc, inc)*3 = 48 sc
Info :
Important! The roof scheme corresponds to the usual flat circle. The shape will depend on the tension of the fishing line. In the beginning, try to pull the line a little more to get a conical shape. The farther from the middle, the looser the fishing line should lie so that the shape becomes flatter towards the edges. Crocheting should not be too loose, the stitches should hold the fishing line tightly.
Round 9 :
(pink 7 sc, inc, turq 7 sc, inc)*3 = 54 sc
Round 10 :
(pink 8 sc, inc, turq 8 sc, inc)*3 = 60 sc
Round 11 :
(pink 9 sc, inc, turq 9 sc, inc)*3 = 66 sc
Round 12 :
(pink 10 sc, inc, turq 10 sc, inc)*3 = 72 sc
Round 13 :
(pink 11 sc, inc, turq 11 sc, inc)*3 = 78 sc
Round 14 :
(pink 12 sc, inc, turq 12 sc, inc)*3 = 84 sc
Round 15 :
(pink 13 sc, inc, turq 13 sc, inc)*3 = 90 sc
Round 16 :
(pink 14 sc, inc, turq 14 sc, inc)*3 = 96 sc
Round 17 :
(pink 15 sc, inc, turq 15 sc, inc)*3 = 102 sc
This merry-go-round amigurumi brings tiny horses and a spinning carousel to life with crochet and simple hardware. It's a joyful mix of soft amigurumi and a practical rotating frame that makes the piece interactive and delightful. Whether for a gift or a keepsake, it becomes a whimsical centerpiece full of charm and handmade love. 🎠🧶