Create an adorable baby mermaid costume complete with a scalloped tail, detachable flippers, a matching headband and your choice of a shell or starfish bikini top. This pattern walks you through the tail shaping, scalloped edging, fins construction and accessories with clear, photo-referenced steps so you can customize size and color. Perfect for photo props, gifts, or imaginative play, the versatile design adapts to yarn weight and hook size for multiple baby sizes.
Progress Tracker
0% Complete
— Tail :
Round 1 :
Magic circle, ch2, 6 dc in circle, joins with sl st into 1st dc. Tighten circle so there is not hole showing. 6dc. (At this point you should have what looks like a tiny cup)
Round 2 :
Ch 2, *1dc in 1st st, 2 dc in next st. Repeat from * around. Join w sl st in 1st dc. 9 dc(keep your stitches snug, but not too tight, you are building the base of the tail).
Round 3 :
Ch2, *1dc, in next 2 sts, 2 dc in next st. Repeat from * around. Join w sl st in 1st dc. 12 dc
Round 4 :
Ch2, *1dc in next 2 sts, 2 dc in next st. Repeat from * around. Join w sl st in 1st dc. 16 dc
Round 5 :
Ch 2, 1dc in each st around. Join w sl st in 1st dc. 16 dc
Round 6 :
Ch 2, *1dc in next 3 sts, 2 dc in next. Repeat from * around. Join w sl st in 1st dc. 20 dc
Round 7 :
Ch 2, 1dc in each st around. Join w sl st in first dc. 20 dc
Round 8 :
Ch2, *1dc in next 4 sts, 2 dc in next st. Repeat from * around. Join with sl st in 1st dc. 24 dc
Round 9 :
Ch 2, 1 dc in each st around. Join w sl st in first dc. 24 dc
Round 10 :
Ch 2, 1 dc in each st around. Join w sl st in 1st dc. 24 dc
Round 11 :
Ch2, * 1 dc in next 5 sts, 2 dc in next st. Repeat from * around. Join w sl st in 1st dc. 28 dc
Round 12 :
Ch 2, 1 dc in each st around. Join w sl st in 1st dc. 28 dc
Round 13 :
Ch 2, * 1 dc in next 3 stst, 2 dc in next st. Join w sl st in 1st dc. 35 dc.
Round 14 :
Ch 2. 1 dc in each st around. Join w sl st in 1st d . 35 dc
Round 15 :
Ch 2, * 1 dc in next 6 sts, 2 dc in next. Repeat from * around. Join w sl st in first dc. 40 dc
Round 16 :
Ch 2, 1 dc in each st around. Join w sl st in 1st dc. 40 dc
Round 17 :
Ch2, *1dc in next 4 st, 2 dc in next. Repeat from * around. Join w sl st in 1st dc. 48 dc
Round 18 :
Ch 2, 1 dc in each st around. Join w sl st in 1st dc. 48 dc
Round 19 :
Ch 2, *1dc in next 5 sts, 2 dc in next. Repeat from * around. Join w sl st in 1st dc. 56 dc
Round 20 :
Ch 2, 1 dc in each st around. Join w sl st in 1st dc. 56 dc
Round 21 :
Ch 2, 1 dc in each st around. Join w sl st in 1st dc. 56 dc
Round 22 :
Ch 2, 1 dc in each st around. Join w sl st in 1st dc. 56 dc
Round 23 :
Ch 2, 1 dc in each st around. Join w sl st in 1st dc. 56 dc
Round 24 :
Ch 2, *1dc in next 12 sts, dc2tog. Repeat from * around. Join w sl st in 1st dc. 52 dc NOTE***To make a longer, larger fin to fit 3-6 months size, repeat rows #19-23, then continue to #24
Round 25 :
Ch2, * 1dc in next 11 sts, dc2tog. Repeat from * around. Join w sl st in 1st dc. 48 dc
Round 26 :
Ch2, * 1dc in next 10 sts, dc2tog. Repeat from * around. Join w sl st in 1st dc. 44 dc
Round 27 :
Ch 2, 1dc in each st around. Join with sl st in 1st dc. 44 dc.
Round 28 :
SHELL scalloped edge trim on top: ch 3, DC in same st 4x, this creates first shell, **sk 1 st. sl st in the next ch, sk 1 stitch, DC in next st 5x. Continue around until you are back at the beginning. Fasten off; weave in ends on the inside of Tail.
Info :
At the end of each sentence, a notation of how many DC you should have is listed. If you do not have this amount, rip out the row and start over so that the pattern comes out correctly in the end.
Info :
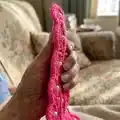
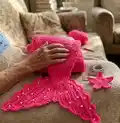
You should have a tail that looks like this & a close up of the scalloped edge.
Info :
**Make a STRING: With same color yarn, chain a long cord, enough to weave into the tail body at the top near the shells, to tighten and gather the outfit so it stays on the little one. It should be long enough to be able to tie like a shoe (more is better than less). Weave in the chain rope with your crochet hook, about every 2 stitches apart, creating the tie towards the back of the outfit, leave tails free.
— Fins :
Round 2 :
1hdc in 2nd ch from hook and each remaining 29 ch. 27hdc
Round 3 :
Ch1 turn, 1 hdc in flo next 26 st, leave last stitch open 26 hdc
Round 4 :
Ch 1 turn, skip 1 st, hdc in flo next 25 sts. 25 hdc
Round 5 :
Ch1 turn, 1hdc in flo next 23 hdc leave last 2 sts open 23 hdc
Round 6 :
Ch 1 turn, skip 1st, 1 hdc in flo next 22 sts. 22hdc
Round 7 :
Ch1 turn, 1 hdc in flo next 21sts, leave last st open. 21 hdc
Round 8 :
Ch1 turn, skip 3 sts, 1 hdc in flo next 18 sts. 18hdc
Round 9 :
Ch1 turn, 1 hdc in flo next 14 sts, sl st next 2 sts. 16 sts
Round 10 :
Ch1 turn, skip 2 sl st. hdc next 14 sts. Fasten off. 14 hdc.
Round 11 :
SHELL: Create a shell stitch on the longest side of the fin (as you did above on the tail top). Start on the edge that is NOT angled. Skip 2 chains on the end before beginning join the yarn 2nd chain from end with a slip stitch. (you won't see this part when the fin is sewn onto the tail so there will be a tiny gap at these ends-don't worry). Start by Ch 3, DC4 x in same st, **sk 1 st. sl st in next ch, sk 1 stitch, DC in next st 5x. Continue to the end of the fin. You should have 4-5 shells. It doesn't matter how many you create, as long as each fin has the same amount so it doesn't look uneven when you sew it on the tail. This example has 5, sometimes I end up with 4. When you come to the end, the last shell will create a rounded edge, fasten off, and weave in ends on back side.
Info :
Your fins should look like this. You will flip the fin on the right over to create this look and sew the two pieces together in the center to create a flipper. You can also slip stitch the 2 pieces together; either way will work just fine.
— Fins Assembly :
Info :
With a yarn needle and same color yarn, sew these two pieces together in the center to create a flipper. With yarn needle and yarn, weave a piece of yarn through the top of your big flipper you just created, leave two tail pieces of yarn at the ends. Pull the 2 ends so the top edging gathers; you can adjust later.
Info :
Pin this gathered flipper to the bottom of your tail that you just created. Make sure your seam area is on either side. Start along one side of the bottom point of the tail, I usually start at the point bottom and count up about 4-5 rows. You can gather and scrunch together and adjust as you go, pinning as you work your way around. Turn it over when your done to see what the front will look like.
Info :
Start pinning 4-5 rows up from bottom point. Close-up of pinned flippers. Backside of the tail with flipper pinned on. Sewing the flippers on the bottom.
Info :
** Do not cut your strings that gather the flippers until you have completely sewn on the flippers. Start hand-sewing with yarn or thread & needle. Do this for the front and back. You can remove your pins once you start attaching the flippers.
Info :
The front side will look like this once you flip it over.
— Scales / Wavy Edge :
Info :
Scales: Use H hook to make a wavy scale look like this at the top of your fin. Using a contrasting yarn of your choice, Join at the seam (usually on the side), with a sl st in the 2nd row underneath of your scalloped edge area. Do not get too close to the top or it will not look right when you're finished. Work very loosely: *ch5, skip 1 st, sl st in next 2 sts. Repeat from * around and join w sl st into first sl st. Repeat until the end. You can make 2-3 rows, whatever you like. Fasten off, tuck ends inside, and finish off.
— Bikini Band for TOP :
Round 1 :
Ch 66(you can chain more for larger sizes, follow this same pattern) If using different texture yarn, size hook, you can adjust as needed; you do not have to chain a total of 66. I base this on how big babies chest is or will be.
Round 2 :
1dc in 2nd ch from hook and in each remaining ch. 6 DC at the end of this row. DO NOT TURN, work on the other side by going around and continuing. This is what it should resemble:
Round 3 :
Join w sl st into 1st dc and fasten off. Sew 1-2 buttons to the end of the top to use as a closure. This makes the top adjustable for most any size.
— Headband :
Round 1 :
Ch 56, DC in 2nd ch from hook * ch 1 and skip a st, dc in next st. Repeat from * to end. Fasten off. Sew button on end for closure. The pattern resemble this effect: (it won't be curved, I curved it for the picture)
— Larger Starfish (HEADBAND) :
Step 2 :
Ch1, 10 sc in circle, tighten and join w sl st in 1s sc. 10sc
Step 3 :
*1sc in 1st st, 2 sc in next sc. Repeat from * around. Join w sl st in 1st sc. 15sc
Step 4 :
Ch 10, sc in 2nd ch from hook, 1 hdc in next 2 ch, dc in next 3 ch, TR in last 2 ch.
Step 5 :
From the start of the point, count to the left 3 chains, insert your hook into the 4th chain and join the first point. It should not be bulky, should be smoothly joined as in the picture.
Step 6 :
Repeat steps 4 & 5. When you go to join the remaining points, you join I the 3rd chain(count 2 open chains to the left, joining in the 3rd chain).
Step 7 :
Do not fasten off, but continue around the entire starfish with a slip stitch, creating a trimmed edge and this will also create a more stable starfish, not too floppy. The ends will still curl a little, but not too much.
Step 8 :
Starfish for headband-sew pearls into the center of the starfish, creating a flower type look; use about 9 pearls. Hand sew the starfish onto the headband. It will be somewhat floppy, which is ok. If you position it correctly, you should be able to sew most of the center on and continue sewing as much as you can to keep it stable on the headband.
Step 9 :
Starfish for bikini top: After creating (2), sew 1 pearl in the center of each starfish, hand sew each starfish onto the bikini band. The tinier the size, the closer together the starfish will go; keep in mind these are covering the nipple areas of the baby.
— Smaller Starfish :
Step 2 :
Ch1, 10 sc in circle, tighten and join w sl st in 1s sc. 10sc
Step 3 :
*1sc in 1st st, 2 sc in next sc. Repeat from * around. Join w sl st in 1st sc. 15sc
Step 4 :
Ch 7, sc in 2nd ch from hook, 1 hdc in next 2 ch, dc in next ch, trc in last 2 ch.
Step 5 :
Skip a st and sc in next 2 sts
Step 6 :
Repeat steps 4 & 5 four more times. Fasten off.
— Shell Cups :
Row 1 :
6 chainless sc. Ch 1, turn.
Row 3 :
We will be increasing to 11 in this round. This row will alternate DC, FPDC, DC, FPDC, DC, FPDC, DC, FPDC, DC, FPDC, DC. Start with a standing double crochet (or chain 3 to count as first DC). Then make a DC in the front post of previous sc row SAME SPACE. *DC in next st. DC front post in SAME STITCH.* Continue* to end. End with DC. This row can get tricky, and I apologize for not having any close ups of this part. Just play around with it, and as long as you have alternating DCs and FPDCs adding up to 11 it should work!
Row 4 :
Standing Double Crochet OR Ch 3, then BPDC, DC, BPDC, DC, BPDC, DC, BPDC, DC, BPDC, Dc. (11 st).
Row 5 :
Standing Double Crochet OR Ch 3, then FPDC, DC, FPDC, DC, FPDC, DC, FPDC, DC, FPDC, DC. (11 st). Fasten off. Weave in ends.
Info :
TIE AROUND NECK. Chain 45. Fasten off. Weave through top outer corners of shells. This part is not adjustable, so go ahead and weave in your ends. ( Step A)
Info :
TIE AROUND UPPER WAIST: Chain 75. Fasten off. Weave through bottom two corners of each shell. Once your ends are weaved in, they should measure the same length on either side (similar to a regular bathing top). (Step B)
This mermaid costume pattern brings imaginative photo-ready style to your handmade projects! Create a scalloped tail, gathered flippers and pretty starfish or shell accents for a magical, customizable outfit. Perfect for baby photos, gifts, or playful dress-up — make one in bright colors or soft pastels to match your theme. 🧜♀️🧶