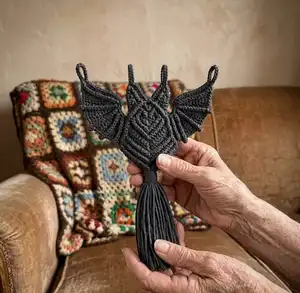
Create a spooky-chic macrame bat wall hanging that adds handcrafted charm to any room. This pattern walks you through basic knots, building the bat body, shaping the wings, and finishing with a neat gathered tassel. You will love the textured V shapes and tiny red eye details that bring this bat to life. Perfect for Halloween decor or year-round boho style.
Progress Tracker
0% Complete
— Basic Knots Used :
Lark's Head Knot Step 1 :
Fold your cord in half, and place the looped in over your dowel.
Lark's Head Knot Step 2 :
Bring the ends of the cord through the loop and tighten it up to secure.
Reserve Lark's Head Knot Step 1 :
Fold your cord in half, and place the looped in over your dowel.
Reserve Lark's Head Knot Step 2 :
Bring the ends of the cord through the loop. Pull the ends to tighten the loop.
Square Knot Step 1 :
Cross the left cord across the center cords and behind the right cord.
Square Knot Step 2 :
Bring the right cord behind the center cords and pull the end through the loop on the far left.
Square Knot Step 3 :
Pull the ends to tighten. This is half of the square knot.
Square Knot Step 4 :
Bring the right cord in front of the center cords to continue the knot sequence.
Square Knot Step 5 :
Bring the left cord behind the center cords and pull the end through the loop on the far right to finish the knot.
Square Knot Step 6 :
Tighten and the square knot is complete.
Double Half Hitch Knot Step 1 :
Hold the left cord in front of the other cords in an L shape; this will be the filler cord.
Double Half Hitch Knot Step 2 :
Bring the next cord over, up and around the filler cord to make a half hitch knot.
Double Half Hitch Knot Step 3 :
Pull the end of the cord to tighten.
Double Half Hitch Knot Step 4 :
Repeat that again with the same cord to make a double half hitch knot.
Double Half Hitch Knot Step 5 :
Tighten up the knot and continue across the row with each cord.
Double Half Hitch Knot Step 6 :
Repeat across the row with each working cord to create diagonal lines and shapes.
Gathering Knot Step 1 :
Fold the right end of the separated working cord to create a facing-down loop on top of the filler cords.
Gathering Knot Step 2 :
Use the left end of the working cord to wrap the filler cords and the loop several times.
Gathering Knot Step 3 :
Pass the end of the working cord used for wrapping through the small loop at the bottom.
Gathering Knot Step 4 :
Continue wrapping the working cord 5-7 times. Leave a smaller loop at the bottom for the final tuck.
Gathering Knot Step 5 :
Pull the top end of the working cord to bring the loop inside the wrap. Then, pull both ends to secure and tighten the knot.
Gathering Knot Step 6 :
Trim both ends of the working cord and tuck them inside the knot for a clean look.
— Instructions :
Info :
Hang the wooden dowel on 2 S hooks. And start with Lark's Head knot.
Step 1 :
Fold 72" cord in half, and place the looped in over the dowel.
Step 2 :
Bring the ends of the cord through the loop and tighten it up to secure.
Step 3 :
Repeat again with a second 72" cord, placing it next to the first on the dowel.
Step 4 :
Add a 72" cord to the right cord by Reverse Lark's Head knot (attach by folding in half, placing loop over dowel, pulling ends through the loop on the right side).
Extended Reverse Lark's Head Step 1 :
After you attach the cord to your dowel with a lark's head knot, take the right cord and bring it behind and over the dowel.
Extended Reverse Lark's Head Step 2 :
Bring the end of the cord down through the loop and tighten to form the extended reverse lark's head knot.
Extended Reverse Lark's Head Step 3 :
Do the same thing on the left side so both sides mirror each other.
Step 5 :
Push the knot next to the first knot, keeping them snug and even along the dowel.
Step 6 :
Repeat with one 72" cord, continuing to add cords across the dowel as shown to create the hanging panel.
Step 7 :
Do the same with the second middle cord by tying two 72" cords with reverse and extended reverse lark's head knots to build the center section.
Step 8 :
Cross the two middle cords, use a 72" cord and tie Extended Reverse Lark's Head knot to create the central V shape on top.
Step 9 :
Now, take the left outermost cord as the filler cord, hold it at a diagonal angle and tie Double Half Hitch knots across the group of cords to form a diagonal row. Repeat the steps to create neat diagonal lines.
Step 10 :
Repeat the double half hitch rows, tightening each knot to match the previous rows and shaping the V contour for the bat body.
Step 11 :
Repeat the same process on the right side mirrored, making diagonal double half hitch rows to match the left side and form a symmetrical bat body.
Step 12 :
Use five left cords as working cords and the 6th cord as filler cord; tie Double Half Hitch knots for two sides as indicated to deepen the V shape and add texture.
Step 13 :
Now you will create the bat's eyes using 8" red cords. Fold each 8" red cord in half and add to the charcoal cord by Reverse Lark's Head knot positioned in the center V area.
Step 14 :
Make square knots with 4 middle cords where indicated to secure and define the center section near the red eye cords. Follow the square knot steps to form the small center knot cluster.
Step 15 :
Use the 6th left cord as filler cord and the next two cords as working cords; tie two double half hitch knots diagonally to continue shaping the upper wing segments.
Step 16 :
Repeat the same on the right side, tying three knots as needed to form the first V shape. Continue repeating steps to create three additional V shapes down the center as shown.
Step 17 :
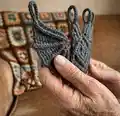
To make Bat's Wing (left side), fold a 72" cord in half and add to the dowel by Reverse Lark's Head knot. Then add four 72" cords to the right cord using Extended Reverse Lark's Head knot to start the wing panel.
Step 18 :
Use the left outermost cord as filler cord. Tie Double Half Hitch knots from left to right across the group of cords to create the wing "ribs"; then switch and use the right outermost as filler to continue shaping the wing. Tie 4 rows with Double Half Hitch knots to build the wing texture.
Step 19 :
Repeat steps to create the right wing, mirroring the left. You will also need the left five 72" cords to make the right wing sections so both wings match and the result will show symmetrical wing ribs.
Step 20 :
Use the outermost cords as filler cords and continue tying Double Half Hitch knots to lengthen and refine the wing tips and shape as desired.
Step 21 :
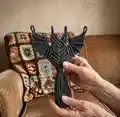
Use 20" charcoal cord to tie a Gathering knot at the base (center underside) of the bat to gather the cords into a tidy tassel. Hold 20" cord in a U shape with the short side on the left, then wrap the long end around the bundle until the wrap length you want.
Step 22 :
Bring the end you have been wrapping with through the loop at the bottom, pull the short cord at the top to bring the loop halfway up into the wrapped section, and cut both ends close to the wraps. Use the tip of scissors to tuck the ends under the wraps for a neat finish.
Step 23 :
Use an Overhand knot to tie the ends of the cords if needed and cut any leftover cords to the desired length for fringe, trimming and neatening the ends.
Info :
Finally, you have a Macrame Bat Wall Hanging done!
This Macrame Bat Wall Hanging pattern is a delightful mix of classic knotting and playful design, perfect for seasonal flair or year-round boho decor. The pattern uses common macrame techniques to build texture, wings, and a tidy tassel finish that makes a lovely handmade statement. Try it in charcoal for classic contrast or in bright colors for a whimsical twist. 🧵🦇