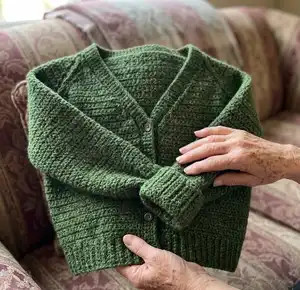
This cropped cardigan features a cabled raglan yoke and flattering V-neck, worked bottom-up in the round and steeked for a clean finish. The pattern includes clear instructions for ribs, steek placement, raglan decreases with cables, and finishing the neck bands and button band. Perfect for knitters who enjoy textured details and a tailored cropped silhouette.
Progress Tracker
0% Complete
— HEM :
Cast On :
With 3 mm / US 2.5 ndl, cast on 141 (165) 189 (201) 209 (233) 257 (273) sts.
Row 1 (RS) :
Sl1, [p1, k1] to end.
Row 2 (WS) :
Sl1, [k1, p1] to end.
Info :
Slip all stitches purlwise unless otherwise specified.
Repeat :
Repeat Rows 1-2 until the piece measures 1.5 cm / 0.5 inches finishing on a WS row. Here you will be adding the first buttonhole.
Buttonhole Row (RS) :
Sl1, k4 (4) 4 (4) 6 (6) 6 (6), k2tog, yo, continue in pattern to end.
Buttonhole Placement :
Work a buttonhole on the RS every 4 cm / 1.5 inches. Continue in this manner until the garment measures approx. 12 cm / 4.75 inches, adjust the length so it fits your upper body and waist.
— ADDING STEEK :
Set Aside Sts :
For the button band and the buttonhole band, slip the first and last 9 (9) 11 (11) 13 (13) 15 (15) sts on to a st holder. These sts will be picked up and worked later.
Cast On Steek :
Cast on 5 sts for the steek and work the steek as follows: p2, k1, p2.
Info :
The first stitch after the steek is now the BOR; the rnd ends before the steek. Keep in mind that the steek sts are not included in the overall st count.
St Count :
You should now have 123 (147) 167 (179) 183 (207) 227 (243) sts, excl. the 5 steek sts, on your ndl.
Join :
Switch to 3.5 mm / US 4 ndls and join to work in the rnd. Work 1 cm / 0.5 inches in stockinette st in the rnd.
— INCREASE FOR THE BUST :
Place Markers :
Place markers as follows (do not knit on this rnd), sl10 (11) 13 (14) 15 (17) 18 (19), pm, sl39 (48) 53 (57) 57 (65) 73 (78), pm, sl25 (29) 35 (37) 39 (43) 45 (49), pm, sl39 (48) 53 (57) 57 (65) 73 (78), pm, sl10 (11) 13 (14) 15 (17) 18 (19) sts (+ 5 steek sts).
Next Rnd (Inc Rnd) :
[K to M, m1R, sm, k1, m1L, k to 1 st before next M, m1R, k1, sm, m1L] twice, k to end and then work the steek in pattern. – 8 sts inc'd
Continue :
Continue working in the rnd and work the Inc Rnd every 1.5 cm / 0.5 inches, a total of 6 (6) 6 (6) 7 (7) 7 (8) times.
St Count After Increases :
You should have 171 (195) 215 (227) 239 (263) 283 (307) sts on your ndl excl. the 5 steek sts.
Work :
Work another 2 cm / 0.75 inches after the final inc. The stockinette stitch should measure approx. 10.5 (10.5) 10.5 (10.5) 12 (12) 12 (13.5) cm / 4.25 (4.25) 4.25 (4.25) (4.75) 4.75 (4.75) 5.25 inches.
Bind Off for Sleeves :
Bind off sts for sleeves as follows: Knit 41 (47) 52 (55) 58 (64) 68 (74) sts, Bind off 6 (6) 6 (6) 6 (8) 8 sts, Knit 77 (89) 99 (105) 111 (123) 131 (143) sts, Bind off 6 (6) 6 (6) 6 (8) 8 sts, knit to end and then work the steek in pattern.
Put Aside :
Put the body aside while you knit the sleeves.
— SLEEVES :
Tip :
The sleeves have a narrow cuff and you'll be increasing the sleeves quite a lot towards the shoulder. If you prefer wider cuffs, cast on more sts and inc fewer times.
Cast On Sleeves :
With 3 mm / US 2.5 ndls, cast on 40 (42) 42 (44) 44 (46) 46 (48) sts. Join to work in the rnd and mark the BOR with a M.
Cuff :
Work 1x1 rib, ie., k1, p1, in the rnd until the work measures 12 cm / 4.75 inches, or your preferred length for the cuff.
Switch :
Switch to 3.5 mm / US 4 ndls.
Next Rnd (Inc Rnd) :
M1L, k to end, m1R. – 2 sts inc'd
Frequency of Inc Rnd :
Work the Inc Rnd every 2.5 (2.5) 2 (2) 1.5 (1.5) 1 (1) cm / 1 (1) 0.75 (0.75) 0.5 (0.5) 0.25 (0.25) inches for a total of 11 (12) 14 (16) 19 (22) 26 (29) times.
Sleeve St Count :
You should have 62 (66) 70 (76) 82 (90) 98 (106) sts on your ndls.
Continue :
Continue working in this manner until sleeve measures approx. 44 (44) 45 (45) 46 (46) 47 (47) cm / 17.25 (17.25) 17.75 (17.75) 18 (18) 18.5 (18.5) inches, or the desired length.
Final Sleeve Rnd :
Work to 3 (3) 3 (3) 3 (3) 4 (4) sts before M on the last rnd, bind off the next 6 (6) 6 (6) 6 (8) 8 (8) sts.
Other Sleeve :
Work the other sleeve in the same manner.
— JOINING SLEEVES TO BODY :
Joining Rnd :
K to 4 sts before the underarm bind-off on Right Front, pm, k4, k4 on one of the sleeves, pm, k to 4 sts before end of Right Sleeve, pm, k4, k4 on Back, pm, k to 4 sts before the other underarm bind-off on Back, pm, k4, k4 on the other sleeve, pm, k to 4 sts before end of Left Sleeve, pm, k4, k4 on Left Front, pm, k to end, work steek in pattern.
St Count After Joining :
You should now have 271 (303) 331 (355) 379 (419) 447 (487) sts excl. 5 steek sts on your ndl.
— RAGLAN DECREASES WITH CABLES :
Arrangement :
Continue working the Fronts, Back, Sleeves, and Raglan Cables as follows: Right Front, Cable A, Right Sleeve, Cable B, Back, Cable A, Left Sleeve, Cable B, Left Front.
Cable A :
C8B: slip 4 sts purlwise onto a cable ndl held behind your work, k4, then k4 sts from cable ndl.
Cable B :
C8F: slip 4 sts purlwise onto a cable ndl held in front of your work, k4, then k4 from cable ndl.
Info :
Work the cables every 4th rnd. K the 8 sts the other 3 rnds.
To Begin Raglan :
To begin, you will do the raglan dec only on the front and back pieces. Slip all M as you come to them.
Next Rnd :
K to 2 sts before 1st M, k2tog, k to 4th M, sm, ssk, k to 2 sts before 5th M, k2tog, k to 8th M, sm, ssk. – 4 sts dec'd
Repeat :
Work the previous 2 rnds another 2 times.
Next Rnd (Dec Rnd) :
[K to 2 sts before M, k2tog, work in cable pattern to next M, ssk] 4 times, k to end and work the steek in pattern. – 8 sts dec'd
Continue :
Work the previous 2 rnds a total of 8 (6) 5 (6) 9 (11) 13 (15) times.
St Count :
You should have 195 (243) 279 (295) 295 (319) 331 (355) sts excl the 5 steek sts on your ndl.
— V-NECK SHAPING :
Note :
From here on, you will also include a decrease for the V-neck on every other row. Keep in mind that you will still continue with the raglan dec and cables.
Next Rnd (Dec Rnd) :
Ssk, [k to 2 sts before M, k2tog, work in cable pattern to next M, ssk] 4 times, k to 2 sts before end, k2tog, work the steek in pattern. – 10 sts dec'd
Continue :
Work the previous 2 rnds a total of 12 (16) 19 (20) 20 (22) 23 (25) times.
Final Steek :
On the last rnd, bind off steek sts. There should be 2 sts remaining on each front piece and you should have a total of 75 (83) 89 (95) 99 (101) 105 sts on your ndl.
Reinforce :
Reinforce the steek, either by machine sewing, hand sewing or crochet, before separating the fronts along the center column of stitches of the steek.
— BUTTON BAND AND BUTTONHOLE BAND :
Pick Up Band Sts :
Place the 9 (9) 11 (11) 13 (13) 15 (15) sts that were set aside after the ribbed hem back onto a 3 mm / US 2.5 ndl. Cast on 6 extra sts on the cardigan side of sts for the facing that will be used to cover up the steeked edge later.
Work Facing :
Work these 6 sts in Stockinette st. These sts should be purled on a right side row and knitted on a wrong side row. The rest of the band is worked in 1x1 rib following the established pattern.
Buttonhole Band :
For the buttonhole band, add a buttonhole every 4 cm / 1.5 inches on the band, the same way as you did for the ribbed hem, up to where dec for the neck shaping begins, approx 8 (7) 7 (8) 8 (9) 9 (10) holes in total.
Work Bands :
Simply work in pattern for the button band and do not forget to cast on the extra stitches for the facing. Work both bands the same length as the steek, stretch the bands a little before you measure.
Bind Off and Place :
Bind off the sts for the facing and place the ribbed sts on the needle with the rest of the sts (fronts, sleeves, back).
— THE REST OF THE NECK BAND :
Method :
The button band and buttonhole band are worked back and forth and joined to the rest of the garment as you go (knitting the last st from the band together with the live st from the yoke, once every 2 rows).
Finish Bands :
You knit the neck bands onto each front one at a time and finish them by joining the two bands together at the back of the neck using kitchener stitch.
Next Row :
Work 8 (8) 10 (10) 12 (12) 14 (14) sts in pattern, k2tog/p2tog the last st on the band with the first st on the garment, turn work.
Next Row :
Sl1, work 8 (8) 10 (10) 12 (12) 14 (14) in pattern, turn work.
Continue :
Work the last 2 rows until the first 10 neck sts are attached to the band, i.e. when you have just passed the first cable.
Repeat :
[Sl1, work 7 (7) 9 (9) 11 (11) 13 (13) sts in pattern, k2tog/p2tog according to pattern, slide st back to left ndl, k2tog/p2tog. Turn work. Work the remaining 8 (8) 10 (10) 12 (12) 14 (14) in pattern, turn work] until you reach the center of the back piece. Repeat on the other side.
Sts Left on Bands :
You should now have 9 (9) 11 (11) 13 (13) 15 (15) sts left on each band. Using kitchener stitch, sew the last sts together.
Finish :
Sew the gap at the underarms together and weave all ends. Tack down the button band and buttonhole band if not already done, and fasten the facing of the button and buttonhole band loosely. Sew buttons in place.
This cropped cabled cardigan pattern is a joyful mix of traditional texture and modern silhouette, designed to be both wearable and rewarding to knit. The steeked front and neat V-neck bands create a polished finish that you'll reach for season after season. Make one in your favorite sport-weight yarn and enjoy the process from rib to graceful raglan cables. 🧶✨