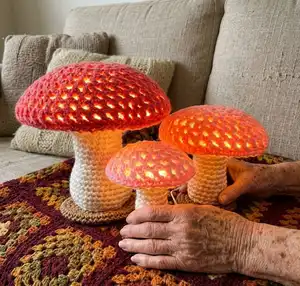
Make a charming trio of illuminated flat mushrooms in small, medium, and large sizes. This pattern guides you step-by-step to crochet caps with internal gills, stems, and self-standing bases, then insert clear craft plastic and LED "fairy lights" to create warm glowing nightlights. Youll enjoy simple shaping techniques, optional color changes, and a no-sew construction that makes gifting easy and fun.
Progress Tracker
0% Complete
— Instructions for All Mushrooms :
Info :
This pattern includes 3 different illuminated mushroom designs, with flat caps and gills that allow LED "fairy lights" hidden inside to cast a warm glow all around. All the mushrooms in this collection are made in one piece from the top all the way down to the self-standing base, with no sewing required.
Infos :
Cut clear craft plastic strips for each size as directed. Small/Medium: cut four strips of 6 mil clear craft plastic. Large: cut six strips of 6 mil clear craft plastic. Use clear tape to fasten two strips together into an X, then layer Xs as directed to create evenly spaced spokes. Insert the finished plastic piece into the cap before completing the gills so the cap keeps shape and the lights diffuse nicely.
Info :
All mushrooms: holding the mushroom cap as though it were a bowl, insert the finished plastic piece inside, matching the center of the plastic spokes with the center of the mushroom cap. Trim off excess plastic even with the last round of single crochet. Continue working the pattern with the fitted plastic inside the cap. Feed the fairy lights up through the base into the mushroom until all lights are inside the cap. Leave the battery control outside the base for easy access.
— Small Size: Lighted Flat Mushroom :
Info :
Cap: With the cap color, ch 2. In second chain from hook, work–
Round 1 :
6 sc. Sl st to join. (6 st)
Round 2 :
ch 3 (counts as first dc + ch), dc in same st, ch 1, (dc, ch 1, dc, ch 1) in next 5 stitches. Sl st in second chain to join. (24 st)
Round 3 :
sl st into ch-1 space, ch 3 (counts as first dc + ch), dc in same st, ch 1, sk st, *dc in next ch-1 space, ch 1, sk st, (dc, ch 1, dc, ch 1) in next ch-1 space, sk st,** repeat from * to ** 4 more times, dc in next ch-1 space, ch 1, sk st. Sl st in second chain to join. (36 st)
Round 4 :
sl st into ch-1 space, ch 3 (counts as first dc + ch), sk st, [dc in next ch-1 space, ch 1, sk st] all the way around. Sl st in second chain to join. (36 st)
Round 5 :
sl st into ch-1 space, ch 3 (counts as first dc + ch), dc in same st, ch 1, sk st, *[dc in next ch-1 space, ch 1, sk st] 2 times, (dc, ch 1, dc, ch 1) in next ch-1 space, sk st,** repeat from * to ** 4 more times, [dc in next ch-1 space, ch 1, sk st] 2 times. (48 st)
Info :
Note: There is no "sl st in second ch to join" between Rounds 5 & 6. Skip the last stitch in Round 5 as instructed, and begin the first sc of Round 6 directly in the second chain. (Fig. S-1)
Round 6 :
sc in each st around. Sl st in first st to join. DO NOT FINISH OFF. (48 st)
Info :
Pause here to insert clear plastic into mushroom cap. Refer to "Instructions for All Mushrooms" for detailed step-by-step directions. After the plastic is in place inside the cap, continue working the mushroom gills.
Round 7 :
– working in back loops only – ch 3 (counts as first dc + ch), sk st, dc in next st, ch 1, sk st, *dc2tog across next 3 st, ch 1, sk st, [dc in next st, ch 1, sk st] 2 times,** repeat from * to ** 4 more times, dc2tog across next 3 st, ch 1, sk st. Sl st in second chain to join. (Fig. S-3 & S-4) (36 st)
Round 8 :
– working in both loops only – ch 3 (counts as first dc + ch), sk st, [dc2tog across next 3 st, ch 1, sk st, dc in next st, ch 1, sk st] 5 times, dc2tog across next 3 st, ch 1, sk st. Sl st in second chain to join. (24 st)
Round 9 :
ch 1 (does not count as first st), [sc in next st, sk st] all the way around. Sl st in first st to join. (Fig. S-5) (12 st)
Round 10 :
– working in front loops only – ch 1 (does not count as first st), sc in each st around. (12 st)
Round 11-14 :
– working in both loops from now on – sc in each st around. (12 st)
Round 15 :
[2 sc in next st, sc in next 3 st] 3 times. (15 st)
Round 16-17 :
sc in each st around. (15 st)
Round 18 :
[invdec, sc in next 3 st] 3 times. DO NOT FINISH OFF. (Fig. S-6) (12 st)
Info :
Use safety-pin style stitch markers to mark the back loops of the first and last stitches of Round 18. These will come in handy later on when finishing the base. (Fig. S-7)
Round 19 :
– working in front loops only – [2 sc in next st, sc in next st] 6 times. (18 st)
Round 20 :
– working in both loops from now on – [sc in next st, 2 sc in next st, sc in next st] 6 times. (24 st)
Round 21 :
sc in each st around. (24 st)
Round 22 :
[sc in next st, invdec, sc in next st] 6 times. (18 st)
Round 23 :
[invdec, sc in next st] 6 times. (12 st) (Fig. S-8)
Info :
Flatten the base to create a disc-shape. Locate the stitch markers from Round 18. Align the first stitch from Round 18 with the first stitch to be worked in the following round.
Round 24 :
sl st through both loops of Round 23 and back loops of Round 18, all the way around. FINISH OFF AND HIDE END. (Fig. S-9) (12 st)
— Medium Size: Lighted Flat Mushroom :
Info :
Cap: With the cap color, ch 2. In second chain from hook, work–
Round 1 :
6 sc. Sl st to join. (6 st)
Round 2 :
ch 3 (counts as first dc + ch), dc in same st, ch 1, (dc, ch 1, dc, ch 1) in next 5 stitches. Sl st in second chain to join. (Fig. M-1) (24 st)
Round 3 :
sl st into ch-1 space, ch 3 (counts as first dc + ch), dc in same st, ch 1, sk st, *dc in next ch-1 space, ch 1, sk st, (dc, ch 1, dc, ch 1) in next ch-1 space, sk st,** repeat from * to ** 4 more times, dc in next ch-1 space, ch 1, sk st. Sl st in second chain to join. (Fig. M-2) (36 st)
Round 4 :
sl st into ch-1 space, ch 3 (counts as first dc + ch), sk st, *(dc, ch 1, dc, ch 1) in next ch-1 space, sk st, [dc in next ch-1 space, ch 1, sk st] 2 times,** repeat from * to ** 4 more times, (dc, ch 1, dc, ch 1) in next ch-1 space, sk st. Sl st in second chain to join. (Fig. M-2) (48 st)
Round 5 :
sl st into ch-1 space, ch 3 (counts as first dc + ch), sk st, [dc in next ch-1 space, ch 1, sk st] 2 times, *(dc, ch 1, dc, ch 1) in next ch-1 space, sk st, [dc in next ch-1 space, ch 1, sk st] 2 times,** repeat from * to ** 4 more times. (60 st)
Round 6 :
sl st into ch-1 space, ch 3 (counts as first dc + ch), dc in same st, ch 1, sk st, [dc in next ch-1 space, ch 1, sk st] 14 times, (dc, ch 1, dc, ch 1) in next ch-1 space, sk st, [dc in next ch-1 space, ch 1, sk st] 14 times. Sl st in second chain to join. (64 st)
Round 7 :
sl st into ch-1 space, ch 3 (counts as first dc + ch), sk st, [dc in next ch-1 space, ch 1, sk st] all the way around. (64 st)
Round 8 :
sc in each st around. Sl st in first st to join. DO NOT FINISH OFF. (64 st)
Info :
Pause here to insert clear plastic into mushroom cap. After the plastic is in place inside the cap, continue working the mushroom gills.
Round 9 :
– working in back loops only – ch 3 (counts as first dc + ch), sk st, [dc in next st, ch 1, sk st] 2 times, dc2tog across next 3 st, ch 1, sk st, [dc in next st, ch 1, sk st] 3 times, dc2tog across next 3 st, ch 1, sk st, [dc in next st, ch 1, sk st] 4 times, dc2tog across next 3 st, ch 1, sk st, [dc in next st, ch 1, sk st] 3 times, dc2tog across next 3 st, ch 1, sk st, [dc in next st, ch 1, sk st] 3 times, dc2tog across next 3 st, ch 1, sk st, [dc in next st, ch 1, sk st] 4 times, dc2tog across next 3 st, ch 1, sk st. Sl st in second chain to join. (Fig. M-5) (52 st)
Round 10 :
– working in both loops from now on – ch 3 (counts as first dc + ch), sk st, *[dc in next st, ch 1, sk st] 2 times, dc2tog across next 3 st, ch 1, sk st,** repeat from * to ** 2 more times, [dc in next st, ch 1, sk st] 3 times, dc2tog across next 3 st, ch 1, sk st, ***[dc in next st, ch 1, sk st] 3 times, dc2tog across next 3 st, ch 1, sk st,**** repeat from *** to **** 1 more time. Sl st in second chain to join. (40 st)
Round 11 :
ch 1 (counts as first half of dc2tog across next 3 st), sk st, dc in next st, ch 1, sk st, [dc2tog across next 3 st, ch 1, sk st] 9 times. Sl st in top of first dc2tog to join. (20 st)
Round 12 :
ch 1 (does not count as first st), [sc in next 8 st, sk st, sc in next st] 2 times. Sl st in first st to join. (Fig. M-6) (18 st)
Round 13 :
– working in front loops only – ch 1 (does not count as first st), sc in each st around. (18 st)
Round 14-17 :
– working in both loops from now on – sc in each st around. (18 st)
Round 18 :
[sc in next 4 st, 2 sc in next st, sc in next 4 st] 2 times. (20 st)
Round 19 :
sc in each st around. (20 st)
Round 20 :
[2 sc in next st, sc in next 9 st] 2 times. (22 st)
Round 21-23 :
sc in each st around. (22 st)
Round 24 :
[sc in next 3 st, invdec, sc in next 4 st, invdec] 2 times. DO NOT FINISH OFF. (Fig. M-7) (18 st)
Info :
Use safety-pin style stitch markers to mark the back loops of the first and last stitches of Round 24. These will come in handy later on when finishing the base. (Fig. M-8)
Round 25 :
– working in front loops only – [2 sc in next st, sc in next st] 6 times. (24 st)
Round 26 :
– working in both loops from now on – [2 sc in next st, sc in next 3 st] 6 times. (30 st)
Round 27 :
[sc in next 2 st, 2 sc in next st, sc in next 2 st] 6 times. (36 st)
Round 28 :
sc in each st around. (36 st)
Round 29 :
[sc in next 2 st, invdec, sc in next 2 st] 6 times. (30 st)
Round 30 :
[invdec, sc in next 3 st] 6 times. (24 st)
Round 31 :
[sc in next st, invdec, sc in next st] 6 times. (18 st) (Fig. M-9)
Info :
Flatten the base to create a disc-shape. Locate the stitch markers from Round 24. Align the first stitch from Round 24 with the first stitch to be worked in the following round.
Round 32 :
sl st through both loops of Round 31 and back loops of Round 24, all the way around. FINISH OFF AND HIDE END. (18 st)
— Large Size: Lighted Flat Mushroom :
Info :
Cap: With the cap color, ch 2. In second chain from hook, work–
Round 1 :
6 sc. Sl st to join. (6 st)
Round 2 :
ch 3 (counts as first dc + ch), dc in same st, ch 1, [dc, ch 1, dc, ch 1] in next 5 stitches. Sl st in second chain to join. (24 st)
Round 3 :
sl st into ch-1 space, ch 3 (counts as first dc + ch), dc in same st, ch 1, sk st, *dc in next ch-1 space, ch 1, sk st, (dc, ch 1, dc, ch 1) in next ch-1 space, sk st,** repeat from * to ** 4 more times, dc in next ch-1 space, ch 1, sk st. Sl st in second chain to join. (36 st)
Round 4 :
sl st into ch-1 space, ch 3 (counts as first dc + ch), sk st, [dc in next ch-1 space, ch 1, sk st] 2 times, (dc, ch 1, dc, ch 1) in next ch-1 space, sk st,** repeat from * to ** 4 more times. (48 st)
Round 5 :
sl st into ch-1 space, ch 3 (counts as first dc + ch), sk st, [dc in next ch-1 space, ch 1, sk st] 2 times, *(dc, ch 1, dc, ch 1) in next ch-1 space, sk st, [dc in next ch-1 space, ch 1, sk st] 2 times,** repeat from * to ** 4 more times. (60 st)
Round 6 :
sl st into ch-1 space, ch 3 (counts as first dc + ch), dc in same st, ch 1, sk st, [dc in next ch-1 space, ch 1, sk st] 4 times, (dc, ch 1, dc, ch 1) in next ch-1 space, sk st, [dc in next ch-1 space, ch 1, sk st] 4 times. Sl st in second chain to join. (72 st)
Round 7 :
sl st into ch-1 space, ch 3 (counts as first dc + ch), sk st, [dc in next ch-1 space, ch 1, sk st] 4 times, (dc, ch 1, dc, ch 1) in next ch-1 space, sk st, [dc in next ch-1 space, ch 1, sk st] 4 times. Sl st in second chain to join. (84 st)
Round 8 :
sl st into ch-1 space, ch 3 (counts as first dc + ch), sk st, [dc in next ch-1 space, ch 1, sk st] all the way around. Sl st in second chain to join. (84 st)
Round 9 :
sl st into ch-1 space, ch 3 (counts as first dc + ch), sk st, [dc in next ch-1 space, ch 1, sk st] 5 times, *(dc, ch 1, dc, ch 1) in next ch-1 space, sk st, [dc in next ch-1 space, ch 1, sk st] 5 times,** repeat from * to ** 4 more times. (96 st)
Round 10 :
sl st into ch-1 space, ch 3 (counts as first dc + ch), sk st, [dc in next ch-1 space, ch 1, sk st] all the way around. Sl st in second chain to join. (96 st)
Info :
Note: There is no "sl st in second ch to join" between Rounds 10 & 11. Skip the last stitch in Round 10 as instructed, and begin the first sc of Round 11 directly in the second chain. (Fig. L-4)
Round 11 :
sc in each st around. Sl st in first st to join. DO NOT FINISH OFF. (96 st)
Info :
Pause here to insert clear plastic into mushroom cap. After the plastic is in place inside the cap, continue working the mushroom gills.
Round 12 :
– working in back loops only – ch 3 (counts as first dc + ch), sk st, *dc2tog across next 3 st, ch 1, sk st, [dc in next st, ch 1, sk st] 4 times,** repeat from * to ** 6 more times, dc2tog across next 3 st, ch 1, sk st. Sl st in second chain to join. (Fig. L-6) (80 st)
Round 13 :
– working in both loops from now on – ch 3 (counts as first dc + ch), sk st, [dc in next st, ch 1, sk st] 2 times, *dc2tog across next 3 st, ch 1, sk st,** repeat from * to ** 3 times, [dc in next st, ch 1, sk st] 3 times, dc2tog across next 3 st, ch 1, sk st. Sl st in second chain to join. (64 st)
Round 14 :
ch 3 (counts as first dc + ch), sk st, *dc2tog across next 3 st, ch 1, sk st, [dc in next st, ch 1, sk st] 2 times,** repeat from * to ** 6 more times. Sl st in second chain to join. (48 st)
Round 15 :
ch 3 (counts as first dc + ch), sk st, *dc2tog across next 3 st, ch 1, sk st, [dc in next st, ch 1, sk st] 1 time,** repeat from * to ** 6 more times. Sl st in second chain to join. (32 st)
Info :
Note: There is no "sl st in second ch to join" between Rounds 15 & 16. Skip the last stitch in Round 15 as instructed, and begin the first sc of Round 16 directly in the second chain.
Round 16 :
sc in next 2 st, [sk st, sc in next 3 st] 7 times, sk st, sc in last st. Sl st in first st to join. DO NOT FINISH OFF. (24 st)
Round 17 :
– working in front loops only – ch 1 (does not count as first st), sc in each st around. (24 st)
Round 18-24 :
– working in both loops from now on – sc in each st around. (24 st)
Round 25 :
[sc in next 3 st, 2 sc in next st] 6 times. (30 st)
Round 26 :
sc in each st around. (30 st)
Round 27 :
[sc in next 2 st, 2 sc in next st, sc in next 2 st] 6 times. (36 st)
Round 28 :
sc in each st around. (36 st)
Round 29 :
[sc in next 2 st, invdec, sc in next 2 st] 6 times. (30 st)
Round 30 :
[invdec, sc in next 3 st] 6 times. (24 st)
Round 31 :
[sc in next st, invdec, sc in next st] 6 times. (18 st)
Round 32 :
sl st through both loops of Round 31 and back loops of Round 24, all the way around. FINISH OFF AND HIDE END. (18 st)
Info :
Note: The following rounds continue shaping for a larger base when using the alternate larger base instructions. Continue as directed below for the large base.
Round 28-31 :
sc in each st around. (36 st)
Round 32 :
[sc in next 2 st, invdec, sc in next 2 st] 6 times. (30 st)
Round 33 :
[sc in next 3 st, invdec] 6 times. DO NOT FINISH OFF. (Fig. L-8) (24 st)
Info :
Use safety-pin style stitch markers to mark the back loops of the first and last stitches of Round 33. These will come in handy later on when finishing the base. (Fig. L-9)
Round 34 :
– working in front loops only – [2 sc in next st, sc in next 3 st] 6 times. (30 st)
Round 35 :
– working in both loops from now on – [sc in next 2 st, 2 sc in next st, sc in next 2 st] 6 times. (36 st)
Round 36 :
[2 sc in next st, sc in next 5 st] 6 times. (42 st)
Round 37 :
[sc in next 3 st, 2 sc in next st, sc in next 3 st] 6 times. (48 st)
Round 38 :
sc in each st around. (48 st)
Round 39 :
[sc in next 3 st, invdec, sc in next 3 st] 6 times. (42 st)
Round 40 :
[invdec, sc in next 5 st] 6 times. (36 st)
Round 41 :
[sc in next 2 st, invdec, sc in next 2 st] 6 times. (30 st)
Round 42 :
[invdec, sc in next 3 st] 6 times. (Fig. L-10) (24 st)
Info :
Flatten the base to create a disc-shape. Locate the stitch markers from Round 33. Align the first stitch from Round 33 with the first stitch to be worked in the following round. (Fig. L-11)
Round 43 :
sl st through both loops of Round 42 and back loops of Round 33, all the way around. FINISH OFF AND HIDE END. (24 st)
These illuminated mushrooms are a delightful way to bring handmade warmth to any room — bright enough to be a cozy nightlight, and small enough to cluster as a whimsical centerpiece. Create a trio in complementary colors or make a whole forest of glowing toadstools for seasonal decor or special gifts. 🧶✨🍄