🧢 Beautiful ✨ Detailed πŸ’ Adorable

Jellyfish Keychains Amigurumi Pattern

Jellyfish Keychains Amigurumi Pattern
4.4β˜… Rating
1-2 Hours Time Needed
2.0K Made This
βœ‚οΈ

Beginner Friendly Level

Perfect for those just starting their crochet journey, with clear instructions and simple techniques

⏱️

Quick Make

Complete in under 2 hoursβ€”lightning fast fun for instant gratification and quick gifts.

🎁

Tiny Treasure

Small, sweet, and gift-worthy creations that fit perfectly in the palm of your hand with detailed charm.

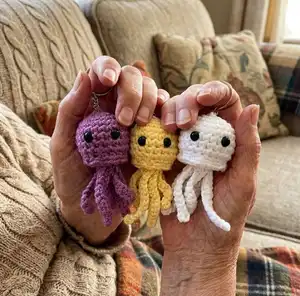
About This Jellyfish Keychains Amigurumi Pattern

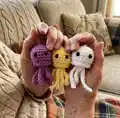
This pattern creates small, charming jellyfish keychains worked from DK yarn using a 3mm hook. Each jellyfish is quick to crochet and includes both spiral and straight tentacles for variety. The pattern covers shaping, creating loops for tentacles, and sewing details like eyes and attachment of the keychain. It is written in UK terms with a US terms section included for convenience.

Jellyfish Keychains Amigurumi Pattern crochet pattern - detailed view of completed project

Perfect for quick makes, gift sets, or charity stalls and requires minimal yarn per keychain. Clear finishing and assembly instructions make it easy to achieve neat, secure results.

Why You'll Love This Jellyfish Keychains Amigurumi Pattern

I absolutely love this pattern because it turns a tiny amount of DK yarn into a delightful, useful object you can carry everywhere. I enjoy the mix of techniques β€” simple rounds for the head combined with playful tentacle construction β€” that produce such personality in a small package. The design is fast to make which means I can whip up a set in an afternoon for gifts or markets. It is approachable yet satisfying, and I always have fun experimenting with different colors and tentacle combinations.

Jellyfish Keychains Amigurumi Pattern step 1 - construction progress Jellyfish Keychains Amigurumi Pattern step 2 - assembly progress Jellyfish Keychains Amigurumi Pattern step 3 - details and accessories Jellyfish Keychains Amigurumi Pattern step 4 - final assembly and finishing

Switch Things Up

I love how easy it is to customize these tiny jellyfish by changing colors; try ombre or variegated DK yarn for playful effects.

I often make a set in contrasting shades so they look great displayed together or sold as a bundle.

I sometimes swap the spiral tentacles for sewn-on short fringe for a different texture and a quicker finish.

I like adding tiny embroidered smiles or cheeks with pink yarn to give each jellyfish its own personality.

Want a sturdier keychain? Attach a small washer or button inside the top before closing and sewing the keyring on for extra reinforcement.

I sometimes use metallic or textured DK yarn for a sparkly beachy look that catches the light.

If you want a wearable version, scale up the pattern with thicker yarn and a larger hook to create cute pendants or bag charms.

I recommend testing the eye placement on a sample before stitching them permanently to change the expression easily.

For gift packaging, I make several in coordinated colors and tie them with a ribbon and a small swing tag describing the yarn used.

Try different tentacle combinations: all spirals, all straight, or mixed sets to give each jellyfish a unique silhouette.

I sometimes add a tiny bell or bead to the keychain ring to give a pleasant jingle and extra charm.

Common Mistakes & How to Fix Them

βœ— Skipping the stitch marker and losing track of the last stitch; always place a marker at the last stitch of each round to keep perfect round counts and avoid accidental increases or decreases. βœ— Overstuffing the head which causes stuffing to show through the stitches and distort the shape; stuff gradually and keep the stuffing firm but compressible so the head retains a smooth dome. βœ— Not securing tentacles firmly before trimming ends which can lead to unraveling later; sew around the base of each tentacle, pull tight to gather, and secure with a couple of small stitches. βœ— Placing eyes too high or too close together which changes the look of the jellyfish; use the guideline to place eyes 3 stitches apart and two rows up from the htr/hdc row for the intended expression. βœ— Working tentacle spirals with inconsistent tension causing uneven spirals; keep your tension even when forming the chain spirals and try one tentacle first to check curl before making the rest.

Jellyfish Keychains Amigurumi Pattern

Make a collection of tiny, adorable jellyfish keychains with this simple crochet pattern. You will love how quickly each mini jellyfish comes together using DK yarn and a 3mm hook. Perfect for gifting, market stalls, or brightening up your own keys and bags. The pattern includes clear instructions, tentacle shaping, and finishing steps so you can get beautiful results every time.

Beginner Friendly 1-2 Hours

Materials Needed for Jellyfish Keychains Amigurumi Pattern

β€” Main Fabric

  • 01
    Hayfield Bonus (DK) Main - 7g
  • 02
    Hayfield Bonus (DK) Black 0965 - oddment for eyes
  • 03
    Small amounts of additional DK colors for variation (approx 5-10g each)

β€” Tools Required

  • 01
    3mm Crochet Hook
  • 02
    Wool needle (for sewing)
  • 03
    Hi-Loft quality toy stuffing
  • 04
    Keychain (split ring with short chain)
  • 05
    Scissors
  • 06
    Stitch markers (to mark last stitch of rounds)
  • 07
    Pins for assembly (optional)

Progress Tracker

0% Complete

β€” Materials :

Info :

Hayfield Bonus (DK) Main – 7g. Hayfield Bonus (DK) Black 0965 – Oddment for Eyes. Keychain. Hi-Loft Quality Toy Stuffing. 3mm Crochet Hook. Wool Needle (for sewing).

β€” Abbreviations :

Infos :

ch – chain. dc – double crochet. htr – half treble crochet. inc – 2 stitches into next stitch. dec – decrease over next two stitches in front loops only. BLO – dc into back loops only picking up the extra loop at the back of the previous htr row to create a firmer stitch. FLO – dc into front loops only. sl st – slip stitch. f/o – fasten off by slip stitch in next stitch.

β€” Note :

Info :

Unless stated work in continuous rounds marking last stitch of each row with a stitch marker before proceeding with the next. When stuffing parts make sure that you don’t overstuff them as you don’t want the stuffing to show through when complete. Each part should be filled just enough that it can be easily squeezed when pinched firmly.

β€” Body (UK Terms) :

Info :

Using Main

Row 1 :

ch2, dc 6 into 2nd st from hook (alternatively dc 6sts into magic ring) (6)

Row 2 :

inc x6 (12)

Row 3 :

(dc into next st, inc) x6 (18)

Row 4 - 6 :

dc (18) (3 rows)

Row 7 :

htr (18) sl st to join in FLO only

Row 8 :

FLO Row: (ch2, miss 1, sl st into next st) x9 (9 loops)

Row 9 :

BLO Row: sl st into BLO directly behind the 1st FLO sl st, (dc into next st, dec) x6 (12)

Info :

Stuff body

Row 10 :

dec x6 (6) sl st to join

Row 11 :

(ch6, starting in 2nd ch from hook, inc x5, sl st into next st from previous row, ch12, starting in 2nd ch from hook, sl st into next 11sts, sl st in next st from previous row) x3 (3 spiral+ 3 straight tentacles)

Info :

F/O leaving a 25cm end

β€” Finishing / Assembly (UK Terms) :

Info :

Using a small running st sew around the base of each tentacle (next to the body), then pull tight to gather. Sew around once more then secure with a couple of small sts. Weave end up to starting circle at top of body and making sure not to pull out of shape, secure with a couple of small sts. Attach keychain to top of body using 5 small back sts. Secure end before weaving through body and cutting flush.

Info :

Using black oddment weave end up through body and sew eyes 3sts apart and 2 rows up from the htr row. Weave ends through body and cut flush to finish.

β€” Body (US Terms) :

Infos :

Materials repeated for US Terms: Hayfield Bonus (DK) Main – 7g. Hayfield Bonus (DK) Black 0965 – Oddment for Eyes. Keychain. Hi-Loft Quality Toy Stuffing. 3mm Crochet Hook. Wool Needle (for sewing).

Infos :

Abbreviations (US page): ch – chain. sc – single crochet. hdc – half double crochet. inc – 2 stitches into next stitch. dec – decrease over next two stitches in front loops only. BLO – sc into back loops only picking up the extra loop at the back of the previous hdc row to create a firmer stitch. FLO – sc into front loops only. sl st – slip stitch. f/o – fasten off by slip stitch in next stitch.

Info :

Using Main

Row 1 :

ch2, sc 6 into 2nd st from hook (alternatively sc 6sts into magic ring) (6)

Row 2 :

inc x6 (12)

Row 3 :

(sc into next st, inc) x6 (18)

Row 4 - 6 :

sc (18) (3 rows)

Row 7 :

hdc (18) sl st to join in FLO only

Row 8 :

FLO Row: (ch2, miss 1, sl st into next st) x9 (9 loops)

Row 9 :

BLO Row: sl st into BLO directly behind the 1st FLO sl st, (sc into next st, dec) x6 (12)

Info :

Stuff body

Row 10 :

dec x6 (6) sl st to join

Row 11 :

(ch6, starting in 2nd ch from hook, inc x5, sl st into next st from previous row, ch12, starting in 2nd ch from hook, sl st into next 11sts, sl st in next st from previous row) x3 (3 spiral+ 3 straight tentacles)

Info :

F/O leaving a 25cm end

Info :

Using a small running st sew around the base of each tentacle (next to the body), then pull tight to gather. Sew around once more then secure with a couple of small sts. Weave end up to starting circle at top of body and making sure not to pull out of shape, secure with a couple of small sts. Attach keychain to top of body using 5 small back sts. Secure end before weaving through body and cutting flush.

Info :

Using black oddment weave end up through body and sew eyes 3sts apart and 2 rows up from the hdc row. Weave ends through body and cut flush to finish.

Assembly Instructions

  • Sew around the base of each tentacle (next to the body) with a small running stitch, then pull tight to gather and secure with a couple of small stitches.
  • Weave the working tail up to the starting circle at the top of the body and secure it with a couple of small stitches so the top does not pull out of shape.
  • Attach the keychain to the top of the body using 5 small back stitches, then secure the yarn end before weaving it through the body and cutting flush.
  • Using black oddment (yarn), weave the end up through the body and sew the eyes 3 stitches apart and 2 rows up from the htr/hdc row for correct placement.
  • Weave all yarn ends through the body and cut flush to finish, checking that each tentacle base is firmly secured before trimming.

Important Notes

  • πŸ’‘Unless stated work in continuous rounds marking last stitch of each round with a stitch marker before proceeding with the next.
  • πŸ’‘When stuffing parts make sure that you don’t overstuff them as you don’t want the stuffing to show through when complete.
  • πŸ’‘Each part should be filled just enough that it can be easily squeezed when pinched firmly.
  • πŸ’‘Use stitch markers to keep track of your rounds, especially when changing rows or making the FLO/BLO loops.

This tiny Jellyfish Keychain pattern makes adorable little pals you can gift, sell, or collect β€” quick, colorful, and utterly charming. Perfect for using up small oddments of DK yarn and creating bright sets for markets or gifts. Happy crocheting and may your hooks be swift and your tentacles curl perfectly! 🧢✨

You ask,

we answer.

FAQs

What size will the finished piece be?

The finished keychain jellyfish measures approximately 4-6 cm tall (excluding keyring) when using Hayfield Bonus DK yarn and a 3mm hook; size varies slightly by yarn and tension.

Can I use different yarn weights for this pattern?

Yes, you can use different yarn weights but the finished size and look will change; switch your hook size appropriately and make a gauge test jellyfish first to check proportions.

Do I need prior crochet experience for this pattern?

This pattern is rated beginner friendly, so basic knowledge of working in the round, increases, decreases, chains and slip stitches is recommended.

How long does this project typically take to complete?

Most crocheters can complete a single jellyfish keychain in under 2 hours; time varies with experience and whether you are making spiral tentacles.

How do I attach the keychain securely?

Attach the keychain at the top of the body using five small back stitches, then weave the yarn end through the body and secure before trimming to ensure it is firmly attached.