🧢 Beautiful ✨ Detailed πŸ’ Adorable

Horizon Fingerless Gloves Pattern

Horizon Fingerless Gloves Pattern
4.8β˜… Rating
2-3 Hours Time Needed
2.7K Made This
βœ‚οΈ

Intermediate Level

Ideal for those with basic crochet experience, featuring slightly more advanced stitches and techniques to expand your skills.

⏱️

Bite-Sized Project

Finishes in 2-4 hoursβ€”perfect for an afternoon of creative relaxation.

🧣

Snug Essential

Everyday comfort with practical charm, designed for both functionality and style through changing seasons.

About This Horizon Fingerless Gloves Pattern

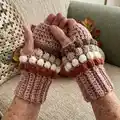
This pattern creates a pair of Horizon fingerless gloves with a ribbed cuff and contrasting bobble stripes for texture and interest. The gloves are worked in Aran weight yarn and use basic stitches plus bobble stitches to create the horizon effect. The pattern is written in US terms and comes in one size designed to fit most hands.

Horizon Fingerless Gloves Pattern crochet pattern - detailed view of completed project

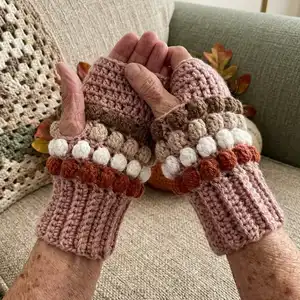
Includes full cuff instructions, body rows for right and left gloves, and finishing notes for tidy ends. Designed to be worked flat then joined to create a neat, comfortable wrist cuff.

Why You'll Love This Horizon Fingerless Gloves Pattern

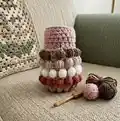
I absolutely love this pattern because it combines simple textured stitches with a striking color detail that really stands out. I enjoyed how quickly the ribbed cuff works up and how satisfying the bobble rows are to crochet. The design is practical yet stylish, perfect for everyday wear or handmade gifts. I also love that it allows for creative color combinations, so each pair feels unique and personal.

Horizon Fingerless Gloves Pattern step 1 - construction progress Horizon Fingerless Gloves Pattern step 2 - assembly progress Horizon Fingerless Gloves Pattern step 3 - details and accessories Horizon Fingerless Gloves Pattern step 4 - final assembly and finishing

Switch Things Up

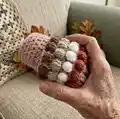
I love experimenting with color pairings for these gloves; try muted autumn shades or high-contrast brights to change the mood of the design.

You can make the gloves longer by adding extra HDC rounds after row 12 to create more hand coverage before finishing.

To create a tighter cuff, I sometimes switch to a 4mm or 4.5mm hook just for the cuff section and then change back to 5mm for the body.

If you want a warm mitten instead, I convert the final rounds into a closed top by decreasing evenly and fastening off to create a mitten tip.

Swap the bobble rows for simple color stripes if you prefer a flatter texture; work sc rows in CC and MC alternately for a striped look.

I often embroider small motifs or add a sewn-on button near the cuff to personalize each pair and add a charming finishing touch.

Make mini versions for keychains or ornaments by using lighter yarn and a smaller hook to scale the pattern down.

Adjust the thumb hole size by changing the number of chains in row 9; chain 3 or chain 5 will make smaller or larger openings respectively.

For a more durable glove, use a slightly tighter tension and weave in ends with a tapestry needle, then block lightly to even out stitches.

I also like to mix two contrast colors in alternating bobble rows to create a subtle ombre or horizon effect that really stands out against the main color.

Common Mistakes & How to Fix Them

βœ— Not joining the cuff correctly can leave a twisted wrist opening; slip stitch through the front loop of row 25 and the adjacent chain loop so the cuff lies flat before turning inside out. βœ— Skipping the chain 1 at the end of rounds can distort your stitch count; always finish rounds with the indicated chain and join with a slip stitch to maintain the correct stitch placement. βœ— Pulling yarn too tight when making bobbles will make them stiff and uneven; keep a relaxed tension and gently shape bobbles as you go to keep them soft and consistent. βœ— Forgetting to leave ends when cutting contrast colors makes weaving tedious; cut CC yarns leaving a tail for weaving and secure them later so colors stay tidy. βœ— Not counting stitches after joining rounds causes mismatched patterns around the thumb hole; count to ensure you have 26 stitches before proceeding to the thumb row.

Horizon Fingerless Gloves Pattern

Make cozy, textured fingerless gloves with a fun bobble stripe detail using this easy-to-follow pattern. You'll work a ribbed cuff, join it into a wrist tube, then crochet the body with alternating bobbles for a striking horizon effect. Perfect for gifting or keeping your hands warm while staying nimble.

Intermediate 2-3 Hours

Materials Needed for Horizon Fingerless Gloves Pattern

β€” Main Fabric

  • 01
    Approximately 100 meters Aran weight/10-12ply yarn for main color (MC)
  • 02
    10 meters each of 4 contrast colors (CC), similar weight (for bobbles and stripes)

β€” Tools Required

  • 01
    5mm hook
  • 02
    Optional smaller 4mm or 4.5mm hook for cuff (optional - I didn't use one)
  • 03
    Tapestry needle

Progress Tracker

0% Complete

β€” Notes :

Info :

Thank you for downloading my pattern. The pattern is one size only and is written in US terms. Please feel free to share your finished creations on Instagram, tagging @littlegoldennook. Please don't sell, change or claim this pattern as your own

β€” Stitches :

Info :

Ch sp: chain space. Ss: slip stitch. Sc: single crochet. HDC: Half double crochet. Scblo: single crochet in back loop of stitch only. Bobble stitch or dc4tog- yarn over, insert into stitch, yarn over and pull up a loop, yarn over and pull through two loops, repeat 4 times until you have 5 loops on the hook, then yarn over and pull through all 5 loops.

Info :

Bobble stitch in contrast color- With MC still on your hook, YO with CC, insert hook into stitch, draw up a loop of CC, YO and pull through 2 loops, repeat 3 times until you have 4 CC loops and one MC loop on your hook. YO with MC and pull through all 5 loops. See Horizon video on my instagram

β€” Cuff :

Info :

Optional: use a smaller 4 or 4.5mm hook for the cuff if you like (I didn't). With MC (main color) chain 11

Round 1 :

Row 1: Sc in 2nd chain from the hook and in each chain to end, ch 1, turn (10)

Round 2 :

Row 2: scblo in first stitch, scblo in each stitch to end, ch 1, turn (10)

Round 3-25 :

Row 3 - 25: repeat row 2 (10)

Info :

Join ends of your wrist cuff by slip stitching through front loop only of row 25 and adjacent loop of starting chain row. Once joined, turn wrist cuff inside out to what is now the outside of the glove, using same loop insert hook (with right side facing) and chain 1. You are now ready to crochet your first row around the top of the cuff.

β€” Body :

Right hand glove :

Row 1: sc in same place as you last chained 1 from, sc in the top of each rib row around the cuff (sc in protruding rib and in inverted rib), sc in base of starting chain, join to 1st sc with ss, ch 1 do not turn (26)

Round 2 :

Row 2: sc with MC, bobble with CC, *sc with MC, bobble with CC*, repeat ** around finishing with bobble w CC, join to top of 1st sc with ss, ch 1 (26)

Round 3 :

Row 3: (with MC) 1 sc in each stitch around, join to top of 1st sc with ss, ch 1 (26)

Round 4 :

Row 4: start with a *bobble stitch with CC, sc with MC*, repeat ** around finishing with sc w MC, join to top of 1st bobble stitch with ss, ch 1 (26)

Round 5 :

Row 5: repeat row 3

Round 6 :

Row 6: repeat row 2

Round 7 :

Row 7: repeat row 3

Round 8 :

Row 8: repeat row 4

Info :

Cut each CC when you are finished with it, leaving an end for weaving in later

Round 9 :

Row 9: thumb hole row 1 hdc in each stitch around to last 4 stitches, chain 4, join to top of 1st hdc with ss, ch 1 (26)

Round 10 :

Row 10: 1 hdc in each stitch around including 1 in each chain space, join to top of 1st hdc with ss, ch 1 (26)

Round 11-12 :

Row 11-12: 1 hdc in each stitch around, join to top of 1st hdc with ss, ch 1 (26)

Round 13 :

Row 13: ss in each stitch around, fasten off

Left hand glove :

Make cuff the same as right hand. Repeat rows 1-8 from above.

Round 9 :

Row 9: thumb hole row 1 hdc, chain 4, skip 4 stitches, 1 hdc in next stitch and in remaining stitches, join to top of 1st hdc with ss, ch 1 (26)

Round 10-13 :

Repeat rows 10-13 from above

β€” Finishing Off :

Info :

Weave in all MC and CC ends securely... ..and voila, enjoy wearing your fun cosy gloves!

Assembly Instructions

  • Join ends of the wrist cuff by slip stitching through the front loop only of row 25 and the adjacent loop of the starting chain row, ensuring the cuff is not twisted.
  • After joining the cuff, turn the cuff inside out so the right side is facing out, then insert your hook in the same loop and chain 1 to begin crocheting around the top of the cuff.
  • When creating the thumb hole, work row 9 as instructed (hdc around to last 4 stitches, ch 4, join), then continue with the hdc rounds to secure the thumb opening.
  • Cut each contrast color (CC) when you finish with it, leaving a tail for weaving in later, and weave in all MC and CC ends securely at the end.

Important Notes

  • πŸ’‘The pattern is one size only and is written in US terms; gauge and yarn choice will affect final fit.
  • πŸ’‘Optional: use a smaller 4mm or 4.5mm hook for the cuff if you prefer a tighter ribbed cuff; the designer did not use a smaller hook.
  • πŸ’‘Cut contrast color (CC) strands when finished with them and leave ends for weaving in to keep color transitions tidy.
  • πŸ’‘Join the cuff carefully by slip stitching through the front loop only so the ribs line up and the cuff sits flat when turned.

Make a cozy pair of Horizon fingerless gloves that blend practical warmth with charming texture and color. They work up quickly and make delightful gifts or everyday accessories. Try bold or muted colorways to suit your style and enjoy the meditative rhythm of bobbles and ribs. 🧢✨

You ask,

we answer.

FAQs

What size will the finished piece be?

The pattern is written as one size designed to fit most hands when using the recommended Aran weight yarn and 5mm hook; finished circumference is worked to 26 stitches around the body section.

Can I use different yarn weights for this pattern?

Yes, you can use different yarn weights but this will change final size; choose an appropriate hook for your yarn and be prepared to adjust stitch counts if needed.

Do I need prior crochet experience for this pattern?

This pattern is rated intermediate; familiarity with single crochet, half double crochet, working in the round, and bobble/dc4tog techniques is recommended.

How long does this project typically take to complete?

Most crocheters complete a pair in about 2-3 hours depending on experience and speed, though time may vary if you add more contrast stripes or customize the fit.