🧢 Beautiful ✨ Detailed πŸ’ Adorable

Granny Square Clutch Pattern

Granny Square Clutch Pattern
4.0β˜… Rating
2-3 Hours Time Needed
2.8K Made This
βœ‚οΈ

Beginner Friendly Level

Perfect for those just starting their crochet journey, with clear instructions and simple techniques

⏱️

Bite-Sized Project

Finishes in 2-4 hoursβ€”perfect for an afternoon of creative relaxation.

✨

Stylish Touch

An elegant detail to elevate any look, combining traditional techniques with contemporary design sensibilities.

About This Granny Square Clutch Pattern

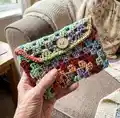
This pattern teaches you how to make a compact clutch built from a traditional granny square. It includes step-by-step instructions for the square, a simple flap, and an optional fabric lining for extra security. The design is made with bulky yarn and works up quickly, resulting in a colorful and practical accessory.

Granny Square Clutch Pattern crochet pattern - detailed view of completed project

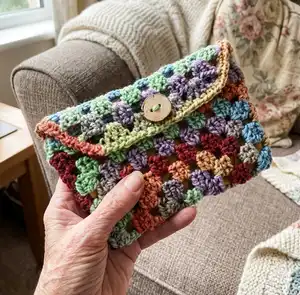
Perfect for makers who want a quick, satisfying project that can be customized in color and size. Includes a stitch legend, chart, and clear finishing instructions to sew a button and add a lining.

Why You'll Love This Granny Square Clutch Pattern

I absolutely love this pattern because it turns a simple granny square into a functional, fashionable clutch that you can finish in an afternoon. I enjoy how versatile the design isβ€”change the yarn or the number of rounds to make any size you want. The colorful results are always cheerful and unique when you use variegated yarn like Sutton Gummi Bear. Sewing the lining and adding a button gives the clutch a polished, handmade finish that I am proud to gift or use myself.

Granny Square Clutch Pattern step 1 - construction progress Granny Square Clutch Pattern step 2 - assembly progress Granny Square Clutch Pattern step 3 - details and accessories Granny Square Clutch Pattern step 4 - final assembly and finishing

Switch Things Up

I love customizing this clutch by changing yarn colors and lengths; you can create a bold stripe effect or a subtle tone-on-tone version just by swapping skeins.

For a larger bag, I increase the number of granny rounds and add extra rows before sewing the sides together to get the size I need.

I sometimes use a lighter weight yarn and a smaller hook to make a delicate mini clutch perfect for gift tags or small accessories.

Adding a fabric lining makes the clutch more durable for carrying coins and keys, and I recommend choosing a contrasting fabric for a fun interior pop.

Try different buttons or a decorative clasp instead of a single button to change the look of the flap closure.

I also like to experiment with edgings: a simple single crochet border looks neat, while a picot edge adds a pretty, feminine touch.

Want a wristlet? Sew on a crocheted strap to one side before attaching the lining so it becomes a hands-free accessory I use all the time.

For a boho vibe, I add tassels or small crocheted flowers to one corner of the flap for personality and movement.

If you want structured sides, insert a thin piece of interfacing into the lining before sewing it up; this gives the bag a more polished, professional feel.

I often embroider initials or small motifs onto the flap before attaching the button to personalize gifts and make each clutch unique.

Common Mistakes & How to Fix Them

βœ— Skipping the chain-2 corners will make your square fail to lay flat; always create the chain-2 spaces at each corner to keep the square shape. βœ— Not counting clusters after each round often results in uneven edges; count the 3-dc clusters at the end of each round to ensure consistency. βœ— Working with inconsistent tension makes the finished clutch misshapen; maintain steady tension and check your gauge before starting. βœ— Forgetting to fold and align the square before joining can cause mismatched seams; fold your square with the good side in and pin or align edges before slip stitching or sewing.

Granny Square Clutch Pattern

Make a colorful Granny Square Clutch that's perfect for concerts, markets, or everyday use. This pattern uses a classic granny square technique with a simple flap and optional lining so you can customize the finish. You'll love how quickly it comes together with bulky yarn and a 6 mm hook. Follow the full step-by-step instructions and photos to create a stylish handmade clutch.

Beginner Friendly 2-3 Hours

Materials Needed for Granny Square Clutch Pattern

β€” Main Fabric

  • 01
    Bulky yarn - Sutton by Fair Isle in the color Gummi Bear (as shown)
  • 02
    Fabric (optional) - small piece to line the clutch, folded to match finished clutch dimensions

β€” Tools Required

  • 01
    Crochet hook: J/10 - 6 mm
  • 02
    One button
  • 03
    Tapestry needle
  • 04
    Scissors
  • 05
    Sewing needle and sewing thread in a matching color (optional)

Progress Tracker

0% Complete

β€” Granny square :

Info :

Create a magic ring or adjustable ring.

Round 1 :

Ch 3, 2 dc + ch 2 + 3 dc + ch 2 + 3 dc + ch 2 + 3 dc + ch 2. Join round with a sl st.

Round 2 :

Ch 3, 2 dc into the same place you chained 3 + [ch 1 + (3 dc + ch 2 + 3 dc) into the ch 2 space from the previous round] repeat 3 times + ch 1 + 3 dc into the last ch-2 space from the previous round + ch 2. Join with a sl st.

Round 3 :

Ch 3, 2 dc into the same place you chained 3 + ch 1. Crochet 3 dc into each ch-1 space you chained from the previous round, followed by a ch 1, and (3dc + ch 2 + 3 dc + ch 1) into each corner (a total of 3 times), 3 dc + ch 2 into the last space. Join round with a sl st.

Round 4 to 7 :

You can make the granny square as big as you wish, I made mine 7 rounds big. You only need to remember this: Crochet 3 dc into each ch-1 space. You can use the table as a visual help; Separate the 3-dc clusters with a chain 1 (unless you are working a corner – see next step); Crochet [3 dc + ch 2 + 3 dc] into each corner. The chain 2 is what creates the corners and makes granny 'square'.

Info :

Once you reach the desire size fold the granny square in half (good side in). Slip stitch or sew the shorter sides of the clutch together. Finish off. Weave in ends. Turn clutch inside out.

Round 8 :

For this round, we are going to crochet [3 dc + ch 1] into each ch-1 space from the round below. The edges/folds of the clutch are worked a little bit different (see the two images above). Start the round with a ch 3 and dc into the same space, ch 1, [3 dc into the next space, ch 1]. Repeat until you reach the corner/seam. Crochet 1 dc into the next 3 stitches, ch 1, [3 dc + ch 1] repeat until the end of the round. Finish round with a dc. Join with a sl st.

Round 9 :

Ch 1, sc into each stitch. Join round with a slip stitch. Do not finish off.

β€” Flap :

Row 1 :

Slip stitch into the next stitch, ch 3 + dc into the next 2 stitches + ch 1 + 3 dc into the gap + from the round below + ch 1. Continue crocheting 3-dc clusters + ch 1 (in my case a total of 7 times) until you reach the end of the row. Double crochet into the last 3 stitches.

Row 2 :

Ch 4, turn, [3 dc + ch 1] repeat 5 times, 3 dc, trc into the beginning of row 1.

Row 3 :

Ch 4, turn, [3 dc + ch 1] repeat 4 times, 3 dc, trc into the beginning of row 2.

Row 4 :

Ch 4, turn, [3 dc + ch 1] repeat 3 times, 3 dc, trc into the beginning of row 3.

Row 5 :

(Optional) Single crochet all around the clutch opening and flap. Finish off. Weave in ends.

Info :

With yarn and a tapestry needle sew on a button.

Info :

Note: You don't need to create a hole for the button. Choose a button size that fits the space between the 3-dc clusters.

β€” Stitch Legend :

Info :

Stitch Legend: 2 dc in 1 st - 2 double crochet in 1 stitch. 3dc v - 3 double crochet. ch - chain. sl st - slip stitch. adjustable ring - adjustable ring. t-ch3 - triple turning chain.

β€” Lining :

Info :

This step is optional but it is recommended if you intend to carry small items.

Info :

Fold a piece of fabric in half (good side in), measure and cut a piece as big as your finished clutch. Sew the shorter sides of the fabric by hand or using a sewing machine. Fold over and sew the top edge (opening) to give the lining a finished look.

Info :

Insert the lining inside of the clutch. Sew the top edge of the lining onto the bag using an invisible stitch.

Info :

Enjoy ☺

Assembly Instructions

  • Fold the finished granny square in half with the good side facing in and join the shorter sides together using slip stitches or by sewing to form the bag shape.
  • Turn the bag inside out so the good side is outside and weave in all yarn ends before finishing the edges.
  • Crochet the flap rows onto the top opening following the Flap section, then finish and sew on a button using a tapestry needle, ensuring the button fits between the 3-dc clusters.
  • If adding a lining, sew a fabric piece folded in half to match the clutch size, insert it into the bag, and attach the top edge of the lining to the bag with invisible stitches for a neat finish.

Important Notes

  • πŸ’‘Use stitch markers or count clusters to keep track of rounds and ensure your square remains even.
  • πŸ’‘Make the granny square as large or small as you like; the pattern photos used 7 rounds for the sample clutch size.
  • πŸ’‘Weave in ends and sew the lining before attaching the button to keep the interior tidy and secure.

This bright Granny Square Clutch is a joyful quick project that makes a perfect gift or market find. Use variegated Sutton yarn to get the colorful effect shown, or choose solids for a classic look. Add an optional lining and a pretty button to make it durable and polished. 🧢✨

You ask,

we answer.

FAQs

What size will the finished piece be?

This clutch is approximately 9" wide by 5" tall when made with bulky Sutton yarn and a 6 mm hook; finished size may vary with yarn and tension.

Can I use different yarn weights for this pattern?

Yes, you can use different yarn weights but the final size and look will change; adjust your hook accordingly and consider making more or fewer granny rounds to reach the desired dimensions.

Do I need prior crochet experience for this pattern?

This pattern is beginner friendly; basic knowledge of double crochet clusters, chain spaces, slip stitches, and simple shaping is helpful to follow the instructions smoothly.

How long does this project typically take to complete?

Most crocheters can complete this clutch in about 2-3 hours, though time may vary depending on experience, customization, and whether you add a lining.