Make a charming Giant Forester amigurumi with this detailed crochet pattern. You will create a textured coat, sculpted face, dramatic beard and full hair using clear, photo-supported instructions. Perfect for gifting or display, this pattern walks you through every piece step-by-step so your finished doll looks just like the photos.
Progress Tracker
0% Complete
— Arms :
Info :
Make two identical pieces. The arms are crocheted separately and then joined as we crochet the body. Stuff the arms as you go and not very tight. Start crocheting with the yarn of skin color in a spiral, use a 2 mm crochet hook Clover (or 1.75 mm of any other brand). Prepare a wireframe for arms. The length of each piece of wire should be about 22 cm. Bend one of the piece ends, forming a loop (about 1 cm). Wrap with masking tape or with adhesive tape.
Round 2-3 :
6sc (6) - 2 rounds
Info :
Cut the thread and fasten off (thumb finished)
Round 3 :
(inc, 1sc)*6 (18)
Round 4-8 :
18sc (18) - 5 rounds
Round 9 :
3sc along the thumb and the main piece at the same time, 15sc along the main piece (18)
Round 10 :
3sc along the rest stitches of the thumb, 15sc along the main piece (18)
Round 11 :
(4sc, dec)*3 (15)
Info :
Stuff slightly. Insert the wire and continue crocheting around it, stuff as you go.
Round 12-13 :
15sc (15) - 2 rounds
Info :
Change the thread color to terracotta. Cut the thread of skin color and fasten off.
Round 14 :
(4sc, inc)*3 (18)
Round 15 :
into back loops only 18sc (18)
Round 16-41 :
18sc (18) - 26 rounds
Info :
Fold the arm in half and work several additional sc needed to shift the thumb to the arm side (for the right and for the left arm). Cut the thread and fasten off.
Info :
Return to round 14, attach the thread of terracotta color to the front loop and crochet the cuffs. Hold the arm with the hand facing down. Make ch and crochet according to the instructions:
Round 1-5 :
18sc (18) - 5 rounds
Info :
Work several additional sc to finish the work right above the thumb. Fold the cuffs down towards the hand. Cut the thread and fasten off. Weave in the thread tails inside of the piece.
— Legs :
Info :
Start crocheting the first leg with the yarn of tabacco color (it will be the left leg for the doll). Make ch13, from the second ch from the hook.
Round 1 :
inc,10sc,4sc into 1 stitch,10sc, inc (into the first stitch, where we have already worked the first increase in the round) (28)
Round 2 :
2inc,10sc,4inc,10sc,2inc (36)
Round 3 :
(1sc, inc)*2, 10sc, (inc, 1sc)*2, (1sc, inc)*2, 10sc, (inc, 1sc)*2 (44)
Round 4 :
(2sc, inc)*2, 10sc, (inc, 2sc)*2, (2sc, inc)*2, 10sc, (inc, 2sc)*2 (52)
Info :
Take a piece of cardboard or plastic sheet, place the sole on it and draw an outline around. Cut two pieces. We will use these two insoles to strengthen the legs. Cut about 2 mm from the piece edge, so that we are able to insert them into the feet.
Round 5-6 :
into back loops only 52sc (52) - 2 rounds
Round 7-9 :
13sc, 26hdc, 13sc (52) - 3 rounds
Info :
Check for the marker location. It should be located exactly in the middle of the heel. In the next rounds we will make decreases to form the foot. Insert the cardboard insole.
Round 10 :
13sc, (dc dec, 2hdc)*6, dc dec, 13sc (45)
Round 11 :
13sc, (1hdc, dc dec)*6, 1hdc, 13sc (39)
Round 12 :
13sc, 7dc dec, 12sc (32)
Round 13 :
(2sc, dec)*8 (24) - when crocheting the last stitch change the thread color to dark brown
Info :
Cut the thread of tabacco brown color and fasten off.
Round 14 :
into back loops only 24sc (24)
Info :
Prepare the frame for the legs. Take a copper wire and measure two pieces with the length of about 36 cm (the doll size). Bend one end on both pieces forming a loop (about 1 cm). Wrap about 15 cm of each piece with a masking tape or with adhesive tape. This part will be located inside of the legs till the point where the wire pieces will be joined and twisted inside of the body. Now bend the wire end with the loop at the right angle (about 2 cm). Insert the wire into the foot and stuff it, continue crocheting and stuff as you go.
Round 15-18 :
24sc (24) - 4 rounds
Round 19 :
(5sc, inc)*4 (28)
Round 20-21 :
28sc (28) - 2 rounds
Info :
Cut the thread and fasten off. Now we are going to crochet the trouser leg. Take the thread of dark brown color and attach it to the front loop of round 13 exactly in the middle (photo 12). Hold the leg with the wire facing out from you. Make ch and crochet according to the pattern. The next round will be the first round of the trouser leg.
Round 1 :
(2sc, inc)*8 (32)
Round 2-3 :
32sc (32) - 2 rounds
Info :
After the third round make sl st into the next stitch. Make ch and turn the work. Crochet in the opposite direction, skipping ch.
Round 4 :
into front loops only 32sc, sl st into ch, make ch, turn the work (32)
Round 5 :
into back loops only 32sc (32)
Info :
There should be a fold of the trouser leg formed, like in the photo.
Round 6 :
(15sc, inc)*2 (34)
Round 8 :
(15sc, dec)*2 (32)
Round 9 :
(dec, 6sc)*4 (28)
Round 10-13 :
28sc (28) - 4 rounds
Round 14 :
crochet through the outer and inner layers of the leg at the same time, joining the pieces: 28sc (28)
Round 15-27 :
28sc (28) - 13 rounds
Info :
Crochet several sc additionally to finish crocheting at the needed point on the inner side of the leg (at the point where the leg will be joined with the other one). I shifted this point closer to the heel, so that the toes are facing to the sides after joining.
Info :
Crochet the second leg according to the same pattern, but don’t cut the thread. Place both legs near each other and compare their length. If the first leg is longer, then add one more round. If both legs have the same length, then start joining them.
— Body :
Info :
Now we are going to join the legs and crochet the body. Stuff firmly as you go. Make ch7 and insert the hook into the next stitch on the first leg. Crochet 14sc and place marker. The next round will be the first round of the body.
Round 1 :
14sc, 7sc along the chain, 28sc, 7sc along the chain, 14sc (70)
Round 2 :
14sc, inc, 5sc, inc, 28sc, inc, 5sc, inc, 14sc (74)
Round 3 :
5sc, inc, 8sc, inc, 7sc, inc, 8sc, inc, 10sc, inc, 8sc, inc, 7sc, inc, 8sc, inc, 5sc (82)
Round 4-8 :
82sc (82) - 5 rounds
Round 9 :
15sc, inc, 9sc, inc, 56sc (84)
Round 10-21 :
84sc (84) - 12 rounds - when crocheting the last stitch change the thread color to terracotta
Round 22-23 :
84sc (84) - 2 rounds
Round 24 :
into back loops only 84sc (84)
Round 25-28 :
84sc (84) - 4 rounds
Info :
Stuff the brown part of the body tight enough. Pay special attention to the lower part the body, to the sides and to the belly.
Round 29 :
7sc, dec, (11sc, dec)*2, 49sc (81)
Round 30-34 :
81sc (81) - 5 rounds
Round 35 :
(8sc, dec)*3, 51sc (78)
Round 36-46 :
78sc (78) - 11 rounds
Info :
Unravel or crochet a couple of stitches additionally so that the arms are located symmetrically at the body sides, according to the pattern: 7 stitches - for the first arm, 34 stitches - for the front side, 7 stitches - for the second arm, 30 stitches - for the back side. Place marker. Pay attention, that the thumb should be facing forward.
Round 47 :
7sc along the body and the inner side of the first arm, 34sc along the front side of the body, 7sc along the body and the inner side of the second arm, 30sc along the back side (78)
Round 48 :
11sc along the outer side of the first arm, 34sc along the front side of the body, 11sc along the outer side of the second arm, 30sc along the back side (86)
Round 49-50 :
86sc (86) - 2 rounds
Info :
Form the wire frame. Bend both wire ends towards each other and then twist them around the main frame.
Info :
Wrap the part of the wireframe with a masking tape or adhesive tape (the part which will be located inside of the neck).
Round 51 :
(10sc, dec, 9sc, dec)*2, 10sc, dec, 7sc, dec, 8sc, dec, 7sc, dec (78)
Round 52 :
(4sc, dec)*13 (65)
Round 54 :
4sc, dec, 21sc, dec, 8sc, dec, (9sc, dec)*2, 4sc (60)
Round 55 :
(2sc, dec, 2sc)*10 (50)
Round 57 :
(3sc, dec)*10 (40)
Round 59 :
(2sc, dec)*10 (30)
Round 61 :
(1sc, dec)*10 (20) - when crocheting the last stitch change the thread color to skin
Round 62 :
into back loops only 20sc (20)
Round 63 :
(dec, 8sc)*2 (18)
Round 64-66 :
18sc (18) - 3 rounds
Info :
Cut the thread and fasten off, leaving a tail for sewing.
Info :
Return to round 23 and attach the thread of terracotta color to the front loop exactly in the middle of the back side of the body. Make ch and crochet holding the body with the legs facing out from you.
Round 2 :
20sc, inc, 41sc, inc, 21sc (86)
Round 3-8 :
86sc (86) - 6 rounds
Info :
Finish crocheting making sl st into the next stitch. Cut the thread and fasten off. Weave in the thread tail.
— Head :
Info :
Crochet with the yarn of skin color.
Round 3 :
(1sc, inc)*6 (18)
Round 4 :
(2sc, inc)*6 (24)
Round 5 :
(3sc, inc)*6 (30)
Round 6 :
(2sc, inc, 2sc)*6 (36)
Round 7 :
(5sc, inc)*6 (42)
Round 8 :
(3sc, inc, 3sc)*6 (48)
Round 9 :
(7sc, inc)*6 (54)
Round 10 :
(4sc, inc, 4sc)*6 (60)
Round 11 :
(9sc, inc)*6 (66)
Round 12 :
(5sc, inc, 5sc)*6 (72)
Round 13-28 :
72sc (72) - 16 rounds
Info :
Insert the safety eyes between rounds 20 and 21, the distance between these points where the eye stems are inserted is 14 stitches.
Round 29 :
(5sc, dec, 5sc)*6 (66)
Round 30 :
(9sc, dec)*6 (60)
Round 31 :
(4sc, dec, 4sc)*6 (54)
Round 32 :
(7sc, dec)*6 (48)
Round 33 :
(3sc, dec, 3sc)*6 (42)
Round 34 :
(5sc, dec)*6 (36)
Round 35 :
(2sc, dec, 2sc)*6 (30)
Round 36 :
(3sc, dec)*6 (24)
Round 37 :
(2sc, dec)*6 (18)
Info :
Cut the thread and fasten off, add fiberfill.
— Needle Sculpting :
Info :
For needle sculpting use the thread of the same color which was used for the body. Thread the needle and insert it into point 1 (at the lower part of the head under the chin). This point is located between the last and the second-to-last rounds on the head. Pull the thread out from point 2 (near the eye), leaving a thread tail to tie a knot later.
Info :
Then insert the needle into point 3, leaving 3 rounds up from point 2, and run it inside of the piece to the point 4 (near the other eye). Pull the thread. Now insert the needle into point 5 (leaving 3 rounds down) and pull the thread out from point 6 (point 6 is located leaving one stitch to the right from point 1). Pull thread tails carefully, so that the eyes were slightly pushed into the head fabric. After this tie the thread tails with 1-2 tight knots. Thread the needle with tails and weave in them inside of the doll’s head.
— Face Details :
Info :
Eye whites. Take a piece of the white yarn and embroider three stitches around the outer side of each eye. Fasten off the white thread and weave in inside of the head.
Info :
Eyelids. Pull the thread of skin color close to the eye above it, make a diagonal stitch with the length of 4 stitches, insert the needle skipping 1 stitch from the white stitch somewhere in the middle of the eye. The eyelid should cover the top edge of the eye slightly and touch the white stitches. Make one more stitch to make the eyelid wider. Embroider 2-3 horizontal stitches under the eye, to form the lower eyelid.
Info :
Eyelashes. Take black sewing thread or divide a piece of black yarn into separate threads and embroider a thin line of eyelashes under the eyelid.
Info :
Eyebrows. Take YarnArt Denim Washed yarn of dark brown color or use the yarn prepared for hair. Embroider the thick part of the eyebrow first leaving 2 rounds up from the eyes and making three horizontal stitches with the length of 4 stitches. Then embroider two more stitches and one more stitch from the wide part of the eyebrow to the corner.
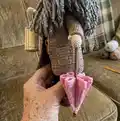
— Nose :
Info :
Crochet with the yarn of skin color.
Info :
Crochet 2sc more additionally and place marker.
Round 3 :
inc, 1sc, 2hdc inc, 1sc, inc, 3sc (13)
Info :
Cut the thread and fasten off, leaving a tail for sewing. Place a nose between the eyes so that the upper point (the first hdc inc) is one round higher from the upper lid. Sew adding some fiberfill.
— Ears :
Info :
Ears are optional and will be hidden after hair attachment. Crochet in skin color. Fix the ears on the head, leaving 7 stitches from the eyes. Sew and weave in tails.
Right ear :
Form a MR and crochet starting from it, make ch3, crochet into the magic ring: 2dc, 2hdc, 2sc, pull the ring closed, cut the thread, leaving a tail for sewing.
Left ear :
Form a MR and crochet mirrored: 2sc, 2hdc, 2dc, ch3, join with MR with sl st, pull the ring closed, cut the thread, leaving a tail for sewing.
— Hair Attaching :
Info :
You can attach the hair at this stage or when all the clothes are ready and the head is sewn. For hair attachment you will need a strong thin thread, a needle (I use Iris yarn), and a thick yarn of dark melange color prepared for hair. I use Pehorka Smesovaya yarn dividing it into separate threads. Cut the yarn into pieces equal to hair length multiplied by two (about 40 cm). I got each piece with the length of about 20 cm *2.
Info :
Take a strong thread and attach it to the head top. Form a loop inserting a needle again into the same point where the thread goes from. Skip 3 stitches and run the needle out, pull the thread. We have formed a loop. Take one piece of yarn, insert it into the loop, and pull the thread so the yarn is hidden between stitches.
Info :
Attach each hair strand leaving 3 stitches from the previous one continuing attaching in rounds. I leave distance between hair strands - 2 rounds on the top and 3 rounds on the head back (hair on the head back attached only if desired). If you use thinner yarn leave 1-2 stitches between hair strands and attach to each round or to every second round. Attach hair to 4 rounds on the head top. The forehead width from the eyebrows to hairline should equal 7 rounds. Continue attaching hair around the face leaving 2 stitches to the side from the eyebrows and the eyes. Attach hair for the beard leaving 7 rounds down from the nose and several strands under the nose forming a moustache. Trim and style the hair after attaching.
This lovely Giant Forester is designed to become a treasured handmade companion with a dramatic beard and voluminous hair that makes every stitch memorable. The pattern gives you full control over hair volume, face sculpting, and poseability so you can craft a doll with character and sturdiness. Enjoy the creative process, and don't forget to trim and style the hair to make your giant truly unique. 🧶✨