🧢 Beautiful ✨ Detailed πŸ’ Adorable

Frog Phone Pouch Amigurumi Pattern

Frog Phone Pouch Amigurumi Pattern
4.2β˜… Rating
5-7 Hours Time Needed
3.4K Made This
βœ‚οΈ

Intermediate Level

Ideal for those with basic crochet experience, featuring slightly more advanced stitches and techniques to expand your skills.

⏱️

Weekend Treat

Takes 5-7 hours, making it an enjoyable project to finish over a couple of days.

🧸

Cute Companion

An adorable friend to cherish, handcrafted with love to bring comfort and joy for years to come.

About This Frog Phone Pouch Amigurumi Pattern

This pattern teaches you how to crochet a phone pouch decorated with a sweet frog amigurumi attached to the front. Youll make the pouch body, lid, strap and the frog parts (head, eyes, crown, body, legs, toes and arms). The design uses single crochet shaping and small assembled pieces for a polished, plush look.

Frog Phone Pouch Amigurumi Pattern crochet pattern - detailed view of completed project

Detailed round-by-round instructions are provided for each piece with sewing and assembly notes included. The finished pouch is both decorative and functional β€” perfect as a gift or personal accessory.

Why You'll Love This Frog Phone Pouch Amigurumi Pattern

I absolutely love this pattern because it combines a useful accessory with a playful amigurumi character that brings joy to everyday items. I enjoy the compact, clever shaping of the frog head and body which gives lots of personality with minimal parts. Sewing the eyes, crown and tiny toes is a relaxing finishing step that really makes the piece sing. It is a pattern that rewards careful stitching with a professional looking result you can be proud to gift.

Frog Phone Pouch Amigurumi Pattern step 1 - construction progress Frog Phone Pouch Amigurumi Pattern step 2 - assembly progress Frog Phone Pouch Amigurumi Pattern step 3 - details and accessories Frog Phone Pouch Amigurumi Pattern step 4 - final assembly and finishing

Switch Things Up

I love how easy it is to customize this pouch by switching yarn colors β€” try pastel tones for a softer look or bold contrasts for a playful style.

If you want a sturdier pouch, I recommend using a slightly tighter tension or a smaller hook than suggested to make the fabric denser.

To make a mini keychain version, use fingering weight yarn and a 1.5–2.0 mm hook and shorten the strap to a loop.

Make it larger by using bulky yarn and a larger hook to create a chunky, cozy pouch that fits bigger phones or small wallets.

I sometimes add embroidery on the pouch flap or small beads for eyes to give extra personality and texture to the frog face.

Experiment with different closures β€” try a snap, button, or magnetic clasp depending on the look and function you prefer.

I often replace the fabric-glued eyes with safety eyes for a sturdier finish on items that will be handled frequently, but glue and sew them for extra security.

For a wearable version, lengthen the strap to create a crossbody pouch and reinforce strap attachment by sewing multiple passes through the pouch fabric.

If you want a washable pouch, consider lining the inside with a thin fabric, sewing it in before final assembly to protect the amigurumi from wear.

I like to make a set of pouches in matching colors for gifts β€” vary the frog expression by adjusting mouth placement and the eye angle for unique personalities.

Common Mistakes & How to Fix Them

βœ— Skipping the note about x-stitch versus v-stitch can change fabric density; choose the recommended x-stitch (yarn under single crochet) for a firm pouch. βœ— Using double crochet for the pouch fabric will cause the pouch to stretch and get mushy; use single crochet as instructed to keep structure. βœ— Not stuffing the head before closing shapes will leave lumps and flattening; stuff gradually and evenly before finishing the final decreases. βœ— Forgetting to weave in ends as you go produces messy finishing; weave in ends after each piece is completed to keep assembly clean.

Frog Phone Pouch Amigurumi Pattern

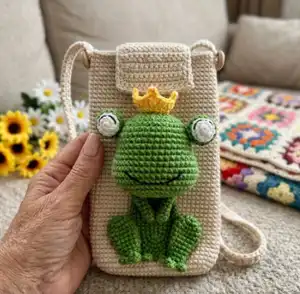
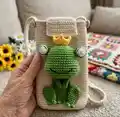
Make a charming frog-adorned phone pouch that doubles as a cute amigurumi applique. This pattern guides you through the crocheted pouch, strap and the sweet frog with step-by-step rounds. Youll enjoy the playful detail like the crown and eyes while creating a functional accessory. Perfect for gifting or adding a handmade touch to your everyday carry.

Intermediate 5-7 Hours

Materials Needed for Frog Phone Pouch Amigurumi Pattern

β€” Main Fabric

  • 01
    Jeans from YarnArt, 165m/50g: Jeans 05
  • 02
    Jeans from YarnArt, 165m/50g: Jeans 37
  • 03
    Jeans from YarnArt, 165m/50g: Jeans 35
  • 04
    Polyester fiberfill for stuffing small amigurumi parts

β€” Tools Required

  • 01
    Crochet hook size 2.3 mm
  • 02
    Two 15 mm buttons
  • 03
    Scissors
  • 04
    Yarn needle for sewing
  • 05
    Stitch markers
  • 06
    Fabric glue for attaching eyes and parts
  • 07
    Polyester stuffing (fiberfill)

Progress Tracker

0% Complete

β€” Bag :

Info :

There are 2 ways to make a single crochet: v-stitch (yarn over single crochet) and x-stitch (yarn under single crochet). There are a lot of video tutorials on youtube, you can watch on it. I use x-stitch (yarn under single crochet). And I think you shouldn't use double crochet, because the pouch will quickly stretch and become mushy.

Round 0 :

Make 24 ch, start in the second ch from hook

Round 1 :

22 sc, 3 sc in the last stitch, continue on the other side of the foundation chain, 21 sc, inc (48)

Round 2 :

inc, 21 sc, 3 inc, 21 sc, 2 inc (54)

Round 3 :

inc, 24 sc, 3 inc, 24 sc, 2 inc (60)

Round 4-51 :

60 sc (60)

Info :

Fasten off and weave the yarn.

β€” Lid of pouch :

Info :

Leaving a long tail for sewing, make 15 ch, start in the second ch from hook

Round 1 :

14 sc, turn

Round 2-13 :

14 sc. Cut and weave the yarn.

Info :

Sew the lid into the pouch between rows 50-51.

β€” Make shoulder - strap :

Round 0 :

Make 3 ch, start in the second ch from hook: 2 sc, turn

Round 2 :

2 sc, turn

Info :

Crochet repeat 2 sc until the shoulder-strap is about 113 cm. Fasten off and weave the yarn.

Info :

Sew the shoulder - strap and button into the pouch.

β€” Head :

Info :

Start in green

Round 1 :

6 sc in the magic ring (6)

Round 2 :

6 inc (12)

Round 3 :

(3 inc, 3 sc)*2 (18)

Round 4 :

(1 sc, inc)*3, 4 sc, (inc, 1 sc)*2, inc, 3 sc (24)

Round 5 :

(1 sc, inc)*4, 5 sc, (inc, 1 sc)*3, inc, 4 sc (32)

Round 6 :

(7 sc, inc)*4 (36)

Round 7-11 :

36 sc (36)

Round 12 :

6 sc, 6 inc, 12 sc, 6 inc, 6 sc (48)

Round 13-17 :

48 sc (48)

Round 18 :

6 sc, 6 dec, 12 sc, 6 dec, 6 sc (36)

Round 19 :

5 sc, dec, 4 sc, dec, 10 sc, dec, 4 sc, dec, 5 sc (32)

Round 20 :

(dec, 2 sc)*8 (24)

Info :

Stuff the head

Round 21 :

(1 sc, dec)*8 (16)

Round 22 :

8 dec (8)

Info :

Slst and stuff the head, then fasten off and weave the yarn.

Info :

Sew the mouse between rows 14-17 with black yarn.

β€” EYE :

Info :

(make 2) Start in white: make 2

Round 1 :

6 sc in the magic ring (6)

Round 2 :

6 inc (12)

Round 3-4 :

12 sc (12)

Round 5 :

6 dec (6)

Info :

Stuff, slst, fasten off and weave the yarn. Sew the eyes between rows 2-3 with black yarn.

Info :

Start in green: make 2

Round 1 :

6 sc in the magic ring (6)

Round 2 :

6 inc (12)

Round 3 :

(3 sc, inc)*3 (15)

Round 4 :

15 sc (15)

Info :

Slst, fasten off and weave the yarn.

Info :

Use fabric glue to paste the white eye into the green eye

Info :

Use fabric glue to paste the eyes into the head between rows 5-9.

β€” CROWN :

Info :

Start in yellow

Round 1 :

Leaving a long tail for sewing the crown into the top of head, make 18 ch, close round, 1 sc in the each ch around : 18 sc

Round 2 :

3 sc, 1 hdc, (1 dc, 3 ch, slst in the third ch from hook, 1 dc)* in the same stitch, 1 hdc, 1 sc, 1 hdc, (1 dc, 3 ch, slst in the third ch from hook, 1 dc)* in the same stitch, 1 hdc, 1 sc, 1 hdc, (1 dc, 3 ch, slst in the third ch from hook, 1 dc)* in the same stitch, 1 hdc, 3 sc. Slst, fasten off and weave the yarn.

β€” Body :

Info :

Start in green

Round 0 :

Make 9 ch, start in the second ch from hook

Round 1 :

7 sc, 3 sc in the last stitch, continue on the other side of the foundation chain, 6 sc, inc (18)

Round 2 :

inc, 6 sc, 3 inc, 6 sc, 2 inc (24)

Round 3 :

1 sc, inc, 6 sc, (1 sc, inc)*3, 6 sc, (1 sc, inc)*2 (30)

Round 4 :

(4 sc, inc)*6 (36)

Round 5 :

2 sc, inc, (5 sc, inc)*5, 3 sc (42)

Info :

Slst, fasten off and weave the yarn.

β€” Leg :

Info :

(make 2) Start in green

Round 1 :

6 sc in the magic ring (6)

Round 2 :

6 inc (12)

Round 3 :

(3 sc, inc)*3 (15)

Round 4-5 :

15 sc (15)

Round 6 :

(3 sc, dec)*3 (12)

Round 7-8 :

12 sc (12)

Round 9 :

(4 sc, dec)*2 (10)

Round 10 :

10 sc (10)

Round 11 :

(dec, 3 sc)*2 (8)

Info :

Don't stuff. Slst, fasten off and weave the yarn.

β€” Toe :

Info :

(make 2) Start in green

Round 0 :

Make 4 ch, start in the second ch from hook: 3 sc in the second ch from hook, 2 slst (the first toe)

Round 1 :

Don't cut the yarn, make 4 ch, start in the second ch from hook: 3 sc in the second ch from hook, 2 slst (the second toe)

Round 2 :

Don't cut the yarn, make 4 ch, start in the second ch from hook: 3 sc in the second ch from hook, 2 slst (the third toe)

Info :

Fasten off the yarn, leaving a long tail for sewing the toe into the leg at row 11.

β€” Arm :

Info :

(make 2) Start in white

Round 1 :

6 sc in the magic ring (6)

Round 2-8 :

6 sc (6)

Info :

Slst and fasten off the yarn, leaving a long tail for sewing. Don't stuff the arms.

β€” Assembling :

Info :

1. Use fabric glue to paste the head into the pouch between rows 21-38.

Info :

2. Use fabric glue to paste the body into the pouch.

Info :

3. Use fabric glue to paste the legs into the pouch.

Info :

4. Sew the arms into the pouch.

Assembly Instructions

  • Use fabric glue to paste the head into the pouch between rows 21-38.
  • Use fabric glue to paste the body centered on the pouch front under the head.
  • Use fabric glue to paste the legs below the body so they sit at the bottom of the pouch opening.
  • Sew the arms into the pouch at the sides of the body using matching yarn and a yarn needle for a secure attachment.

Important Notes

  • πŸ’‘Use x-stitch (yarn under single crochet) for a firm, non-stretchy fabric for the pouch.
  • πŸ’‘Do not use double crochet stitches for the pouch fabric because it will quickly stretch and become mushy.
  • πŸ’‘Stuff the head before completing final decreases to maintain a smooth round shape.
  • πŸ’‘Use fabric glue to attach small flat elements like white eye discs before sewing to secure placement.

This sweet Frog Phone Pouch pattern brings handcrafted charm to your everyday carry with an adorable froggy friend. The little frog includes a crown and expressive eyes for a playful, finished look. Make one for yourself or gift it to someone special β€” every pouch is unique and full of personality. 🧢🐸✨

You ask,

we answer.

FAQs

What size will the finished piece be?

The finished phone pouch measures approximately Length: 17 cm and Width: 10 cm when using the recommended Jeans yarn and 2.3 mm hook.

Can I use different yarn weights for this pattern?

Yes, you can use different yarn weights but the final size will change and fabric drape will vary; adjust your hook size accordingly and test gauge before starting.

Do I need prior crochet experience for this pattern?

This pattern is rated intermediate, so familiarity with magic ring, single crochet increases and decreases, and small amigurumi assembly is recommended.

How long does this project typically take to complete?

Most crocheters finish this project in about 5-7 hours, depending on experience and whether you make the strap and frog details by hand slowly.