🧢 Beautiful ✨ Detailed πŸ’ Adorable

FNAF Bonnie Amigurumi Pattern

FNAF Bonnie Amigurumi Pattern
4.8β˜… Rating
5-7 Hours Time Needed
3.1K Made This
βœ‚οΈ

Intermediate Level

Ideal for those with basic crochet experience, featuring slightly more advanced stitches and techniques to expand your skills.

⏱️

Weekend Treat

Takes 5-7 hours, making it an enjoyable project to finish over a couple of days.

🧸

Cute Companion

An adorable friend to cherish, handcrafted with love to bring comfort and joy for years to come.

About This FNAF Bonnie Amigurumi Pattern

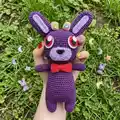
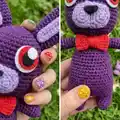
This pattern creates a purple Bonnie amigurumi inspired by Five Nights at Freddy's, complete with anime-style felt eyes and a little bow tie. You will work mostly in single crochet rounds to shape the head, body, legs, arms and ears, then assemble the pieces for the finished look. The pattern includes an eye template and notes on placement to help you get the best expression for your Bonnie.

FNAF Bonnie Amigurumi Pattern crochet pattern - detailed view of completed project

Clear, photographed steps and a linked video tutorial make the trickier parts easy to follow. Designed for intermediate crocheters who enjoy shaping and finishing details.

Why You'll Love This FNAF Bonnie Amigurumi Pattern

I absolutely love this pattern because it balances simple repetitive stitches with charming shaping that really brings the character to life. I enjoyed designing the big anime-style eyes and a cheeky bow tie which give Bonnie a lot of personality. I also love that the pattern is modular β€” you can make the ears, arms, and legs separately and see the project come together. Sharing the tutorial and templates felt rewarding because it helps makers of different skill levels succeed and personalize their own Bonnie.

FNAF Bonnie Amigurumi Pattern step 1 - construction progress FNAF Bonnie Amigurumi Pattern step 2 - assembly progress FNAF Bonnie Amigurumi Pattern step 3 - details and accessories FNAF Bonnie Amigurumi Pattern step 4 - final assembly and finishing

Switch Things Up

I love how easy it is to customize this Bonnie pattern with different colors or small accessories.

I often change the yarn color to create alternate characters β€” try pastel purples or greys for a softer look or neon colors for a playful twist.

I also switch yarn weight to change the size: a bulky yarn with a larger hook makes a cuddly large version, while a sport-weight yarn creates a tiny collectible.

I sometimes replace the felt eyes with safety eyes for a cleaner, shiner look, or embroider the pupils for a fully handmade finish.

Want a different expression? Move the eyes slightly closer or farther apart and experiment with different mouth or nose shapes to change personality.

I like to add small props like a tiny scarf, top hat, or a removable bow tie wrapped with a different colored yarn center.

For posable limbs, I occasionally insert thin florist wire into the arms before stuffing so the arms can be posed.

Try different textures by switching to boucle or chenille yarn for a unique, plush surface that gives Bonnie a distinct look.

I recommend testing any major changes on a small practice piece first so you can adjust counts and proportions without affecting the main project.

If you're making several as gifts, I like to give each one a small sewn-in felt tag with the recipient's initial to personalize them.

Common Mistakes & How to Fix Them

βœ— Skipping the tightening of the magic ring can leave a hole in the center of your piece; pull the ring tight and close the hole before continuing. βœ— Stuffing too much at once creates lumps and uneven shaping; stuff gradually as you go and adjust shaping before adding more stuffing. βœ— Not leaving a long enough tail to sew closed can make finishing difficult; always leave sufficient yarn to sew into the final stitches securely. βœ— Forgetting to place a stitch marker when joining legs to the body will cause miscounts; mark your new start stitch on the left leg and continue from there to keep stitch counts accurate.

FNAF Bonnie Amigurumi Pattern

Make your own cuddly Bonnie from Five Nights at Freddy's with this detailed intermediate amigurumi pattern. You will get step-by-step round-by-round instructions, eye templates, and assembly tips to create a polished finished toy. Perfect for gifting or collecting, this pattern guides you through head, body, ears, arms, legs, and accessories with photos and helpful notes. Grab your hook and yarn and enjoy bringing Bonnie to life!

Intermediate 5-7 Hours

Materials Needed for FNAF Bonnie Amigurumi Pattern

β€” Main Fabric

  • 01
    Hobby Lobby 'I Love This Cotton' - Purple (252) - main color
  • 02
    Hobby Lobby 'I Love This Cotton' - Amethyst (250) - lighter purple for muzzle/inner ear
  • 03
    Hobby Lobby 'I Love This Cotton' - Red (60) - bow tie and eye detail
  • 04
    Felt sheet - White - for eye highlights and details
  • 05
    Felt sheet - Black - for pupil and nose
  • 06
    Felt sheet - Pink - optional eye accents
  • 07
    Polyester fiberfill - for stuffing the head, body, and limbs (enough to fill whole amigurumi)

β€” Tools Required

  • 01
    Crochet hook size D/3.25mm
  • 02
    Stitch markers
  • 03
    Scissors
  • 04
    Darning/tapestry needle for sewing pieces
  • 05
    Felt and fabric glue (optional) for eye layers
  • 06
    Pins for positioning pieces while sewing
  • 07
    Polyester stuffing (fiberfill)

Progress Tracker

0% Complete

β€” Head :

Round 1 :

MR and place 6SC (6)

Round 2 :

[INC] x6 (12)

Round 3 :

[SC, INC] x6 (18)

Round 4 :

[SC1, INC, SC1] x6 (24)

Round 5 :

[SC3, INC] x6 (30)

Round 6 :

[SC2, INC, SC2] x6 (36)

Round 7 :

[SC5, INC] x6 (42)

Round 8 :

[SC3, INC, SC3] x6 (48)

Round 9-20 :

[SC] across (48)

Info :

TIP: I place eyes between rounds 13-14 two inches apart.

Round 21 :

[SC3, DEC, SC3] x6 (42)

Round 22 :

[SC5, DEC] x6 (36)

Round 23 :

[SC2, DEC, SC2] x6 (30)

Round 24 :

[SC3, DEC] x6 (24)

Round 25 :

[SC1, DEC, SC1] x6 (18)

Round 26 :

[SC1, DEC] x6 (12)

Round 27 :

[DEC] x6 (6)

Info :

Slip stitch off, and make sure you leave enough yarn to sew into last 6 stitches. Weave in tails

β€” Bow Tie :

Info :

Chain 25, attach first stitch to last with a slip stitch.

Info :

[SC] around for four rounds.

Info :

Slip stitch off, make a long tail (16') and wrap around the center as shown in video tutorial.

β€” Legs :

Round 1 :

MR, [SC] x5 inside ring and tighten the loop (5)

Round 2 :

[INC] x5 (10)

Round 3 :

[SC1, INC] x5 (15)

Round 4-5 :

[SC] across (15)

Round 6 :

[SC] across (15)

Info :

- Break the yarn and fasten off your work. The right leg is done. - Repeat R1-6 with left leg as well, but this time do not fasten off. - Place a stitch marker into the last stitch you made on the left leg. This is your new start for your rounds. - Continue next to the body.

β€” Body :

Round 7 :

8SC in the stitches of the left leg, CH9 and join to the right leg with a SC(this counts as the 1st SC of the following SC), SC in the next stitches of the right leg, 9SC in the 9CH, 7SC in the stitches of the left leg. (48)

Round 8 :

[SC] across (48)

Round 9 :

[SC22, DEC] x2 (46)

Round 10 :

[SC] across (46)

Round 11 :

[SC21, DEC] x2 (44)

Round 12 :

[SC] across (44)

Round 13 :

[SC20, DEC] x2 (42)

Round 14 :

[SC] across (42)

Round 15 :

[SC19, DEC] x2 (40)

Round 16 :

[SC] across (40)

Round 17 :

[SC18, DEC] x2 (38)

Round 18 :

[SC] across (38)

Round 19 :

[SC17, DEC] x2 (36)

Round 20 :

[SC] across (36)

Round 21 :

[SC16, DEC] x2 (34)

Round 22 :

[SC] across (34)

Round 23 :

[SC15, DEC] x2 (32)

Round 24 :

[SC] across (32)

Round 25 :

[SC14, DEC] x2 (30)

Round 26 :

[SC] across (30)

Round 27 :

[SC3, DEC] x6 (24)

Info :

Break yarn and fasten off.

β€” Arms :

Round 1 :

MR with 6SC (6)

Round 2 :

[INC] x6 (12)

Round 3-11 :

[SC] across (12)

Info :

TIP: I stuff the tips of the hands up to round 5, but leave the rest of the arms empty.

β€” Eyes :

Round 1 :

With pink yarn, MR with 6SC (6)

Round 2 :

[INC] x6 (12)

Round 3 :

Change to white, [SC1, INC] x6 (18)

Info :

Slip stitch off

Info :

I have a tutorial on how to make "anime" eyes which will be linked at the end of this PDF.

β€” Nose :

Round 1 :

MR and place 5SC (5)

Round 2 :

[INC] x5 (10)

Round 3 :

[SC1, INC] x5 (15)

Info :

Repeat 1-3 but this time don't slip stitch off.

Info :

Sew first piece down the side for 3 stitches on both pieces. Check out our tutorial for further instructions.

Round 3-5 :

[SC] around both pieces. (24)

β€” Outer Ear :

Round 1 :

MR with 6SC (6)

Round 2 :

[INC] x6 (12)

Round 3 :

[SC1, INC] x6 (18)

Round 4-17 :

[SC] around (18)

Round 18 :

[SC1, DEC] x6 (12)

Info :

Slip stitch off and attach to top of the head.

β€” Inner Ear :

Info :

Chain 13, skip first chain and [SC] inside 11 chains, INC2 in final chain, turn and [SC11,INC2] in the backs of the foundational chains.

Info :

Slip stitch off and attach to the fronts of the ears.

Assembly Instructions

  • Attach outer ears to the top of the head by sewing through the round where you finished the ear foundation; position symmetrically and stitch securely.
  • Place and attach inner ear pieces to the fronts of the outer ears with small blanket stitches or glue, centering the inner ear over the ear face.
  • Sew the two nose pieces together along the side for three stitches on both pieces, then SC around both pieces to join and shape the nose before attaching to the muzzle.
  • Position eyes between head rounds 13-14 approximately two inches apart and attach felt or crocheted eye layers as shown in the template; secure firmly.
  • Sew arms to sides of the body at a level that aligns with the top of the body rounds shown in photos, stuffing tips up to round 5 before closing.
  • Sew the head to the body using the yarn tail left from the head closure, aligning center and securing evenly around the neck opening.

Important Notes

  • πŸ’‘Hook size is less important than working tight stitches so stuffing does not show through the fabric, so adjust tension rather than only changing hook size.
  • πŸ’‘If you change your yarn size, adjust eye sizes and embroidery proportions accordingly so the facial features remain in balance.
  • πŸ’‘Stuff the legs as you go and stuff the head and body firmly but not overstuffed to avoid distortion of the shape.
  • πŸ’‘Leave enough yarn tail when closing pieces so you can sew pieces securely and weave in tails neatly after assembly.

This Bonnie amigurumi pattern brings a playful spooky charm to your handmade collection with bold eyes and a cheeky bow tie. The pattern includes head-to-toe shaping instructions and eye templates so you can recreate the look exactly. Whether you make one for yourself or as a gift, it will be a treasured, handcrafted keepsake. πŸ§Άβœ¨πŸ’œ

You ask,

we answer.

FAQs

What size will the finished piece be?

The finished amigurumi measures approximately 9-12 inches tall when using 'I Love This Cotton' and a 3.25mm hook; final size varies with yarn and tension.

Can I use different yarn weights for this pattern?

Yes, you can use different yarn weights, but this will change the final size; if you choose a different weight, adjust hook size and the felt eye template accordingly.

Do I need prior crochet experience for this pattern?

This pattern is rated intermediate, so basic knowledge of single crochet, increases, decreases, and working in the round is recommended.

How long does this project typically take to complete?

Most crocheters complete this project in 5-7 hours, depending on experience, finishing skills, and whether you make the felt eyes by hand or with a Cricut.

Are the eye templates included?

Yes, eye templates and suggested Cricut sizes are included in the PDF so you can cut felt layers for the anime-style eyes.