Create a charming handmade bouquet of crochet flowers with this clear, beginner-friendly pattern. You will learn to make tulips, daisies, baby daisies, and two styles of roses plus leaves and stems. The instructions guide you step-by-step and include materials, abbreviations, and assembly tips so you can recreate the exact bouquet shown or customize colors and sizes.
Progress Tracker
0% Complete
— Note from seller :
Info :
Each crocheter has a different way of writing patterns, this pattern is beginner friendly, so I made more specific explanations of each step, I keep updating the pattern as I receive feedback from you, hence, if you get to any confusing part please reach out so I can fix it
— Material needed :
Infos :
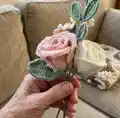
crochet hook size 2-2.5mm. cotton yarn of your preference (4 ply). thin wire for every petal or leaf that will need it. wood stick or a thick wire for the flower stem it (to make moldable stems to be able to wrap it like the first picture around a bucket, use moldable metallic wires as stem). glue (hot glue). The color of the yarn used for each part is up to you, in the document i'll show some options but there are plenty more combinations that will look great.
— Yarn size specifications :
Info :
For this pattern I used a 4ply yarn from my local store. Milk yarn, cotton yarn, acrylic yarn, all can be used, will depend on what are you more comfortable with. As per instructions you can select the yarn you prefer, depending on the size of your yarn, adjust the hook used, if the yarn is thicker, the product will turn out bigger, if it is an amigurumi, with a thicker yarn and a bigger crochet hook you can make up a plushie. For the exact size of my images it will be 4ply. Please note that yarn size will also vary depending on the manufacturer and the fiber content of the yarn. Normally to make the same size of crocheted product as my images a 2mm-2.5mm hook is used, with a 4ply yarn, make sure it is not too thick or too thin.
— Abbreviations :
Infos :
DISCLAIMER: US crochet terms used. The explanations of each stitch might not be exactly the same as what each of you learned and each way of making the stitch is perfectly correct, there are many ways of dec. or inc, etc. BLO - back loop only: When working in the back loop only, insert your hook into only the back loop of the stitch. Ch - chain: To make a chain stitch, yarn over (YO) your hook and then pull it through the loop on your hook. This will create a new loop. Repeat this process until you have the desired number of chains. Dc - double crochet: YO, insert hook into stitch, YO, pull up a loop (3 loops on hook). YO, pull through 2 loops (2 loops on hook). YO, pull through remaining 2 loops. 1 double crochet completed. Dec - decrease: Yarn over (yo), insert hook into stitch, yo, pull up a loop (3 loops on hook). Yo, pull through 2 loops (2 loops on hook). Yo, insert hook into next st, yo, pull up a loop (4 loops on hook). Yo, pull through 2 loops (3 loops on hook). Yo, pull through remaining 3 loops. Dc2tog completed. FLO - front loop only: When working in the front loop only, insert your hook into only the front loop of the stitch. Hdc - half double crochet: Yarn over (yo), insert hook into stitch, yo, pull up a loop (3 loops on hook). Yo, pull through all loops. Half crochet completed. Inc - increase: Add one or more stitches to the current round or row. To increase with a single crochet, work two single crochet stitches into the same stitch.
Infos :
MR - magic ring: A technique used to begin crocheting in the round, create a circle with the yarn, insert your hook into the circle, and then work the desired number of stitches into the center of the circle. Once finished, pull on the tail of the yarn to close the circle. Rep - repeat: Repeat a pattern or sequence of stitches. Sc - single crochet: Insert hook into stitch, yarn over (yo), pull up a loop (2 loops on hook). Yo, pull through both loops on hook. 1 single crochet completed. Sk - skip stitch: Skip the next stitch in the row or round. Sl st - slip stitch: Insert your hook into the next stitch, YO, and pull through both the stitch and the loop on your hook. St - stitch: A stitch refers to a loop of yarn that is pulled through another loop to create a pattern. Tr - treble crochet: YO twice, then insert your hook into the next stitch. YO again and pull up a loop (4 loops left on hook). YO and pull through the first two loops on your hook (3 loops left). YO and pull through the next two loops on your hook. YO and pull through the last two loops on your hook. w - sc3 in same st: Work three single crochet stitches into the same stitch. YO - yarn over: Wrap the yarn over the hook before inserting it into the next stitch. FO - fasten off: Cut the yarn and pull it through the final loop to secure the stitch.
— Tulips :
Round R1 :
Small petals (x3): R1: Chain 12.
Round R2 :
Small petals (x3): R2: (add wire) sk, sc, hdc, 7dc, hdc, w, hdc, 7dc, hdc, sc
Round R3 :
Small petals (x3): R3: 23 sc, sl, FO
Round R1 :
Big petals (x3): R1: chain 13
Round R2 :
Big petals (x3): R2: sk, 11 sc, w, 11 sc
Round R3 :
Big petals (x3): R3: (add wire) sc, hdc, 9dc, hdc, w, hdc, 9dc, hdc, sc
Round R4 :
Big petals (x3): R4: 27sc, sl, FO
Round R1 :
Big leaf: R1: chain 31
Round R2 :
Big leaf: R2: (add wire) sk, 3 sc, 3 hdc, 18 dc, 3 hdc, 2 sc, w, 2sc, 3 hdc, 18 dc, 3hdc, 3 sc, sl, FO
Info :
Start sticking with glue around the stick the small petals, and then add the bigger ones, in a circular way. Add the leaf in the down part of the stick, and roll yarn around the stick to secure the leaf and make the stem look more natural.
— Daisy flower :
Round R1 :
Center of the flower: R1: 6 sc magic ring
Round R2 :
Center of the flower: R2: 6 inc
Round R3 :
Center of the flower: R3: 12 sc and FO
Info :
(Make one yellow and with the same steps make a green one for the back of the flower, to connect with the stem.) You will have to connect both and stitch it together, before completely closing the stitch add some fibrefill or cotton to fill the inside of the center. And then start with the petals:
Round Petals :
Petals: (3 ch, dc, 3 ch, sl st) Rep 12. There will be 12 petals in total.
Info :
Connect the wire or wooden stick to the flower, depending on how you want to put the daisies it will be better to put the stem right in the middle of the center in the back of the flower or as the other flowers in between the two centers. Both ways will look good. Don't forget to roll yarn over so the stem looks more realistic.
— Baby daisy flower :
Round R1 :
R1: 5 sc magic ring
Round R2 :
R2: (2 ch, 3 dc, 2 ch) Rep 5 times
Info :
The center of the flower just pass the yarn making some stitches in the center. You can make a few baby daisies and connect them to a wire o wooden stick rolling green yarn to make the stem. If you use a light color, there is also the option to add some blush on the edges to make some gradient in the color.
— Rose flower type 1 :
Round R1 :
Flower petals: R1: chain 53
Round R2 :
Flower petals: R2: 52 sc
Round R3 :
Flower petals: R3: chain 5, dc, sk2, to begin with. The rest rep (dc, 2ch, dc) sk2 until the end. The part inside of the parenthesis has to be worked in the same stitch
Round R4 :
Flower petals: R4: chain 3, in the next hole work (2dc, 2ch, 2dc); Work on the hole of the upper part (2dc, 2ch, 2dc) Rep until the end
Round R5 :
Flower petals: R5: *ch 1, and in the hole of the upper part work 8dc. In the next hole work 1 sc. And repeat from* until the end and sl, FO.
Info :
Should end up with something like this: To finish the rose, roll it up starting with the first chain at the center of the rose, then stick it together with glue.
Round R1 :
Flower bottom: R1: (3 ch, 20 dc, sl st) magic ring
Round R2 :
Flower bottom: R2: 8ch, ((sk, 2sc, 2hdc, 2dc, 1 tc) on chain) sk3, sl st
Info :
Repeat 5 times and sl, FO, making a similar to star figure to put in the bottom of the rose.
Round R1 :
Rose leaf: R1: 12ch, sk, sc, hdc, 7dc, hdc; on the other side of the chain: w, hdc, 7dc, hdc, sc
Round R2 :
Rose leaf: R2: (add wire), sc, 2ch. Rep until reached the end and sl, FO.
Info :
Stick every part together and roll yarn around a wooden stick to make the stem.
— Rose flower type 2 :
Round R1 :
Small petal (x4) R1: 10 dc magic ring
Round R2 :
Small petal (x4) R2: 10 hdc inc
Round R3 :
Small petal (x4) R3: 6 sc, 8 hdc inc, 6 sc
Round R1 :
Midi petal (x4) R1: 10 dc magic ring
Round R2 :
Midi petal (x4) R2: 10 hdc inc
Round R3 :
Midi petal (x4) R3: (2 sc, sc inc) rep
Round R4 :
Midi petal (x4) R4: 8 sc, 9 hdc inc, 9 sc
Round R1 :
Big petal (x5) R1: 10 dc magic ring
Round R2 :
Big petal (x5) R2: 10 hdc inc
Round R3 :
Big petal (x5) R3: (hdc, hdc inc) rep
Round R4 :
Big petal (x5) R4: 8 sc, 6 hdc inc, (hdc, dc in same st), 3 ch, (dc, hdc in same st), 6 hdc inc, 8 sc
Round R1 :
Flower bottom: R1: 6 sc magic ring
Round R2 :
Flower bottom: R2: 6 inc
Round R3 :
Flower bottom: R3: 6 (sc, inc)
Round R4 :
Flower bottom: R4: 18sc
Round R5 :
Flower bottom: R5: [9 ch, (sk1 backward, 2 sl st, 2sc, 2 hdc, dc, tc in chain), sk 2, sl st] rep 6 times.
Round R1 :
Rose leaf: R1: 12ch, sk, sc, hdc, 7dc, hdc; on the other side of the chain: w, hdc, 7dc, hdc, sc
Round R2 :
Rose leaf: R2: (add wire), sc, 2ch. Rep until reached the end and sl, FO.
Info :
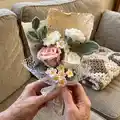
Start sticking and rolling the petals as the image, in order, from the small petals to the big petals. Stick every part together and roll yarn around a wooden stick to make the stem. To add gradient to the flower you can add some blush.
— Leafs :
Round R2 :
R2: (add metallic wire to secure the position) sk, sc, hdc, dc, 5 tc, dc, hdc, w, hdc, dc, 5 tc, dc, hdc, sc, sl, FO.
Info :
Make 5 or 7 leaves (depending if you want to make the leaves branch bigger or smaller), and connect all as the picture to the wooden stick, making leaves coming out of the stem. Don't forget to roll yarn over to wooden stick to make it more realistic.
Thank you for choosing this Flower Bouquet C pattern; I hope it brings handmade beauty to your home and gifts. Make roses, tulips, and daisies in colors you love and arrange them into a bouquet that never wilts. Share your finished creations and keep experimenting with colors and textures for endless floral joy. 🌸🧶