๐Ÿงถ Beautiful โœจ Detailed ๐Ÿ’ Adorable

Crochet Whale Amigurumi Pattern

Crochet Whale Amigurumi Pattern
4.4โ˜… Rating
12-15 Hours Time Needed
2.4K Made This
โœ‚๏ธ

Intermediate Level

Ideal for those with basic crochet experience, featuring slightly more advanced stitches and techniques to expand your skills.

โฑ๏ธ

Multi-Day Project

A rewarding 12+ hour journeyโ€”perfect for dedicated crafters who love detailed work.

๐Ÿฅ

Charming Critter

Delightful animal designs with sweet details that capture the essence of your favorite woodland and farmyard friends.

About This Crochet Whale Amigurumi Pattern

This pattern creates a detailed, poseable crochet whale with wired fins and a separate lower jaw. Youll work in continuous rounds with invisible color changes and shaping to create a smooth body. The pattern uses YarnArt Jeans size 2 for a neat, dense fabric ideal for amigurumi. Clear photos and instructions guide each assembly step so you can finish with professional results.

Crochet Whale Amigurumi Pattern crochet pattern - detailed view of completed project

Includes step-by-step rounds for head, body, fins and jaw, plus wiring instructions for poseable fins. Perfect for intermediate crocheters who enjoy shaping and finishing techniques.

Why You'll Love This Crochet Whale Amigurumi Pattern

I absolutely love this pattern because it combines classic amigurumi shaping with small tailoring touches like wired fins that make the whale poseable. I enjoy the clean look the YarnArt Jeans yarn gives and how the invisible color change keeps the belly neat. I love sharing patterns that teach a useful technique โ€” the shifting stitch for spiral crochet makes the shaping consistent and precise. Every finished whale feels special because of the careful finishing and the option to personalize colors and eye details.

Crochet Whale Amigurumi Pattern step 1 - construction progress Crochet Whale Amigurumi Pattern step 2 - assembly progress Crochet Whale Amigurumi Pattern step 3 - details and accessories Crochet Whale Amigurumi Pattern step 4 - final assembly and finishing

Switch Things Up

I love customizing this whale by changing yarn colors โ€” try a light grey top with a pale belly for a classic look, or choose pastels for a nursery-friendly toy.

I sometimes make a mini version by using a finer yarn and a smaller hook to create keychain-sized whales that are adorable and portable.

I recommend adding accessories like a tiny crocheted hat, embroidered mouth, or felt spots to personalize each whale for gifts.

If you want more poseability, use thicker wire or a double wire bundle for the tail for stronger shaping; just be sure to wrap and secure the ends well.

I often stitch the safety eyes on with a washer or use embroidered eyes for a fully child-safe toyโ€”choose according to the intended recipient.

For a sturdier toy that holds its shape, use tighter tension and smaller hook; for a softer, cuddlier whale, choose a larger hook and softer stuffing.

I like to experiment with surface embroidery for barnacles or white belly spots to give each whale more character.

You can make a family of whales in coordinating colors and sizes โ€” change yarn weight and hook to create small, medium and large versions.

If you prefer weighted toys, add a small pouch of pellets in the base for stability and place it inside before final closing.

I also enjoy making a matching set of sea creatures by using the same yarn and similar finishing techniques for octopus or fish companions.

Common Mistakes & How to Fix Them

โœ— Skipping the marker for the beginning of rounds causes the spiral start to drift; use a thin contrasting thread or stitch marker and adjust with a shifting stitch when needed. โœ— Not stuffing gradually leads to lumps and uneven shaping; stuff little by little, especially around the head and jaw, to keep smooth curves. โœ— Forgetting to secure the wire ends correctly can cause poking or bending over time; wrap the wire loop and secure it with adhesive bandage and duct tape as instructed before inserting. โœ— Pulling the invisible color change too tight creates gaps and tension differences; change color by wrapping the new yarn around the hook and pull through the remaining loops gently for a neat finish.

Crochet Whale Amigurumi Pattern

Make a charming crochet whale using simple single crochet rounds and clear step-by-step assembly. This pattern guides you through the head, body, fins and jaw, including wiring for poseable fins and invisible color changes. Youll enjoy shaping a soft, huggable whale perfect for gifting or nursery decor.

Intermediate 12-15 Hours

Materials Needed for Crochet Whale Amigurumi Pattern

โ€” Main Fabric

  • 01
    55 % cotton, 45 % pac YarnArt Jeans size 2 (50 g/150 m) - color 01 white
  • 02
    YarnArt Jeans size 2 (50 g/150 m) - color 54 blue

โ€” Tools Required

  • 01
    Crochet hook No 1.75 Crochet Soft Touch
  • 02
    Scissors
  • 03
    Stitch markers or thin cotton thread as a marker
  • 04
    Beads (for details if desired)
  • 05
    Sintepuh (synthentic stuffing) / polyester stuffing
  • 06
    8 mm safety eyes (2 pieces)
  • 07
    Wire (for fin posability)
  • 08
    Adhesive roll bandage (to wrap wire loops)
  • 09
    Duct tape (to secure wire bundles)
  • 10
    Tapestry needle for sewing and weaving ends

Progress Tracker

0% Complete

โ€” Head + Body :

Info :

Blue yarn

Round 1 :

8 sc into MR [8]

Round 2 :

8 inc [16]

Round 3 :

(1 sc, inc)*8 [24]

Round 4 :

12 sc, (1 sc, inc)*6 [30]

Round 5 - 9 :

30 sc [30] {5 rounds}

Round 10 :

2 sc, inc, (4 sc, inc)*5, 2 sc [36]

Round 11 :

36 sc [36]

Round 12 :

12 sc, (3 sc, inc)*6 [42]

Round 13 :

3 sc, inc, (6 sc, inc)*5, 3 sc [48]

Round 14 :

48 sc [48]

Round 15 :

12 sc, (5 sc, inc)*6 [54]

Round 16 - 17 :

54 sc [54] {2 rounds}

Round 18 :

15 sc, inc, (6 sc, inc)*5, 3 sc [60]

Round 19 - 21 :

60 sc [60] {3 rounds}

Round 22 :

(9 sc, inc)*6 [66]

Round 23 - 24 :

66 sc [66] {2 rounds}

Round 25 :

16 sc, inc, (8 sc, inc)*5, 4 sc [72]

Round 26 - 27 :

72 sc [72] {2 rounds}

Round 28 :

30 sc, 3 inc, 30 sc, 3 inc, 6 sc [78]

Round 29 :

30 sc, (1 sc, inc)*3, 30 sc, (1 sc, inc)*3, 6 sc [84]

Round 30 - 34 :

84 sc [84] {5 rounds}

Info :

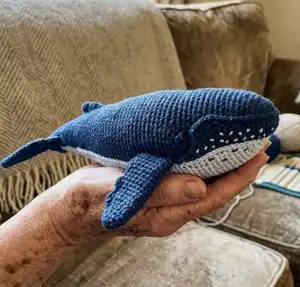
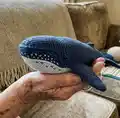
Insert the safety eyes between the rounds 29 and 30 leaving 43 stitches apart. {img 1-2}

Round 35 - 44 :

84 sc [84] {10 rounds}

Info :

Make 3 wires of 40 cm. Curve one end of each piece into a loop like on the pics and wrap it with the adhesive roll bandage. Also curve the wrapped part at an angle of 90 degrees. At a distance of 11 cm {img 6}. Stuff it with sintepuh.

Info :

Insert two curved wires between row 38 and row 39, below the eye {img 8 - 9}.

Info :

Insert the third wire into the center. Secure with duct tape {img 9 - 11}.

Round 45 - 57 :

84 sc [84] {13 rounds}

Round 58 :

12 sc, (11 sc, inc)*6 [90]

Round 59 :

90 sc [90]

Round 60 :

12 sc, (11 sc, dec)*6 [84]

Round 61 :

12 sc, (10 sc, dec)*6 [78]

Round 62 - 63 :

78 sc [78] {2 rounds}

Info :

Stuff with synthetic fluff.

Round 64 :

12 sc, (9 sc, dec)*6 [72]

Round 65 - 67 :

72 sc [72] {3 rounds}

Round 68 :

24 sc, (6 sc, dec)*6 [66]

Round 69 - 72 :

66 sc [66] {4 rounds}

Round 73 :

12 sc, 3 hdc in the 1 stitch {img 13}, 53 sc [68]

Info :

Stuff with synthetic fluff.

Round 74 :

26 sc, (5 sc, dec)*6 [62]

Round 75 :

13 sc, 3 hdc in the 1 stitch, 48 sc [64]

Round 76 :

64 sc [64]

Round 77 :

22 sc, (5 sc, dec)*6 [58]

Round 78 :

58 sc [58]

Round 79 :

14 sc, 3 hdc in the 1 stitch, 43 sc [60]

Round 80 - 81 :

60 sc [60] {2 rounds}

Round 82 :

24 sc, (4 sc, dec)*6 [54]

Info :

Stuff with synthetic fluff.

Round 83 :

9 sc, from the 11th stitch from the hook: 35 sc [44] {img 14, 15}

Round 84 :

44 sc [44]

Info :

Go back to row 83. Fold the missed stitches in half and sew. {img 16, 17}

Round 85 - 87 :

44 sc [44] {3 rounds}

Round 88 :

(20 sc, dec)*2 [42]

Round 89 :

(5 sc, dec)*6 [36]

Round 90 - 91 :

36 sc [36] {2 rounds}

Round 92 :

(4 sc, dec)*6 [30]

Round 93 - 97 :

30 sc [30] {5 rounds}

Round 98 :

(3 sc, dec)*6 [24]

Info :

Finish the end of the line {img 18 - 21}.

Round 99 - 103 :

24 sc [24] {5 rounds}

Round 104 :

(2 sc, dec)*6 [18]

Info :

Stuff with synthetic fluff.

Round 105 - 106 :

18 sc [18] {2 rounds}

Round 107 :

(1 sc, dec)*6 [12]

Round 108 - 109 :

12 sc [12] {2 rounds}

Round 111 :

6 dec [6]

Info :

Fasten off leaving a tail about 15 cm long and cut the yarn. Using a tapestry needle, weave the yarn tail through the front loop of each stitch and pull tight to close.

โ€” Right Fin :

Info :

Blue yarn

Round 1 :

make chain of 30 stitches, from the 2nd stitch from the hook: 28 sc, 4 sc in the 1 stitch, on the other side of the chain - 28 sc [60] {img 1}

Round 2 :

ch, turn, from the 2nd stitch from the hook: 28 sc, 4 inc, 3 sc, 7 hdc, 7 dc, 2 inc-dc, 4 dc, 2 hdc, 3 sc [66] {img 2}

Round 3 :

ch, turn, from the 2nd stitch from the hook: 3 sc, 2 hdc, 5 dc, 2 inc-dc, 8 dc, 5 hdc, 3 sc, 14 sl st, 20 sc, 4 sl st [68] {img 3}. Don't cut the thread.

Info :

Ch, turn {img 13}, from the 2nd stitch from the hook 5 sl st, 9 sc, 4 sl st {img 14}, 1 sc, 3 hdc in the 1 stitch {img 15}, 1 sc, 3 sl st, 2 sc, 3 hdc in the 1 stitch {img 16}, 2 sc, 11 sl st {img 17}, 2 sc, 3 hdc in the 1 stitch, 2 sc, 1 sl st {img 18}, 3 hdc in the 1 stitch, 1 sl st, 1 sc {img 19}, 3 hdc in the 1 stitch, 2 sc, 1 sl st {img 20}, 3 hdc in the 1 stitch, 1 sc, 2 sl st, 3 sc, 8 sl st {img 21}.

Info :

White yarn - make matching white detail as described next and attach together.

Info :

White yarn: 1 r: make chain of 30 stitches, from the 2nd stitch from the hook: 28 sc, 4 sc in the 1 stitch, on the other side of the chain - 28 sc [60]. 2 r: ch, turn, from the 2nd stitch from the hook: 3 sc, 2 hdc, 4 dc, 2 inc-dc, 7 dc, 7 hdc, 3 sc, 4 inc, 28 sc [66]. 3 r: ch, turn, from the 2nd stitch from the hook: 4 sl st, 20 sc, 14 sl st, 3 sc, 5 hdc, 8 dc, 2 inc-dc, 5 dc, 2 hdc, 3 sc [68] {img 4}.

Info :

Attach them together (wrong side to wrong side) {img 6}. Blue yarn: Keep white detail on top, blue detail on bottom. Ch, turn. Bind off 2 pieces together (blue and white ones). Catch blue piece in the stitch and white piece in BLO {img 7 - 12}.

โ€” Left Fin :

Info :

Blue yarn - same construction as Right Fin. 1 r: make chain of 30 stitches, from the 2nd stitch from the hook: 28 sc, 4 sc in the 1 stitch, on the other side of the chain - 28 sc [60]. 2 r: ch, turn, from the 2nd stitch from the hook: 28 sc, 4 inc, 3 sc, 7 hdc, 7 dc, 2 inc-dc, 4 dc, 2 hdc, 3 sc [66]. 3 r: ch, turn, from the 2nd stitch from the hook: 3 sc, 2 hdc, 5 dc, 2 inc-dc, 8 dc, 5 hdc, 3 sc, 14 sl st, 20 sc, 4 sl st [68] {img 3}. Don't cut the thread.

Info :

Make the white detail matching the blue one and attach wrong side to wrong side, then bind off together and finish catching blue piece in the stitch and white piece in BLO {img 7 - 12}.

Info :

You have made 2 items. One white and one blue {img 5}.

โ€” Lower Jaw :

Info :

Blue yarn

Round 1 :

make chain of 28 stitches {img 1}, from the 2nd stitch from the hook: 26 sc, 3 sc in the 1 stitch, on the other side of the chain - 26 sc [55] {img 2}

Round 2 :

ch, turn, from the 2nd stitch from the hook: 26 sc, 3 inc, 26 sc [58] {img 3}

Round 3 :

ch, turn, from the 2nd stitch from the hook: 26 sc, (1 sc, inc)*3, 26 sc [61] {img 4}

Round 4 :

ch, turn, from the 2nd stitch from the hook: 27 sc, inc, (2 sc, inc)*2, 27 sc [64] {img 5}

Round 5 :

ch, turn, from the 2nd stitch from the hook: 26 sc, (3 sc, inc)*3, 26 sc [67] {img 6}

Info :

Continue shaping the lower jaw following the photo steps and attach to the head at the mouth opening after stuffing and finishing edges.

Assembly Instructions

  • Insert the safety eyes between rounds 29 and 30, leaving 43 stitches apart; secure eyes and check placement before continuing.
  • Make three 40 cm wires, curve one end into a loop and wrap with adhesive roll bandage, then curve the wrapped part at 90 degrees; insert two curved wires between row 38 and row 39 below the eye and the third into the center, secure with duct tape.
  • Stuff the body with synthetic fluff gradually at the indicated stuffing points (after rounds 63, 73, 82, 99 etc.) to keep smooth shaping and avoid lumps.
  • Sew the lower jaw into the mouth opening and close the seam by folding the missed stitches (go back to the specified row 83 area), then sew and finish neatly.
  • Attach fins by positioning them on either side of the body and sewing securely; hide and weave in all tails for a clean finish.

Important Notes

  • ๐Ÿ’กWork in a continuous spiral without slip stitches or turning chains; use a marker to track the beginning of each round for consistent shaping.
  • ๐Ÿ’กUse a thin cotton thread as a temporary marker and apply a shifting stitch when you notice the beginning of the round shifting to the right.
  • ๐Ÿ’กMake invisible color changes by wrapping the new color around your hook within two stitches before the color change; avoid pulling the final loop too tight.
  • ๐Ÿ’กStuff gradually and evenly; overstuffing can distort shaping while under stuffing leaves gapsโ€”add small amounts of filler as you shape.

This charming crochet whale pattern is perfect for making a thoughtful handmade gift or a special nursery accent. The wired fins add personality and posability, while the invisible color changes keep the belly neat and professional. Follow the clear rounds, photos, and finishing tips to create a whale youโ€™ll be proud to display. ๐Ÿ‹๐Ÿงถ

You ask,

we answer.

FAQs

What size will the finished piece be?

The finished amigurumi measures approximately 30-35 cm long when using the recommended YarnArt Jeans size 2 and 1.75 mm hook; exact size depends on stuffing and tension.

Can I use different yarn weights for this pattern?

Yes, you can use different yarn weights, but this will change the final sizeโ€”use an appropriate hook for your chosen yarn and expect adjustments to wire lengths and stuffing amounts.

Do I need prior crochet experience for this pattern?

This pattern is rated intermediate, so basic knowledge of single crochet, increases, decreases, and working in spiral is recommended for best results.

How long does this project typically take to complete?

Most crocheters complete this project in 12-15 hours across multiple sessions, depending on experience, finishing detail, and customizations.