🧢 Beautiful ✨ Detailed πŸ’ Adorable

Crochet Hook Holder Pattern

Crochet Hook Holder Pattern
4.7β˜… Rating
2-4 Hours Time Needed
2.5K Made This
βœ‚οΈ

Beginner Friendly Level

Perfect for those just starting their crochet journey, with clear instructions and simple techniques

⏱️

Bite-Sized Project

Finishes in 2-4 hoursβ€”perfect for an afternoon of creative relaxation.

✨

Stylish Touch

An elegant detail to elevate any look, combining traditional techniques with contemporary design sensibilities.

About This Crochet Hook Holder Pattern

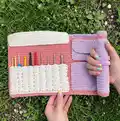
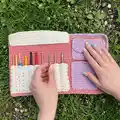
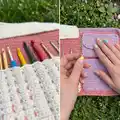
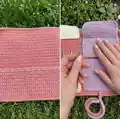
This easy-to-follow pattern creates a foldable crochet hook holder with multiple pockets for hooks and small tools. It includes pocket sizing for various hook types, a protective flap, and a secure closure loop and strap. The pattern uses simple single crochet rows and sewing to assemble the finished organizer.

Crochet Hook Holder Pattern crochet pattern - detailed view of completed project

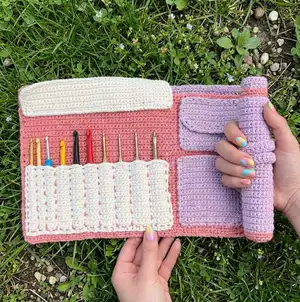
Worked flat in separate pieces, then sewn together, this project is ideal for using cotton yarn scraps. Photos and finishing notes help you position pockets and add snap fasteners if desired.

Why You'll Love This Crochet Hook Holder Pattern

I absolutely love this pattern because it transforms simple yarn into a highly functional and beautiful tool organizer that I actually use every day. I enjoy how customizable it is β€” you can change colors, pocket sizes, and closures to suit your preferences. It is satisfying to sew the pieces together and see the hook holder take shape into a tidy, portable roll. The pattern uses approachable stitches, so I can relax while making something practical and giftable.

Crochet Hook Holder Pattern step 1 - construction progress Crochet Hook Holder Pattern step 2 - assembly progress Crochet Hook Holder Pattern step 3 - details and accessories Crochet Hook Holder Pattern step 4 - final assembly and finishing

Switch Things Up

I like changing the color layout to match my yarn stash, switching pocket colors to create a striped or ombre effect for a fresh look.

I sometimes use a bulkier cotton yarn and a larger hook to make a chunkier, more padded holder for larger hooks and comfort.

I also make mini versions with thinner cotton or fingering weight yarn to create keychain-sized holders for travel or gifting.

I add a fabric lining to pockets for added stability and a cleaner interior finish when I want a more durable piece.

I swap the snap fastener for a button and loop closure for a handmade vintage vibe and easy one-handed opening.

I embroider initials or small motifs on the outer layer to personalize gifts or mark which set belongs to whom.

I add a zippered pocket instead of a flap pocket when I need secure storage for small notions like stitch markers and tapestry needles.

I adjust pocket heights and the number of hook separators based on the brands of hooks I own, making deeper pockets for Tunisian hooks.

I sometimes insert a thin piece of felt or soft interfacing behind the hook pocket for extra protection and structure.

I create coordinated sets by matching a yarn bowl cozy or project bag to the hook holder for matching tool storage.

I experiment with different closures like elastic loops, magnetic snaps, or toggles to see which is fastest and most secure for my workflow.

I recommend testing hook spacing with real hooks before sewing separators so you can easily customize the fit for your preferred hook lineup.

Common Mistakes & How to Fix Them

βœ— Skipping the second chain when starting rows can alter stitch count and width; always begin from the 2nd ch from the hook as instructed. βœ— Not counting stitches after the first row leads to mismatched pocket widths later on; count your stitches at the end of R1 to confirm you have the correct number. βœ— Sewing pockets without testing hook placement can result in misaligned separators; insert your tallest hook to mark where to sew the protector flap and separators before stitching. βœ— Using inconsistent tension creates uneven rows and pocket edges; maintain steady tension and check gauge to ensure final piece dimensions match. βœ— Forgetting to fasten off and weave ends neatly can make assembly messy and unstable; fasten off each piece and weave in ends before sewing layers together.

Crochet Hook Holder Pattern

Make a practical and pretty crochet hook holder to organize your hooks and notions. This pattern guides you through making multiple pockets, a hook protector flap, and a secure closure so your tools stay tidy. Perfect for gifting or keeping your hooks sorted at home or on the go. Clear instructions and photos help you assemble the finished hook roll.

Beginner Friendly 2-4 Hours

Materials Needed for Crochet Hook Holder Pattern

β€” Main Fabric

  • 01
    Yarnspirations Cotton Cakes Yarn (530 yd / 250 g) - Lilac (less than 1 skein)
  • 02
    Yarnspirations Cotton Cakes Yarn (530 yd / 250 g) - Watermelon (less than 1 skein)
  • 03
    Yarnspirations Cotton Cakes Yarn (530 yd / 250 g) - Cream (less than 1 skein)

β€” Tools Required

  • 01
    Crochet hook size 4.0 mm
  • 02
    Scissors
  • 03
    Tapestry needle
  • 04
    Sew-on snap fasteners (optional, used ones made by Singer)
  • 05
    Cotton thread for sewing snaps (optional)
  • 06
    Pins for assembly (optional)

Progress Tracker

0% Complete

β€” Materials & Gauge :

Info :

You will need (click to see which ones I used): Yarnspirations Cotton Cakes Yarn (530yd/250g), in these colors: Lilac (less than 1 skein). Watermelon (less than 1 skein). Cream (less than 1 skein). 4.0 mm hook. scissors. tapestry needle. Optional: Sew-on Snap Fasteners (used ones made by Singer).

Info :

Stitches used, in US terms: sc = single crochet. dec = decrease. ch = chain. whip or mattress stitch for sewing. Running Stitch (Embroidery).

Info :

Final Sizes: Open: 10.75 x 15 inches. Closed (like book): 10.75 x 8 inches.

Info :

Gauge: 5 sc x 5 rows = 1 square inch for sc in row.

β€” Instructions :

Info :

You can crochet each part separate from each other and then sew them all together at the end.

β€” Outer large pocket/layer :

Info :

Using the color Lilac, Ch 84

Round 1 :

starting from the 2nd ch from the hook: 1 sc in each ch, turn (83sts)

Round 2-52 :

1 sc in each st, turn

Info :

Fasten off.

β€” Inner layer :

Info :

Using the color Watermelon, Ch 84

Round 1 :

starting from the 2nd ch from the hook: 1 sc in each ch, turn (83sts)

Round 2-49 :

1 sc in each st, turn

Info :

Fasten off.

β€” Right bottom pocket :

Info :

Using the color Lilac, Ch 21

Round 1 :

starting from the 2nd ch from the hook: 1 sc in each ch, turn (20sts)

Round 2-25 :

1 sc in each st, turn

Info :

Fasten off.

β€” Right top pocket :

Info :

Using the color Lilac, Ch 21

Round 1 :

starting from the 2nd ch from the hook: 1 sc in each ch, turn (20sts)

Round 2-16 :

1 sc in each st, turn

Info :

Fasten off.

β€” Right top pocket closure :

Info :

Using the color Lilac, Ch 21

Round 1 :

starting from the 2nd ch from the hook: 1 sc in each ch, turn (20sts)

Round 2-8 :

1 sc in each st, turn

Round 9-12 :

1 sc dec, sc in each st, until the last 2 sts, 1 sc dec turn

Info :

Fasten off.

β€” Hook pocket :

Info :

Using the color Cream, Ch 47

Round 1 :

starting from the 2nd ch from the hook: 1 sc in each ch, turn (46sts)

Round 2-25 :

1 sc in each st, turn

Info :

Fasten off.

β€” Hook protector flap :

Info :

Using the color Cream, Ch 47

Round 1 :

starting from the 2nd ch from the hook: 1 sc in each ch, turn (46sts)

Round 2-14 :

1 sc in each st, turn

Info :

Fasten off.

β€” Outside closure loop :

Info :

Using the color Lilac, Ch 9

Round 1 :

starting from the 2nd ch from the hook: 1 sc in each ch, turn (8sts)

Round 2 :

1 sc in each st

Info :

Fasten off.

β€” Outside closure :

Info :

Using the color Lilac, Ch 36

Round 1 :

starting from the 2nd ch from the hook: 1 sc in each ch, turn (35sts)

Round 2-4 :

1 sc in each st, turn

Info :

Fasten off.

β€” Finishing the Crochet Hook Holder :

Info :

Sew the right bottom pocket to the inner layer. Then sew the top right pocket with flap to the inner layer as well. Next sew the hook pocket to the bottom left corner of the inner layer. Insert your tallest hook so you can see where to sew the protector flap to the inner layer. Finally, sew hook separator lines using a running stitch to the hook pocket in the distance you need for your hooks. Each brand has different hook measurements. So make sure to test it out. I made some smaller hook pockets for thinner hooks (Tunisian hooks) and some larger ones (Furls Hooks). Next, sew the outer layer to the inner layer and the closure loop and closure flap also to the outer layer. Finally I added (sewn with cotton thread) snap fasteners to the closure snap and top right pocket. You can also add snap fasteners for the back pocket (between outer and inner layer) to prevent your patterns/papers/magazines to fall out. Weave in any left-over ends.

β€” Picture Reference :

Info :

See the provided photos for placement of pockets, flap, closure loop and snap fasteners as visual reference.

Assembly Instructions

  • Sew the right bottom pocket to the inner layer aligning the lower edge, then secure with whip or mattress stitch along the sides and bottom.
  • Sew the top right pocket and attach its closure flap to the inner layer, ensuring the flap will fold over and align with the closure snap.
  • Attach the hook pocket to the bottom left corner of the inner layer and insert your tallest hook to mark where to sew the protector flap and separators.
  • Sew hook separator lines with a running stitch into the hook pocket at the spacing that fits your hooks, testing with various hook brands for fit.
  • Sew the outer layer to the inner layer, then sew the closure loop and outside closure flap to the outer layer in the correct folded position.
  • If desired, sew snap fasteners (using cotton thread) to the closure snap and top right pocket, and optionally between inner and outer layers for a back pocket snap.

Important Notes

  • πŸ’‘Insert your tallest hook when aligning the protector flap so the flap covers all hooks comfortably before sewing.
  • πŸ’‘Test spacing for hook separators with actual hooks from different brands since hook thickness varies widely.
  • πŸ’‘Weave in all ends and press gently if desired for neater assembly and a professional finish.

This Crochet Hook Holder Pattern helps you create a tidy, pretty organizer for your hooks and small notions. It combines simple single crochet rows with straightforward sewing to make a useful, giftable item. Make one in your favorite colors and enjoy a more organized crafting space! 🧢✨

You ask,

we answer.

FAQs

What size will the finished piece be?

The finished holder measures approximately 10.75 x 15 inches when open and 10.75 x 8 inches when closed, using the recommended yarn and hook size.

Can I use different yarn weights for this pattern?

Yes, you can use other yarn weights, but the final size and pocket fit will change; adjust hook size and check gauge to get the proportions you want.

Do I need prior crochet experience for this pattern?

This pattern is beginner friendly and uses basic single crochet and simple shaping; basic knowledge of single crochet and chaining is all you need.

How long does this project typically take to complete?

Most crocheters finish this project in 2-4 hours, though time will vary by experience and how carefully you assemble and sew the pieces.