🧢 Beautiful ✨ Detailed πŸ’ Adorable

Crochet Hexi Hooded Pullover Pattern

Crochet Hexi Hooded Pullover Pattern
4.1β˜… Rating
12-15 Hours Time Needed
3.2K Made This
βœ‚οΈ

Beginner Friendly Level

Perfect for those just starting their crochet journey, with clear instructions and simple techniques

⏱️

Multi-Day Project

A rewarding 12+ hour journeyβ€”perfect for dedicated crafters who love detailed work.

πŸ‘•

Casual Chic

Relaxed style with a modern twist, perfect for everyday wear while maintaining that handcrafted uniqueness.

About This Crochet Hexi Hooded Pullover Pattern

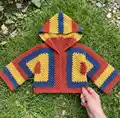
This pattern creates a cozy hooded pullover constructed from two large hexagon panels worked in a striped hexi pattern. The hexagons are folded and seamed to form sleeves, center back and center front, with an integrated hood worked in the same motif. The design uses simple double crochet groups and color changes to build bold stripes and geometric details. Diagrams and stitch charts are included to guide shaping and seaming for a polished finish.

Crochet Hexi Hooded Pullover Pattern crochet pattern - detailed view of completed project

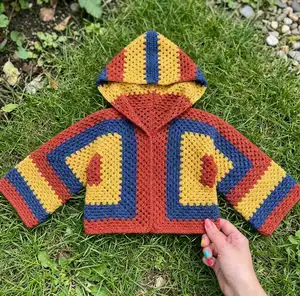
Worked in Bernat Softee Cotton with 3 contrasting colors, the pullover is easy to customize in size and color. Clear diagrams show hexagon construction, hood shaping and sleeve cuff finishing for reliable assembly.

Why You'll Love This Crochet Hexi Hooded Pullover Pattern

I absolutely love this pattern because it turns a simple repeat of double crochet groups into a striking geometric sweater that looks designer-made. I love how the hexagon construction folds into sleeves and body with minimal seams, which makes assembly satisfying and quick. The striped color pattern lets me play with bold or subtle palettes to match any wardrobe. I also enjoy that the hood is integrated with the same motif so the finished piece feels cohesive and balanced.

Crochet Hexi Hooded Pullover Pattern step 1 - construction progress Crochet Hexi Hooded Pullover Pattern step 2 - assembly progress Crochet Hexi Hooded Pullover Pattern step 3 - details and accessories Crochet Hexi Hooded Pullover Pattern step 4 - final assembly and finishing

Switch Things Up

I love to change the color order to create different moods; try muted neutrals for a subtle look or bright contrasting colors for a retro vibe.

I often use a bulkier yarn and a larger hook to make a chunkier, warmer version; you will get a squishier drape and a larger finished size.

To make a smaller, portable version, use fingering or sport weight yarn with a smaller hook to create a mini hexi jacket or child-sized sweater.

I sometimes add a button band or simple ribbed edging along the front opening for a different finish and extra structure to the fronts.

For a more fitted silhouette, reduce the hexagon size by stopping repeats earlier and shortening the sleeve length before seaming.

Consider adding pockets by crocheting small rectangular panels and sewing them into the side seams at the hem level for function and style.

I like to embroider simple motifs or add crochet appliques to the front panels for a personalized touch that pops against the stripes.

Try lining the hood with a soft cotton fabric for extra warmth and a cleaner inside finish, especially if you plan to gift the pullover.

Experiment with sleeve length β€” work fewer stripe repeats for 3/4 sleeves, or add repeats for full coverage and coziness.

For an elevated look, use a tonal palette and metallic or speckled yarn for one contrast color to add subtle shine and interest.

Common Mistakes & How to Fix Them

βœ— Not checking gauge before starting; make a 4" [10 cm] square of 16 sc and 20 rows or 6 groups of 3 dc = 5" [12.5 cm] to ensure correct sizing. βœ— Skipping stitch markers or sl st placement during hexagon rounds; place markers in corner ch-2 spaces to identify corners and keep your shaping consistent. βœ— Trying to make the hexagon lie flat too early and overworking stitches; the pattern will wave and relax after you progressβ€”trust the process and continue the rounds. βœ— Forgetting to fasten off long tails for seaming; leave a 20" [51 cm] tail before seaming the hood to ensure you have enough yarn to sew edges flat. βœ— Changing colors without securing ends can create messy joins; weave in or tack color changes as you go to keep the back tidy and reduce finishing time. βœ— Not counting the groups of 3-dc correctly at join points results in uneven edges; count 3-dc groups and ch-1 or ch-2 spaces at the ends of rows before seaming.

Crochet Hexi Hooded Pullover Pattern

Make a cozy striped hexi pullover with an integrated hood using Bernat Softee Cotton. This pattern uses two large hexagons folded and seamed to form sleeves and body, creating a bold geometric look. Youll enjoy the simple repeat pattern and colour changes that build an eye-catching pullover. Suitable for crocheters who want a relaxed, modern sweater with clear instructions and diagrams.

Beginner Friendly 12-15 Hours

Materials Needed for Crochet Hexi Hooded Pullover Pattern

β€” Main Fabric

  • 01
    Bernat Softee Cotton (4.2 oz/120 g; 254 yds/232 m) - main yarn used
  • 02
    Contrast A: Warm Red (69007) - XS/S: 3 balls (approx 750 yds / 682 m); M/L: 4 balls (approx 855 yds / 777 m); 1/2/3XL: 4 balls (approx 975 yds / 886 m); 4/5XL: 5 balls (approx 1125 yds / 1023 m)
  • 03
    Contrast B: Golden (69023) - XS/S: 2 balls (approx 510 yds / 464 m); M/L: 3 balls (approx 590 yds / 537 m); 1/2/3XL: 3 balls (approx 670 yds / 610 m); 4/5XL: 3 balls (approx 765 yds / 695 m)
  • 04
    Contrast C: Seaside Blue (69011) - XS/S: 2 balls (approx 495 yds / 450 m); M/L: 3 balls (approx 565 yds / 515 m); 1/2/3XL: 3 balls (approx 645 yds / 587 m); 4/5XL: 3 balls (approx 745 yds / 677 m)

β€” Tools Required

  • 01
    US G/6 (4 mm) Susan Bates Silvalume crochet hook or size needed to obtain gauge
  • 02
    Susan Bates stitch markers
  • 03
    Susan Bates steel yarn needle
  • 04
    Scissors
  • 05
    Measuring tape
  • 06
    Pins for assembly

Progress Tracker

0% Complete

β€” Stripe Pat :

Info :

5 rnds of A. 7 rnds of B. 5 rnd of C. These 17 rnds form Stripe Pat.

β€” Hexagon (Make 2) :

Info :

See diagram on page 5. With A, ch 4. Join with sl st to first ch to form ring.

1st rnd :

Ch 5 (counts as dc and ch-2). (3 dc. Ch 2) 5 times in ring. 2 dc in ring. Join with sl st to 3rd ch of ch-5. 6 groups of 3 dc and 6 ch-2 sps.

2nd rnd :

Sl st in next ch-2 sp. Ch 5 (counts as dc and ch-2). 3 dc in same sp as last sl st. *Skip next 3 dc. (3 dc. Ch 2. 3 dc) in next ch-2 sp. Rep from * 4 times more. 2 dc in first ch-2 sp. Join with sl st to 3rd ch of ch-5.

3rd rnd :

Sl st in next ch-2 sp. Ch 5 (counts as dc and ch-2). 2 dc in same sp as last sl st. *Skip next 3 dc. 3 dc in sp between next 2 groups of 3-dc. Skip next 3 dc. (3 dc. Ch 2. 3 dc) in next corner ch-2 sp. Rep from * 4 times more. Skip next 3 dc. 3 dc in sp between next 2 groups of 3-dc. Skip last 3 dc. 2 dc in first ch-2 sp. Join with sl st to 3rd ch of ch-5.

Info :

First 3 rnds of Stripe Pat are complete.

4th rnd :

Sl st in next ch-2 sp. Ch 5 (counts as dc and ch-2). 2 dc in same sp as last sl st. *(Skip next 3 dc. 3 dc in sp between next 2 groups of 3-dc) twice. Skip next 3 dc. (3 dc. Ch 2. 3 dc) in next corner ch-2 sp. Rep from * 4 times more. (Skip next 3 dc. 3 dc in sp between next 2 groups of 3-dc) 2 dc in first ch-2 sp. Join with sl st to 3rd ch of ch-5.

5th rnd :

Sl st in next ch-2 sp. Ch 5 (counts as dc and ch-2). 2 dc in same sp as last sl st. *Skip next 3 dc. 3 dc in sp between next 2 groups of 3-dc. Skip next 3 dc. (3 dc. Ch 2. 3 dc) in next corner ch-2 sp. Rep from * to * to end of rnd. Skip last 3 dc. 2 dc in first ch-2 sp. Join with sl st to 3rd ch of ch-5.

Info :

NOTE: Your work will not lay flat at this point, don't worry! It's part of the process!

Keeping cont :

Keeping cont of Stripe Pat, rep last rnd until work from center to straight side of hexagon measures approx 10 1/2" (12-14 1/2-16 1/2") [26.5 (30.5-37-42) cm]. Fasten off.

β€” Finishing before Hood :

Info :

Following diagrams below, bring opposite points of Left Side hexagon together and fold to form Left Side of Cardigan. Rep for Right Side. PM between 3-dc groups along top edge 4 (4-5-5) groups of 3-dc from front edge. Sew back seam. Sew top sleeve seams to markers. Sew front seam, leaving 5" [12.5 cm] from top corners for front opening.

Info :

Fasten off leaving a tail 20" [51 cm] long for seaming. Fold top of Hood in half. Using tail, sew Hood seam, being sure to keep edges flat.

β€” Hood :

Info :

See diagrams on page 4. With RS facing, join A with sl st to corner ch-2 sp of front lapel of Right Front.

1st row :

(RS). Ch 3 (counts as dc). 2 dc in same sp as sl st. *Skip next 3 dc. 3 dc in sp between next 2 groups of 3-dc.* Rep from * to last 3 dc before right shoulder seam. 3 dc in sp of shoulder seam. Rep from * to * to last 3 dc before Back seam. Skip next 3 dc. 3 dc in corner ch-2 sp before seam. Ch 3. 3 dc in next corner ch-2 sp after seam. Rep from * to * to last 3 dc before left shoulder seam. 3 dc in sp of shoulder seam. Rep from * to * to last 3-dc group before corner of left side lapel. Skip next 3 dc. 3 dc in corner ch-2 sp. 3 dc in corner ch-2 sp. Turn. 18 (18-20-20) groups of 3-dc and ch-3 sp.

2nd row :

(Inc row). Ch 4 (counts as dc and ch 1). *Skip next 3 dc. 3 dc in sp between next 2 groups of 3-dc. Rep from * to center back ch-3 sp. [3 dc. Ch 1. 1 dc (center dc). Ch 1. 3 dc] in center back-ch-3 sp. Rep from * to last 3 dc. Ch 1. 1 dc in last dc. Turn.

3rd row :

Ch 3 (counts as dc). 2 dc in first ch-1 sp. *Skip next 3 dc. 3 dc in sp between next 2 groups of 3-dc.* Rep from * to ch-1 sp before center dc. 3 dc in next ch-1 sp. Skip next (center) dc. 3 dc in next ch-1 sp. Rep from * to * to last ch-1 sp. 2 dc in last ch-1 sp. 1 dc in last dc. Turn. 20 (20-22-22) groups of 3-dc.

4th row :

Ch 4 (counts as dc and ch 1). *Skip next 3 dc. 3 dc in sp between next 2 groups of 3-dc. Rep from * to last 3 dc. Skip next 2 dc. Ch 1. 1 dc in last dc. Turn.

5th row :

Ch 3 (counts as dc). 2 dc in first ch-1 sp. *Skip next 3 dc. 3 dc in sp between next 2 groups of 3-dc.* Rep from * to last ch-1 sp. 2 dc in last ch-1 sp. 1 dc in last dc. Turn. (Note: counts vary by size in brackets; follow size numbers shown in pattern.)

6th to 11th rows :

Rep 2nd to 5th rows once more, then 2nd and 3rd rows once, having 1 more 3-dc group before center. 24 (24-26-26) groups of 3-dc at end of last rep.

12th row :

Ch 4 (counts as dc and Ch 1). *Skip next 3 dc. 3 dc in sp between next 2 groups of 3-dc. Rep from * to last 3 dc. Skip next 2 dc. Ch 1. 1 dc in last dc. Turn.

13th row :

Ch 3 (counts as dc). 2 dc in next ch-1 sp. *Skip next 3 dc. 3 dc in next ch-1 sp.* Rep from * to last ch-1 sp. 2 dc in last ch-1 sp. 1 dc in last dc. Turn.

Keeping cont :

Keeping cont of Stripe Pat, rep 12th and 13th rows until Hood measures approx 10" [25.5 cm], ending on 2nd row.

β€” Shape top of Hood :

1st row :

Ch 4 (counts as dc and Ch 1). (Skip next 3 dc. 3 dc in sp between next 2 groups of 3-dc) 10 (10-11-11) times. Skip next 2 groups of 3-dc. *3 dc in sp between next 2 groups of 3-dc.* Rep from * to last 3 dc. Skip next 2 dc. Ch 1. 1 dc in last dc. Turn.

Keeping cont :

Keeping cont of Stripe Pat, rep last rnd until work from center to straight side of hexagon measures approx 10 1/2" (12-14 1/2-16 1/2") [26.5 (30.5-37-42) cm]. Fasten off.

β€” Sleeve Cuffs :

Info :

See diagram on page 5. With RS facing, join corresponding color to keep cont of Stripe Pat with sl st in sp between 2 groups of 3-dc (in last sp between 2 groups of 3-dc before shoulder seam) on last row of Sleeve at bottom of Sleeve. Keeping cont of Stripe Pat, rep last rnd until Sleeve from underarm measures 17" [43 cm]. Fasten off. Rep for opposite Sleeve.

Assembly Instructions

  • Bring opposite points of each hexagon together and fold along the center to form Left and Right Sides of the cardigan; pin and match 3-dc groups for even alignment before seaming.
  • Place markers between the specified 3-dc groups along the top edge (4 (4-5-5) groups from front edge) and sew the top sleeve seams to those markers using a yarn needle and mattress or whipstitch.
  • Sew the back seam and then sew the front seam leaving 5" [12.5 cm] from top corners for the front opening so the opening remains even and neat.
  • Join the hood by folding it and sewing the top seam with a 20" [51 cm] tail, keeping edges flat; then position and sew the hood to the neckline matching center back and shoulder seams.
  • Attach sleeve cuffs by joining yarn at the bottom of the sleeve in the space between 3-dc groups and work the cuff rows; fasten off and weave in ends securely.
  • Pin parts in place and baste seams before final sewing to ensure symmetry; check shoulder alignment and sleeve lengths before finishing.

Important Notes

  • πŸ’‘Pullover is comprised of 2 Hexagons which are folded and seamed along the top to form Sleeves and seamed down Center Back and Center Front.
  • πŸ’‘Hexagon shape will become wavy as you progress and will not lay flat as it begins to grow; do not worry if your piece does not lay flat before folding.
  • πŸ’‘Use stitch markers to keep track of corner ch-2 spaces and top-edge 3-dc groups for accurate seaming and placement.
  • πŸ’‘Fasten off and leave long tails where indicated for seaming; a 20" [51 cm] tail is recommended to seam the hood edges flat.

This colorful Crochet Hexi Hooded Pullover combines striped hexi motifs with a comfy integrated hood for an easy, stylish sweater. The hexagon construction creates a bold geometric silhouette you can customize with your favorite colors. Fold, seam, and finish for a cozy, casual piece youll reach for all season. πŸ§ΆπŸ‘•

You ask,

we answer.

FAQs

What size will the finished piece be?

Finished chest measurements vary by size: XS/S = 38" [96.5 cm], M/L = 42" [106.5 cm], 1/2/3XL = 56" [142 cm], 4/5XL = 60" [152.5 cm] as indicated in the pattern.

Can I use different yarn weights for this pattern?

Yes, but changing yarn weight will change the finished size and drape; choose a hook appropriate for your yarn and rework the gauge to match the pattern measurements.

Do I need prior crochet experience for this pattern?

This pattern is rated easy and is beginner friendly, but familiarity with double crochet groups, joining rounds, and reading simple row repeats is recommended.

How long does this project typically take to complete?

Most crocheters will take multiple sessions to complete this pullover; expect around 12-15 hours depending on experience, size chosen, and finishing time.