🧶 Beautiful ✨ Detailed 💝 Adorable

Crochet Flexagon Amigurumi Pattern

Crochet Flexagon Amigurumi Pattern
4.8★ Rating
5-7 Hours Time Needed
1.6K Made This
✂️

Intermediate Level

Iideal for those with basic crochet experience, featuring slightly more advanced stitches and techniques to expand your skills.

⏱️

Weekend Treat

Takes 5-7 hours, making it an enjoyable project to finish over a couple of days.

🧸

Cute Companion

An adorable friend to cherish, handcrafted with love to bring comfort and joy for years to come.

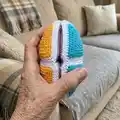
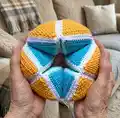
About This Crochet Flexagon Amigurumi Pattern

This pattern creates a colorful crochet flexagon made from small equilateral triangles joined into pyramids and assembled into a twistable toy. The design uses simple single crochet shaping and basic decreases to form each triangle, then finishes with a neat white edge for contrast. You will learn an organised sewing method to join pieces into pyramids and assemble the final flexagon.

Crochet Flexagon Amigurumi Pattern crochet pattern - detailed view of completed project

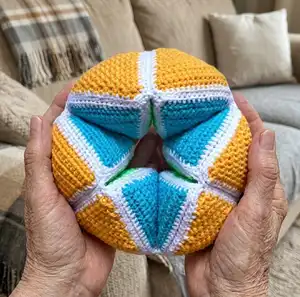
Perfect for crafters who enjoy small modular projects and hand-sewing assembly. The finished toy measures about 15 cm using the recommended yarn and hook.

Why You'll Love This Crochet Flexagon Amigurumi Pattern

I absolutely love this pattern because it turns simple triangle motifs into a playful, interactive toy that invites fidgeting and discovery. I enjoy how predictable stitch shaping makes the triangles quick and meditative to crochet, while the final assembly brings a satisfying puzzle-like finish. The bright color combinations give the flexagon personality and make it a joyful handmade gift. Sewing the pyramids together is relaxing for me, and watching the finished toy flip and transform always feels rewarding.

Crochet Flexagon Amigurumi Pattern step 1 - construction progress Crochet Flexagon Amigurumi Pattern step 2 - assembly progress Crochet Flexagon Amigurumi Pattern step 3 - details and accessories Crochet Flexagon Amigurumi Pattern step 4 - final assembly and finishing

Switch Things Up

I love customizing the color layout for each project: try pastel shades for a soft, baby-friendly version or bold neons for a modern, eye-catching look.

I often change yarn weight and hook size to create different sizes — using a DK or aran weight yarn with a larger hook gives you a chunkier flexagon.

I like to swap the white edge for a contrasting color to soften or intensify the overall palette; try a dark edge for a graphic finish.

Try embroidering small motifs on the triangle faces before assembling to personalize each segment.

For a keychain or mini version, use fingering weight yarn and a smaller hook to scale the pattern down significantly.

If you want a heavier, more stable piece, add a bit of poly-pellet or a small weight into the stuffing near the base of the pyramids.

I sometimes add ribbon loops or small tags between seams to attach charms or labels for gifts.

Experiment with textured stitches on the triangle faces (like alternating hdc or front-post rows) to give tactile interest.

You can join the triangles with visible decorative stitching instead of the hidden half cross seam for a rustic, hand-stitched look.

I recommend testing one pyramid assembly first before committing to all pieces so you can adjust tension, stuffing, and seam style to your preference.

Common Mistakes & How to Fix Them

✗ Not tracking stitch counts during row shaping leads to incorrect triangle shaping; count stitches after each row and mark rows as you complete them to stay accurate. ✗ Inconsistent tension across triangles creates uneven pyramid seams; maintain even, relaxed tension and try to crochet all triangles in one sitting or with the same hand tension. ✗ Skipping the white edging or sewing it carelessly produces a messy finish; attach the white thread carefully and work SC evenly along the edge, placing 3 SC at each top. ✗ Overfilling or underfilling pyramids affects the final flexagon shape; stuff gradually while assembling and aim for firm but flexible stuffing for best movement. ✗ Using a different decrease method than described can change the stitch count and shape; follow the specified single crochet decrease technique to keep rows matching the pattern.

Crochet Flexagon Amigurumi Pattern

Make a playful crochet flexagon — a tactile, twistable toy that combines simple triangle motifs into a moving 3D puzzle. This pattern guides you through crocheting 24 triangular pieces, edging, assembling pyramids and stitching them into a functional flexagon you can hold and flip. Follow the step-by-step rounds, clear diagrams and assembly tips to create a colorful toy perfect for gifting or sensory play.

Intermediate 5-7 Hours

Materials Needed for Crochet Flexagon Amigurumi Pattern

— Main Fabric

  • 01
    YarnArt Jeans 33 (blue)
  • 02
    YarnArt Jeans 77 (orange)
  • 03
    YarnArt Jeans 60 (light green)
  • 04
    YarnArt Jeans 35 (yellow)
  • 05
    Alize Cotton Gold 55 (white)
  • 06
    Any similar cotton or cotton-blend yarn suitable for crochet hook No 2 (use same yarn weight for all colors)

— Tools Required

  • 01
    Crochet hook № 2
  • 02
    Holofiber filler
  • 03
    Sewing needle (blunt end recommended for assembly)
  • 04
    Scissors
  • 05
    Yarn needle for weaving ends
  • 06
    Pins (optional for holding pieces while sewing)

Progress Tracker

0% Complete

— Notes :

Info :

You can use any yarn and a suitable hook. If you work with other colors than indicated in the pattern, I would recommend you to write down which color you use and which color you are replacing with. The size of the finished toy from the indicated materials is ~15 cm

— Abbreviations :

Infos :

ch - chain. sc - single crochet. dec - decrease. inc3 - increase (3 sc in one stitch). sl st - slip stitch. (...) - the number in parentheses indicates the number of stitches in the row.

— Materials and Tools :

Info :

Yarn: YarnArt Jeans 33 (blue). YarnArt Jeans 77 (orange). YarnArt Jeans 60 (light green). YarnArt Jeans 35 (yellow). Alize Cotton Gold 55 (white). Tools: Crochet hook № 2. Holofiber filler. Sewing needle. Scissors.

— Equilateral triangle :

Info :

Note! How to make a single crochet decrease: - Insert hook into the indicated stitch. Yarn over and pull up a loop. (2 loops on the hook.) - Insert hook into the next stitch. Yarn over and pull up a loop. (3 loops on the hook.) - Yarn over, pull through all 3 loops on the hook.

Info :

Make 6 triangles of yellow, orange, light green and blue.You should have 24 triangles in total.

Round 1 :

17 ch, from the second stitch from the hook - 16 sc, ch, turn (16)

Round 2 :

dec, 12 sc, dec, ch, turn (14)

Round 3 :

14 sc, ch, turn (14)

Round 4 :

dec, 10 sc, dec, ch, turn (12)

Round 5 :

12 sc, ch, turn (12)

Round 6 :

dec, 8 sc, dec, ch, turn (10)

Round 7 :

10 sc, ch, turn (10)

Round 8 :

dec, 6 sc, dec, ch, turn (8)

Round 9 :

8 sc, ch, turn (8)

Round 10 :

dec, 4 sc, dec, ch, turn (6)

Round 11 :

6 sc, ch, turn (6)

Round 12 :

dec, 2 sc, dec, ch, turn (4)

Round 13 :

4 sc, ch, turn (4)

Round 14 :

2 dec, ch, turn (2)

Round 15 :

dec (1)

Info :

Fasten off, cut the thread.

— Edge and Finishing :

Info :

Attach the white thread to any of the sides of the triangle and work with sc along the edge, in the tops of the triangle - 3 sc in one stitch. Finish with a needle (see photo) and fasten the thread from the inside. You should have - (14 sc - on the side, 3 sc - at the top) *3 (51)

— Pyramids :

Info :

Now you need to assemble the pyramids from the triangles. To do this, take a needle with a blunt end (or another one that is convenient for you), and sew 3 (!!!!) pyramids with white (or the color that you worked with) yarn according to the following schemes.

Info :

Sew with an Half Cross stitch seam for the back half-loops.

Info :

Fill with filler.

Info :

Form Pyramid A by combining triangles in the order shown (Blue, Orange, Light-green, Yellow as pictured) and make 3 of Pyramid A.

Info :

Form Pyramid B by combining triangles in the order shown (Orange, Blue, Light-green, Yellow as pictured) and make 3 of Pyramid B.

Info :

You should get 3 of pyramids A and 3 of pyramids B. Now you can start assembling the flexagon. Connect pyramid A and pyramid B (see photo) - sew in the place indicated by a stroke. Use the seam formed when sewing the pyramids.

Info :

Make 3 parts, each part consists of 2 pyramids.

— Assembly :

Info :

Assembly the parts in the way as shown in the next photo and sew along the line that is indicated by a stroke.

Info :

If you look from above, the seams are located where the arrows indicate (see photo for reference).

Info :

Done! Let's twist and turn!! And also to develop imagination, fine motor skills and simply distract yourself from the outside world and calm down☺ I hope you enjoyed the process!

Info :

Happy crocheting!

Assembly Instructions

  • Sew three triangles together to form Pyramid A using a Half Cross stitch seam along the back half-loops, fill with filler before closing each pyramid.
  • Sew three triangles together to form Pyramid B the same way, making three Pyramid B units total so you have 3 of A and 3 of B.
  • Connect Pyramid A and Pyramid B by sewing them together at the seam marked in the photo, using the seam formed while sewing each pyramid as the joining guide.
  • Make three paired parts, each consisting of 2 joined pyramids (A+B), then assemble the three parts into the flexagon by sewing along the indicated lines/strokes shown in the photos.
  • Use a blunt-end needle for assembly to avoid splitting yarn and sew through the back loops as instructed for a neat seam; finish and weave in all ends from the inside.
  • Stuff pyramids firmly but not overfull so the flexagon can fold and flip easily; adjust stuffing before final closing stitches.

Important Notes

  • 💡You can use any yarn and a suitable hook; if substituting yarns, try to keep consistent weight for best results.
  • 💡If you change colors from the pattern, write down which color you used and which color it replaces to keep track of pieces during assembly.
  • 💡The size of the finished toy from the indicated materials is ~15 cm, so check gauge if you need a different finished size.
  • 💡Sew pyramids with a Half Cross stitch seam for the back half-loops for a clean, secure join.
  • 💡Fill pyramids with holofiber filler before closing and adjust stuffing to achieve flexible movement without bulging seams.

This bright, twistable crochet flexagon is a cheerful handmade fidget that brings playful movement to your hands and decor. It combines simple crochet triangles with thoughtful sewing to create a tactile, transformable toy you can pass along as a special gift. Make a set in different colorways and enjoy the satisfying flip and fold every time! 🧶😊✨

You ask,

we answer.

FAQs

What size will the finished piece be?

The finished flexagon measures approximately 15 cm across using the recommended yarn (YarnArt Jeans / Alize Cotton Gold) and crochet hook №2.

Can I use different yarn weights for this pattern?

Yes, you can substitute yarns, but the final size and drape will change; use a suitable hook for your chosen yarn and maintain consistent weight across all pieces.

Do I need prior crochet experience for this pattern?

This pattern is rated intermediate because it combines shaping, consistent stitch counting, and hand sewing; basic knowledge of single crochet and decreases is recommended.

How long does this project typically take to complete?

Most crocheters complete this project in 5-7 hours depending on experience and how quickly you sew the pyramids and assemble the flexagon.