About This Crochet Donut Pillow Pattern
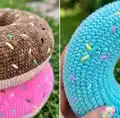
This pattern guides you through crocheting a round donut-shaped pillow about 12.2 inches (29 cm) across using plush yarn. It includes every round for shaping the donut, a color-change row for the frosting edge, and step-by-step finishing instructions. Youll also learn a simple sprinkle embroidery technique to decorate the top.

The pattern is written in US terms and uses single crochet shaping with clear round counts. Photos and notes show sewing the final hole closed and adding multi-color sprinkles for a realistic look.
Why You'll Love This Crochet Donut Pillow Pattern
I absolutely love this pattern because it turns a simple yarn stash into a whimsical home accent that people adore. I enjoy how quickly the donut takes shape with straightforward increases and decreases, and the plush yarn gives it a super squishy feel. Decorating with colorful sprinkles is one of my favorite parts — its relaxing and instantly makes each pillow unique. I take pleasure in the finishing steps; folding and sewing the hole closed creates a neat, professional result I am proud to share.
Switch Things Up
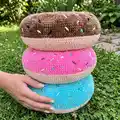
I love making variations by changing yarn colors for the frosting and base; try chocolate, pink, aqua, or pastel combinations to suit your decor.
I sometimes use a bulkier plush yarn and a larger hook to create a chunkier, more squishy pillow — youll get a larger finished donut.
I also make tiny versions for keychains by using thinner yarn and a smaller hook; trim down rounds proportionally and reduce stuffing.
I like adding felt or crocheted appliques on top of the sprinkles to create themed donuts like hearts or stars.
I often experiment with placement and density of sprinkles — heavier coverage gives a playful look while sparse sprinkles look minimalist and modern.
I sometimes insert a zippered lining so the pillow cover is removable for washing; this is great if you want washable home decor.
I add piping or a contrasting slip-stitch round between the base and frosting for a stronger visual border if I want a sharper edge.
I recommend trying embroidery floss or thin cotton yarn for very fine, realistic sprinkles when working on smaller donuts.
I often alternate two frosting colors in Round 24 to create an ombre edge — it gives a subtle, professional finish.
I also like to add a small tag or loop to turn the pillow into a hanging decoration in kids rooms or play spaces.
I encourage you to experiment with stuffing firmness; softer stuffing yields a cuddly pillow while firmer stuffing keeps its donut shape for display.
I sometimes sew several donuts together to make a playful donut stack cushion set — mixing sizes and colors is a fun project with great gifting potential.
Common Mistakes & How to Fix Them
✗ Not working tightly enough when using plush yarn causes gaps and stuffing to show; use slightly tighter tension and check for gaps after stuffing small amounts.
✗ Skipping the back-loop only row at the color change will blur the frosting edge; follow Round 24 exactly and work only in the back loops to create a clear seam.
✗ Overstuffing before closing the hole makes sewing difficult and distorts the shape; stuff gradually, sew a bit, then stuff more until you reach the desired firmness.
✗ Failing to count stitches after increases or decreases leads to incorrect shaping later; count your stitches frequently, especially after every increase or decrease round.
✗ Using very different yarn weights without adjusting the hook will change finished size and gauge; if you change yarn weight, choose an appropriate hook size and swatch to check size.