🧢 Beautiful ✨ Detailed πŸ’ Adorable

Creeper Amigurumi Pattern

Creeper Amigurumi Pattern
4.0β˜… Rating
5-7 Hours Time Needed
2.3K Made This
βœ‚οΈ

Intermediate Level

Ideal for those with basic crochet experience, featuring slightly more advanced stitches and techniques to expand your skills.

⏱️

Weekend Treat

Takes 5-7 hours, making it an enjoyable project to finish over a couple of days.

🧸

Cute Companion

An adorable friend to cherish, handcrafted with love to bring comfort and joy for years to come.

About This Creeper Amigurumi Pattern

This pattern creates a kawaii-style Creeper amigurumi about 15 cm tall using 2.5 mm cotton yarn. The instructions include every round for the head, body, feet and the finishing details for a cute face. You will learn basic shaping with increases and decreases and simple embroidery for the accents.

Creeper Amigurumi Pattern crochet pattern - detailed view of completed project

Includes full materials, abbreviations and clear assembly notes so you can complete the toy with confidence. Photos guide the finishing steps so placement of eyes, mouth and squares is easy to follow.

Why You'll Love This Creeper Amigurumi Pattern

I absolutely love this pattern because it transforms a classic Minecraft character into a cute, huggable amigurumi with simple techniques. I enjoy how the square head is achieved with straightforward increases and decreases that create a crisp shape. The tiny embroidered squares and felt facial pieces add personality without complex colorwork. I hope you feel proud when you finish this little Creeper and that it brings a smile to the recipient.

Creeper Amigurumi Pattern step 1 - construction progress Creeper Amigurumi Pattern step 2 - assembly progress Creeper Amigurumi Pattern step 3 - details and accessories Creeper Amigurumi Pattern step 4 - final assembly and finishing

Switch Things Up

I love how easy it is to change the look of this Creeper by swapping yarn colors; try pastel shades for a softer kawaii version.

I often use bulky yarn and a larger hook to make a chunkier, more plush Creeper for a bigger cuddly toy.

If you want a tiny keychain version, choose finer yarn with a smaller hook and reduce stuffing for a compact result.

I recommend adding tiny felt accessories like a scarf or a hat to personalize each Creeper for gifts.

You can embroider different facial expressions by altering eye placement and mouth shape to make happy, surprised or grumpy characters.

Try using variegated yarn to create a mottled effect on the body and head for a unique texture without changing rounds.

For a more durable toy for children, sew felt pieces instead of gluing and secure all seams with sturdy thread.

I sometimes add a small weighted pellet in the base to help the Creeper sit more stably on shelves.

To make a set, vary yarn weights and colors to create a family of Creepers with matching but different sizes.

Experiment with adding wire to limbs for poseable feet if you want a display piece that can be posed.

Common Mistakes & How to Fix Them

βœ— Skipping stitch markers during rounds and shaping can cause inconsistent stitch counts; place a marker at the start of each round and move it as you progress to avoid mistakes. βœ— Overstuffing the head and body can distort the square and cylindrical shapes; stuff gradually, checking shape frequently and adding small amounts until firm but not stretched. βœ— Not counting stitches after increases and decreases leads to incorrect shaping later on; count stitches at the end of each round, especially after rounds with multiple decreases or increases. βœ— Sewing parts without pinning first can result in misaligned limbs or facial features; use pins to position pieces and check symmetry before stitching them in place.

Creeper Amigurumi Pattern

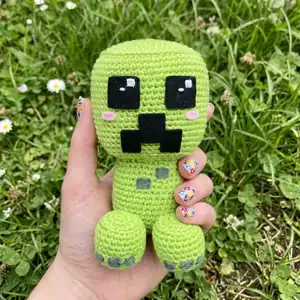
Make your own kawaii Creeper with this friendly amigurumi crochet pattern. You will enjoy complete, step-by-step rounds for the head, body, feet and facial details so your toy turns out neat and cuddly. The pattern is written clearly with materials and tips to help you finish a charming 15 cm Creeper. Perfect for gifting or decorating your game-themed collection.

Intermediate 5-7 Hours

Materials Needed for Creeper Amigurumi Pattern

β€” Main Fabric

  • 01
    2.5 mm cotton yarn (Rainbow cotton 8/6) - Green lime (main color, approx. small skein)
  • 02
    2.5 mm cotton yarn - Dark green (small amount for squares)
  • 03
    2.5 mm cotton yarn - Pink (small amount for blushes)
  • 04
    2.5 mm cotton yarn - White (small amount for eye reflections)
  • 05
    Black felt - small piece for eyes and mouth
  • 06
    Synthetic cotton filling - for stuffing head, body and feet

β€” Tools Required

  • 01
    Crochet hook size 2.5 mm
  • 02
    Yarn needle for sewing and embroidery
  • 03
    Scissors
  • 04
    Hot glue gun or needle and thread to sew the felt
  • 05
    Stitch markers
  • 06
    Polyester stuffing / synthetic cotton filling
  • 07
    Pins for assembly (optional)

Progress Tracker

0% Complete

β€” Introduction :

Info :

I would like to thank you for choosing to purchase this pattern. I hope that you are completely satisfied with it, and, above all, that the result of your work is exactly as you imagined. This adorable Kawaii-style Creeper is crocheted with 2.5 mm (fine) cotton yarn and the result is 15 cm high, but keep in mind that if you change the weight of the yarn, its final size will vary. I invite you to try playing with various yarns or add other accessories, give it your personal touch and let your imagination run wild. I will be delighted to see your result.

β€” Abbreviations :

Infos :

Ch - Chain. st (s). - Stich (s). slst. - Slip stich. sc. - Single crochet. hdc. - Half double crochet. dc. - Double crochet. dhp - Double high point (treble crochet). inc. - Increase. dec. - Decrease. BLO. - Back loop only. FLO. - Front loop only. R.1. - Round 1.

β€” Materials :

Infos :

2.5 mm cotton yarn (Rainbow cotton 8/6): Green lime, Dark green, Pink, White. Black felt. Hot glue gun or needle and thread to sew the felt. Synthetic cotton filling. 2.5mm crochet hook. Yarn needle. Scissors.

β€” Head :

Info :

With 2.5 mm lime green cotton yarn.

Round 1 :

8 sc in a magic ring (8)

Round 2 :

8 inc (16)

Round 3 :

2 inc, 2 sc (24)

Round 4 :

1 sc, 2 inc, (4 sc, 2 inc) x3, 3 sc (32)

Round 5 :

2 sc, 2 inc, (6 sc, 2 inc) x3, 4 sc (40)

Round 6 :

3 sc, 2 inc, (8 sc, 2 inc) x3, 5 sc (48)

Round 7 :

4 sc, 2 inc, (10 sc, 2 inc) x3, 6 sc (56)

Round 8 :

5 sc, 2 inc, (12 sc, 2 inc) x3, 7 sc (64)

Round 9 :

1 sc BLO (64)

Round 10 - 26 :

1 sc (64)

Round 27 :

7 sc, 2 dec, (12 sc, 2 dec) x3, 5 sc BLO (56)

Round 28 :

6 sc, 2 dec, (10 sc, 2 dec) x3, 4 sc (48)

Round 29 :

5 sc, 2 dec, (8 sc, 2 dec) x3, 3 sc (40)

Round 30 :

4 sc, 2 dec, (6 sc, 2 dec) x3, 2 sc (32)

Round 31 :

3 sc, 2 dec, (4 sc, 2 dec) x3, 1 sc (24)

Info :

Stuffing

Round 32 :

2 sc, 2 dec (16)

Round 33 :

8 dec (8)

Round 34 :

4 dec (4)

Info :

Fasten off with sl st, cut and hide the strand.

β€” Body :

Info :

With 2.5 mm lime green cotton yarn.

Round 1 :

8 sc in a magic ring (8)

Round 2 :

8 inc (16)

Round 3 :

2 inc, 2 sc (24)

Round 4 :

1 sc, 2 inc, (4 sc, 2 inc) x3, 3 sc (32)

Round 5 :

2 sc, 2 inc, (6 sc, 2 inc) x3, 4 sc (40)

Round 6 :

1 sc BLO (40)

Round 7 - 18 :

1 sc (40)

Round 19 :

2 sc, 2 dec, (6 sc, 2 dec) x3, 4 sc BLO (32)

Round 20 :

1 sc, 2 dec, (4 sc, 2 dec) x3, 3 sc (24)

Info :

Stuffing

Round 21 :

2 sc, 2 dec (16)

Round 22 :

8 dec (8)

Round 23 :

4 dec (4)

Info :

Fasten off with sl st and leave a long strand to sew to the head.

Info :

Sew with a yarn needle joining R.19 of the body to R.29 of the head.

β€” Feet :

Info :

With 2.5 mm lime green cotton yarn.

Round 1 :

8 sc in a magic ring (8)

Round 2 :

8 inc (16)

Round 3 :

2 inc, 2 sc (24)

Round 4 :

1 sc BLO (24)

Round 5 - 10 :

1 sc (24)

Round 11 :

2 sc, 2 dec (16)

Info :

Stuffing

Round 12 :

8 dec (8)

Round 13 :

4 dec (4)

Info :

Fasten off with sl st and leave a long strand to sew to the body.

Info :

Join R.4 - R.6 of the feet to R.6 - R.8 of the body.

Info :

Sew two feet to the front and two feet to the back.

β€” Details :

Info :

With 2.5 mm dark green cotton yarn and a yarn needle embroidery three squares in front of each foot in R.9. With 2.5 mm dark green cotton yarn and a yarn needle embroidery two squares in the front part of the body, one square in R.14 and another in R.16.

β€” Face :

Info :

Cut out two 2.5 cm eyes with black felt and embroidery two reflections with white cotton yarn and a yarn needle to give it a kawaii touch. Glue the eyes between R.13 and R.17 of the head. With black felt, cut out a mouth 4.5 cm long and 3 cm high. Glue the mouth between R.19 and R.25 of the head. With pink cotton yarn and a yarn needle make two blushes in R.19 on the head.

Info :

Congratulations! Your amigurumi is now ready. I hope you enjoyed the process and the result.

Assembly Instructions

  • Sew the head to the body by matching R.19 of the body to R.29 of the head and join securely with a yarn needle.
  • Join the feet to the body by aligning R.4 - R.6 of each foot to R.6 - R.8 of the body and sew them in place so two feet face the front and two face the back.
  • Embroider dark green squares: three small squares on the front of each foot (in R.9) and two squares on the front of the body (one in R.14 and another in R.16) using a yarn needle.
  • Glue the black felt eyes between R.13 and R.17 of the head and glue the black felt mouth between R.19 and R.25 of the head; use a hot glue gun or sew the felt with needle and thread for extra security.
  • Make two small blushes with pink cotton yarn in R.19 of the head using a yarn needle for a kawaii finish.

Important Notes

  • πŸ’‘Use stitch markers to mark the beginning of each round to avoid losing your place during increases and decreases.
  • πŸ’‘Stuff gradually and evenly; overstuffing can distort the square head and cylindrical body shapes.
  • πŸ’‘Pin pieces into position before sewing to check placement and symmetry for the eyes, mouth and feet.
  • πŸ’‘Weave in or hide ends as you go to keep the inside neat and reduce final finishing time.

This adorable Creeper amigurumi pattern turns a video game icon into a cute, huggable friend you can make at home. The design uses simple shaping and small embroidered details to deliver big personality with minimal materials. Whether you give it as a gift or keep it for your collection, you will love the kawaii result. 🧢😊

You ask,

we answer.

FAQs

What size will the finished piece be?

The finished amigurumi measures approximately 15 cm high when using 2.5 mm cotton yarn and a 2.5 mm hook.

Can I use different yarn weights for this pattern?

Yes, you can, but changing yarn weight will change the final size; match your hook to the yarn weight and adjust stuffing accordingly.

Do I need prior crochet experience for this pattern?

This pattern is rated intermediate β€” basic knowledge of single crochet, increases, decreases and working in the round is recommended.

How long does this project typically take to complete?

Most crocheters finish this Creeper in about 5-7 hours, depending on experience and the speed of embroidery and assembly.