🧢 Beautiful ✨ Detailed πŸ’ Adorable

Bull Amigurumi Pattern

Bull Amigurumi Pattern
4.1β˜… Rating
5-7 Hours Time Needed
3.0K Made This
βœ‚οΈ

Intermediate Level

Ideal for those with basic crochet experience, featuring slightly more advanced stitches and techniques to expand your skills.

⏱️

Weekend Treat

Takes 5-7 hours, making it an enjoyable project to finish over a couple of days.

🧸

Cute Companion

An adorable friend to cherish, handcrafted with love to bring comfort and joy for years to come.

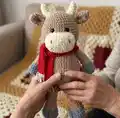
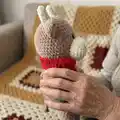
About This Bull Amigurumi Pattern

This pattern creates a soft, plush bull amigurumi about 39 cm tall using Alize Softy yarn in two strands. You will crochet the head, muzzle, horns, ears, arms, legs, tail, and body, then assemble and embroider details. The design emphasizes simple shaping and a cuddly textured finish using a 4.5 mm hook. Spiral rounds and clear stitch counts make following along straightforward.

Bull Amigurumi Pattern crochet pattern - detailed view of completed project

Includes full materials and abbreviations, step-by-step rounds, and illustrated assembly photos. Great for making a handmade gift or a special toy for a child.

Why You'll Love This Bull Amigurumi Pattern

I absolutely love this pattern because it combines simple amigurumi shaping with fluffy, tactile yarn for a super-squishy finish. I enjoy the little design details like the rounded muzzle, tiny horns, and embroidered nostrils that give the bull so much personality. The pattern is thoughtfully structured so you can crochet each part separately and assemble them cleanly for a professional look. It is satisfying to see the toy come together piece by piece and even more rewarding to gift the finished bull to someone special.

Bull Amigurumi Pattern step 1 - construction progress Bull Amigurumi Pattern step 2 - assembly progress Bull Amigurumi Pattern step 3 - details and accessories Bull Amigurumi Pattern step 4 - final assembly and finishing

Switch Things Up

I love how easily this pattern adapts to different colors β€” try pastel shades for a nursery-friendly bull or bright colors for a playful look.

You can change the yarn weight and hook size to make the bull larger or smaller; bulky yarn gives a chunky, cuddly toy while sport weight yields a delicate miniature.

I often add small accessories like a crocheted scarf, tiny hat, or bow to give each bull a unique personality.

For a more realistic look, embroider small hooves in contrasting thread or use a darker yarn for the hoof tips.

I sometimes swap safety eyes for embroidered eyes for a fully washable toy and a softer expression.

If you want posable limbs, consider inserting thin wire inside the arms and legs before final stuffing and closing.

I recommend experimenting with different horn shapes β€” longer, curved horns or shorter stubby ones change the character instantly.

Try surface crochet or a few slip stitch rows in a contrasting color to create a saddle or blanket decoration on the bull's back.

I also like to vary the muzzle size slightly for cuter proportions β€” adding or subtracting one increase round changes the face width.

When making a set, mix yarn textures and shades to create a whole herd of bulls with distinct looks and charm.

Common Mistakes & How to Fix Them

βœ— Skipping stitch markers at the start of rounds causes lost stitch counts and uneven shaping; place a marker at the first stitch of every round to keep consistent rounds and counts. βœ— Not crocheting with two strands as instructed will change gauge and size considerably; always hold two strands together throughout to match the designer's size. βœ— Forgetting to stuff parts as you go can lead to lumpy shapes and difficulty closing openings; stuff gradually and evenly, especially for the head and body. βœ— Changing colors without securing ends may create loose stitches and messy joins; weave in ends or crochet over tails when switching yarns to secure them. βœ— Not counting stitches after increases and decreases results in incorrect shaping and misaligned features; count your stitches every few rounds to verify totals.

Bull Amigurumi Pattern

Make a cuddly crocheted bull with this complete pattern designed for intermediate crocheters. You will create a soft, huggable toy with detailed muzzle, horns, ears, and embroidered nostrils. The pattern uses plush yarn held in two strands for a squishy finish and includes step-by-step assembly instructions and photos to guide you. Perfect as a gift or cozy keepsake to treasure for years.

Intermediate 5-7 Hours

Materials Needed for Bull Amigurumi Pattern

β€” Main Fabric

  • 01
    Alize Softy (115m/50g) yarn - 3 skeins of color 617 (beige), less than half a skein of color 62 (cream), less than half a skein of color 119 (gray)

β€” Tools Required

  • 01
    Crochet hook 4.5 mm
  • 02
    Safety eyes 12 mm (2 pieces)
  • 03
    Filler for toys - holofiber
  • 04
    Wide-eye needle for sewing parts
  • 05
    Yarn needle/tapestry needle
  • 06
    Scissors
  • 07
    Stitch markers (for round start)
  • 08
    Pins for assembly

Progress Tracker

0% Complete

β€” Head :

Round 1 :

6 sc in mr

Round 2 :

6 inc (12)

Round 3 :

(1 sc, inc)*6 (18)

Round 4 :

(2 sc, inc)*6 (24)

Round 5 :

(3 sc, inc)*6 (30)

Round 6 :

(4 sc, inc)*6 (36)

Round 7 :

(5 sc, inc)*6 (42)

Round 8 :

(6 sc, inc)*6 (48)

Round 9-16 :

48 sc in each row

Round 17 :

(6 sc, dec)*6 (42)

Round 18 :

(5 sc, dec)*6 (36)

Round 19 :

(4 sc, dec)*6 (30)

Round 20 :

(3 sc, dec)*6 (24)

Info :

Finish crocheting. Leave a long thread for sewing the head to the body later.

Info :

Attach safe eyes between 11 and 12 rows, the distance between the eyes is 4 sc. Stuff head tight with holofiber.

β€” Muzzle :

Info :

Cream color. Crochet 9 ch, from the second loop from the hook:

Round 1 :

7 sc, 3 sc in one loop, 6 sc, inc (18)

Round 2 :

inc, 6 sc, 3 inc, 6 sc, 2 inc (24)

Round 3 :

1 sc, inc, 6 sc, (1 sc, inc)*3, 6 sc, (1 sc, inc)*2 (30)

Round 4-6 :

30 sc in each row

Info :

Finish crocheting. Leave a long thread for sewing to the head later.

β€” Horns :

Info :

Cream color

Round 1 :

4 sc in mr

Round 2 :

4 sc

Round 3 :

(1 sc, inc)*2 (6)

Round 4 :

6 sc

Round 5 :

5 sc, inc (7)

Round 6 :

6 sc, inc (8)

Info :

1 sl st and finish crocheting. Leave a long thread for sewing to the head.

β€” Ears :

Info :

Beige color

Round 1 :

4 sc in mr

Round 2 :

4 inc (8)

Round 3 :

(3 sc, inc)*2 (10)

Round 4 :

(4 sc, inc)*2 (12)

Round 5 :

(5 sc, inc)*2 (14)

Round 6 :

14 sc

Info :

Fold in half and crochet 7 sc. Leave a long thread for sewing to the head.

β€” Arms :

First :

Start gray yarn

Round 1 :

7 sc in mr

Round 2 :

7 inc (14)

Round 3-5 :

14 sc in each row

Round 6 :

2 sc, dec, 10 sc (13)

Round 7 :

2 sc, dec, 9 sc (12)

Info :

change color to beige

Round 8-18 :

12 sc in each row

Info :

2 sc, then fold in half and crochet 6 sc. Leave a long thread for sewing to the body. Stuff arm to half.

Second :

Start gray yarn

Round 1 :

7 sc in mr

Round 2 :

7 inc (14)

Round 3-5 :

14 sc in each row

Round 6 :

6 sc, dec, 6 sc (13)

Round 7 :

6 sc, dec, 5 sc (12)

Info :

change color to beige

Round 8-18 :

12 sc in each row

Info :

1 sc, then fold in half and crochet 6 sc. Leave a long thread for sewing to the body. Stuff arm to half.

β€” Legs :

Info :

Start gray yarn

Round 1 :

6 sc in mr

Round 2 :

6 inc (12)

Round 3 :

(1 sc, inc)*6 (18)

Round 4 :

(2 sc, inc)*6 (24)

Round 5-7 :

24 sc in each row

Round 8 :

4 sc, 6 dec, 6 sc, change color to beige and crochet 2 sc (18)

Round 9 :

5 sc, 2 dec, 9 sc (16)

Round 10 :

5 sc, dec, 9 sc (15)

Round 11 :

3 sc, 2 dec, 8 sc (13)

Round 12 :

3 sc, dec, 8 sc (12)

Round 13-23 :

12 sc in each row

Info :

1 sc, fold in half and crochet 6 sc. Leave a long thread for sewing to the body.

Info :

In the second leg after the 23 row, crochet 2 sc, fold in half and crochet 6 sc. Leave a long thread for sewing to the body. Add stuffing.

Info :

Embroider imitation hooves.

β€” Tail :

Info :

Beige color. Crochet 11 ch, from the second loop from the hook crochet 10 sc. Finish crocheting. Leave a long thread for sewing to the body.

Info :

Tail tip in the form of a brush: 1. cut the gray yarn into pieces of about 8-10 cm. 2. fold these pieces in half and pull out with a hook at the end of the tail, forming a loop. 3. pull all the ends into the resulting loop.

β€” Body :

Round 1 :

6 sc in mr

Round 2 :

6 inc (12)

Round 3 :

(1 sc, inc)*6 (18)

Round 4 :

(2 sc, inc)*6 (24)

Round 5 :

(3 sc, inc)*6 (30)

Round 6 :

(4 sc, inc)*6 (36)

Round 7 :

(5 sc, inc)*6 (42)

Round 8 :

(6 sc, inc)*6 (48)

Round 9-14 :

48 sc in each row

Round 15 :

(6 sc, dec)*6 (42)

Round 16-17 :

42 sc in each row

Round 18 :

(5 sc, dec)*6 (36)

Round 19-20 :

36 sc in each row

Round 21 :

(4 sc, dec)*6 (30)

Round 22 :

30 sc

Round 21 :

(3 sc, dec)*6 (24)

Info :

Finish crocheting. Cut off the tip, fasten inside. Add stuffing.

β€” Assembly :

Info :

Stuff muzzle tight with holofiber. Sew a muzzle, ears (fold in half and sew), horns. Embroider nostrils.

Info :

Sew head to body.

Info :

Then sew arms and legs.

Info :

And sew the tail.

Assembly Instructions

  • Stuff muzzle tight with holofiber and sew it securely to the front of the head, aligning the base with the marked center.
  • Sew horns and ears to the top of the head; fold ears in half and sew the folded edge so the ear shape is correct before attaching.
  • Attach the head to the body using the long tail left after finishing the head; sew evenly around the neck opening for a secure join.
  • Position and sew arms on either side of the body between upper body rounds for a natural pose, and sew legs at the base of the body so the toy can sit or stand.
  • Embroider nostrils on the muzzle with gray yarn or embroidery thread to match the sample photos.
  • Sew the tail to the back lower part of the body and attach the brush tip by pulling yarn ends through and securing the knot.

Important Notes

  • πŸ’‘Work in spiral rounds; mark the beginning of each round with a stitch marker or contrast color thread to maintain correct stitch placement.
  • πŸ’‘Crochet all the details of the toy with yarn held in two strands as instructed to achieve the correct thickness and texture.
  • πŸ’‘Stuff parts firmly but not overstuffed to maintain shape while allowing seams to close neatly.
  • πŸ’‘Leave long sewing tails when finishing parts to make assembly easier and more secure.

This charming Bull amigurumi is designed to be cuddly, durable, and full of personality β€” a perfect handmade gift or nursery companion. Handmade with soft yarn and simple shaping, it becomes a favorite keepsake for kids and adults alike. Enjoy the creative process and share the finished bull with loved ones! 🧢🧡

You ask,

we answer.

FAQs

What size will the finished piece be?

The finished bull measures approximately 39 cm tall when made with Alize Softy yarn held in two strands and a 4.5 mm hook.

Can I use different yarn weights for this pattern?

Yes, you can use different yarn weights, but the final size will vary; adjust your hook size accordingly and test gauge to achieve desired proportions.

Do I need prior crochet experience for this pattern?

This pattern is rated intermediate, so basic knowledge of single crochet, increases, decreases, magic ring, and working in spiral rounds is recommended for best results.

How long does this project typically take to complete?

Most crocheters complete this project in 5-7 hours, though time may vary based on experience level, yarn choice, and assembly time.