๐Ÿงถ Beautiful โœจ Detailed ๐Ÿ’ Adorable

Bernat Pipsqueak Star Blanket Pattern

Bernat Pipsqueak Star Blanket Pattern
4.1โ˜… Rating
8-10 Hours Time Needed
3.6K Made This
โœ‚๏ธ

Intermediate Level

Ideal for those with basic crochet experience, featuring slightly more advanced stitches and techniques to expand your skills.

โฑ๏ธ

All-Day Adventure

Requires 8-10 hours, ideal for a full day of immersive crocheting.

๐Ÿค—

Soft Hug

Gentle, plush, and full of warmth, creating a sense of comfort and coziness wherever they find a home.

About This Bernat Pipsqueak Star Blanket Pattern

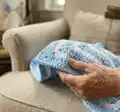
This pattern makes a plush star-shaped baby blanket using Bernat Pipsqueak yarn and two contrasting colors. The textured stripes and star points are created by working repeated rounds with ch-2 corner spaces and sc2tog shaping. It is ideal for baby gifts or a cozy nursery accent, finished with a soft, snuggly feel.

Bernat Pipsqueak Star Blanket Pattern crochet pattern - detailed view of completed project

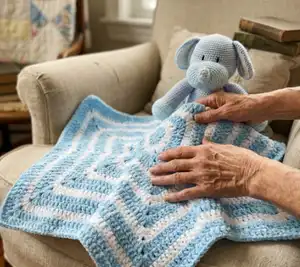
The pattern alternates rounds between Color A and Color B to build the striped star effect. Full round-by-round instructions and yarn amounts are provided for accurate results.

Why You'll Love This Bernat Pipsqueak Star Blanket Pattern

I absolutely love this pattern because the star shape is both striking and clever, giving a simple blanket a lot of personality. I enjoy how the color changes build soft stripes without complicated colorwork, making the project relaxing to work on. The plush texture of Bernat Pipsqueak adds a luxurious, baby-friendly finish that is irresistible to touch. I also appreciate that the pattern repeats in a predictable way, so once you learn the round structure the work becomes meditative and enjoyable.

Bernat Pipsqueak Star Blanket Pattern step 1 - construction progress Bernat Pipsqueak Star Blanket Pattern step 2 - assembly progress Bernat Pipsqueak Star Blanket Pattern step 3 - details and accessories Bernat Pipsqueak Star Blanket Pattern step 4 - final assembly and finishing

Switch Things Up

I love customizing this blanket by swapping the color palette for different looks; try pastels for a soft nursery or bold contrasts for a modern nursery theme.

Change yarn weight and hook size to make a smaller lovey or a larger throw; using bulky yarn will create a chunky, cozy version.

I sometimes add a simple single crochet border in a contrasting color for a polished edge that frames the star nicely.

Embellish the finished blanket with small crocheted appliques or embroidered initials to personalize a baby gift.

For a different texture, substitute some rounds with half double crochet or a textured stitch for added interest between points.

Make a matching set by crocheting a hat or booties using the same color changes and yarn to coordinate with the blanket.

Use a variegated skein for one color and a solid for the other to create a subtle, painterly striped effect without extra color changes.

I sometimes block the finished blanket lightly to even out the star points and open up the stitches for a neater finish.

If you want a reversible look, plan color changes so that contrasting bands appear balanced on both sides when weaving in ends carefully.

Consider adding a lightweight fabric backing or lining for extra durability and softness if the blanket will see frequent use or washing.

Common Mistakes & How to Fix Them

โœ— Skipping the initial join when forming the center ring can create a loose or uneven starting point; always join with a slip stitch to form a secure ring before proceeding. โœ— Not counting stitches after increases and ch-2 corner spaces leads to misaligned star points; count stitches at the end of each round to ensure consistency. โœ— Working ch-3 as the first dc but forgetting that it counts as a dc can shift your stitch placement; remember the note that ch 3 at beg of rnd counts as dc throughout. โœ— Pulling loops too tightly when making sc2tog or drawing up loops can distort the texture; keep even, moderate tension so sc2tog sits neatly among the surrounding double crochets. โœ— Skipping color joins or not fastening off ends securely results in loose color changes; fasten off and weave in ends neatly after the final rounds for a clean finish.

Bernat Pipsqueak Star Blanket Pattern

Make a soft, star-shaped baby blanket using Bernat Pipsqueak yarn. This pattern guides you through color changes and star point shaping to create a cozy, cuddly blanket perfect for nurseries or gifting. Youll enjoy the plush texture and gentle stripes while working a repeatable round structure. The finished blanket measures about 40 inches from point to point.

Intermediate 8-10 Hours

Materials Needed for Bernat Pipsqueak Star Blanket Pattern

โ€” Main Fabric

  • 01
    Bernat Pipsqueak (100 g/3.5 oz; 109 m/120 yds) - 3 balls of A and 2 balls of B
  • 02
    Alternative option listed: (250 g/8.8 oz; 274 m/300 yds) - 1 ball each of A and B
  • 03
    Contrast A (58730 or 59730 Silly Sea) 259 m / 283 yds
  • 04
    Contrast B (58005 or 59005 Whitey White) 208 m / 227 yds

โ€” Tools Required

  • 01
    Crochet hook size 6.5 mm (U.S. K or 10ยฝ) or size needed to obtain gauge

Progress Tracker

0% Complete

โ€” Measurement :

Info :

Approx 40 ins [101.5 cm] from point to point.

โ€” Materials :

Infos :

Bernatยฎ Pipsqueak (100 g/ 3.5 oz; 109 m/ 120 yds) 3 balls of A and 2 balls of B or (250 g/8.8 oz; 274 m/300 yds) 1 ball each of A and B Contrast A (58730 or 59730 Silly Sea) 259 m / 283 yds Contrast B (58005 or 59005 Whitey White) 208 m / 227 yds

โ€” Tools & Gauge :

Info :

Size 6.5 mm (U.S. K or 10ยฝ) crochet hook or size needed to obtain gauge. GAUGE: 10 dc and 6 rows = 4 ins [10 cm].

โ€” Abbreviations :

Info :

ABBREVIATIONS: www.bernat.com/abbreviations

โ€” Instructions :

Info :

Note: Ch 3 at beg of rnd counts as dc throughout. Beg at center, with A, ch 5. Join with sl st to form ring.

1st rnd :

Ch 2 (does not count as st). 12 hdc in ring. Join with sl st to first hdc. 12 hdc.

2nd rnd :

Ch 1. 1 sc in same sp as last sl st. *3 dc in next hdc. 1 sc in next hdc. Rep from * around to last hdc. 3 hdc in last hdc. Join B with sl st to first sc.

3rd rnd :

With B, sl st in next dc. Ch 3. (2 dc. Ch 2. 2 dc) in next dc. 1 dc in next dc. *Miss next sc. 1 dc in next dc. (2 dc. Ch 2. 2 dc) in next dc. 1 dc in next dc. Rep from * 4 times more. Join A with sl st to top of ch 3.

4th rnd :

With A, sl st in next dc. Ch 3. 1 dc in next dc. *(2 dc. Ch 2. 2 dc) in next ch-2 sp. 1 dc in each of next 2 dc.** Draw up a loop in each of next 2 dc. Yoh and draw through all loops on hook โ€“ sc2tog made. 1 dc in each of next 2 dc. Rep from * 4 times more, then from * to ** once. Sc2tog over last 2 sts. Join with sl st to top of ch 3.

5th rnd :

Ch 3. 1 dc in each of next 3 dc. *(2 dc. Ch 2. 2 dc) in next ch-2 sp. 1 dc in each of next 4 dc.** Miss next st. 1 dc in each of next 4 dc. Rep from * 4 times more, then from * to ** once. Miss last st. Join B with sl st to top of ch 3.

6th rnd :

With B, sl st in next dc. Ch 3. 1 dc in each of next 4 dc. *(2 dc. Ch 2. 2 dc) in next ch-2 sp. 1 dc in each of next 5 dc.** Sc2tog over next 2 dc. 1 dc in each of next 5 dc. Rep from * 4 times more, then from * to ** once. Sc2tog over last 2 dc. Join A with sl st to top of ch 3.

7th rnd :

With A, ch 3. 1 dc in each of next 6 dc. *(2 dc. Ch 2. 2 dc) in next ch-2 sp. 1 dc in each of next 7 dc.** Miss next st. 1 dc in each of next 7 dc. Rep from * 4 times more, then from * to ** once. Miss last st. Join with sl st to top of ch 3.

8th rnd :

Sl st in next dc. Ch 3. 1 dc in each of next 7 dc. *(2 dc. Ch 2. 2 dc) in next ch-2 sp. 1 dc in each of next 8 dc.** Sc2tog over next 2 dc. 1 dc in each of next 8 dc. Rep from * 4 times more, then from * to ** once. Sc2tog over last 2 dc. Join B with sl st to top of ch 3.

9th rnd :

With B, ch 3. 1 dc in each of next 9 dc. *(2 dc. Ch 2. 2 dc) in next ch-2 sp. 1 dc in each of next 10 dc.** Miss next st. 1 dc in each of next 10 dc. Rep from * 4 times more, then from * to ** once. Miss last st. Join A with sl st to top of ch 3.

10th rnd :

With A, sl st in next dc. Ch 3. 1 dc in each of next 10 dc. *(2 dc. Ch 2. 2 dc) in next ch-2 sp. 1 dc in each of next 11 dc.** Sc2tog over next 2 dc. 1 dc in each of next 11 dc. Rep from * 4 times more, then from * to ** once. Sc2tog over last 2 dc. Join with sl st to top of ch 3.

11th rnd :

Ch 3. 1 dc in each of next 12 dc. *(2 dc. Ch 2. 2 dc) in next ch-2 sp. 1 dc in each of next 13 dc.** Miss next st. 1 dc in each of next 13 dc. Rep from * 4 times more, then from * to ** once. Miss last st. Join B with sl st to top of ch 3.

Info :

Cont as established, (working 1 rnd B; 2 rnds A throughout) until work from center to outer point measures approx 20 ins [51 cm] ending with 2 rnds A. Fasten off.

Assembly Instructions

  • No assembly is required; the blanket is worked in continuous rounds from the center and finishes as one piece.
  • Weave in all loose ends securely on the wrong side using a yarn needle to hide tails and prevent unraveling.
  • If desired, gently block the blanket to even out stitches and to square the star points for a neater finish.
  • Inspect color joins and secure any loose yarn tails at each color change to ensure the stripes lie flat and neat.

Important Notes

  • ๐Ÿ’กFollow the note: ch 3 at beginning of each round counts as a dc throughout to keep stitch counts accurate.
  • ๐Ÿ’กWork the sc2tog by drawing up loops in the specified stitches as described to maintain the intended texture.
  • ๐Ÿ’กCheck your gauge (10 dc and 6 rows = 4 ins [10 cm]) and adjust hook size as needed to match the pattern measurements.

This cozy star blanket pattern creates a plush, snuggly piece thats perfect for babies and nurseries. The soft Bernat Pipsqueak yarn gives it a luxurious feel while the striped points add playful charm. Make one for gifting or to keep as a treasured cuddle blanket. ๐Ÿงถโœจ๐Ÿ˜Š

You ask,

we answer.

FAQs

What size will the finished piece be?

The finished blanket measures approximately 40 inches [101.5 cm] from point to point when using the recommended yarn and hook size.

Can I use different yarn weights for this pattern?

Yes, you can use different yarn weights, but this will change the finished size and drape; adjust your hook size and check gauge to achieve desired dimensions.

Do I need prior crochet experience for this pattern?

This pattern is rated intermediate, so familiarity with double crochet, half double crochet, sc2tog, and working in rounds is recommended.

How long does this project typically take to complete?

Most crocheters can finish this blanket in about 8-10 hours, depending on experience and working speed.