๐Ÿงถ Beautiful โœจ Detailed ๐Ÿ’ Adorable

Bear Clothes Amigurumi Pattern

Bear Clothes Amigurumi Pattern
4.8โ˜… Rating
5-7 Hours Time Needed
2.7K Made This
โœ‚๏ธ

Intermediate Level

Ideal for those with basic crochet experience, featuring slightly more advanced stitches and techniques to expand your skills.

โฑ๏ธ

Weekend Treat

Takes 5-7 hours, making it an enjoyable project to finish over a couple of days.

๐ŸŽ€

Playful Twist

Fun patterns meet timeless design in pieces that express personality while remaining wonderfully wearable.

About This Bear Clothes Amigurumi Pattern

This collection contains full instructions to crochet a charming outfit for an 18 cm amigurumi: a pointed hat with brim, decorative band and buckle, cardigan with button loops, underpants, and a pompom. Each piece is written in rounds with clear stitch counts so you can follow along precisely. You'll find tips for finishing, sewing and simple decoration so the outfit looks neat and polished.

Bear Clothes Amigurumi Pattern crochet pattern - detailed view of completed project

The pattern uses YarnArt Jeans yarn and a 2.0 mm hook for fine, tidy stitches and good shaping. Photographs and step notes help with assembly and placement of decorations so finishing is quick and accurate.

Why You'll Love This Bear Clothes Amigurumi Pattern

I absolutely love this pattern because it turns a simple amigurumi into a character with personality through clothing and small details. I enjoyed creating the pointed hat and its structured brim; it adds instant charm to a toy. The cardigan and underpants are designed to fit snugly and are quick to crochet, making them satisfying to finish. Small touches like the buckle, pompom, and button loops let you personalize each outfit and practice short shaping techniques.

Bear Clothes Amigurumi Pattern step 1 - construction progress Bear Clothes Amigurumi Pattern step 2 - assembly progress Bear Clothes Amigurumi Pattern step 3 - details and accessories Bear Clothes Amigurumi Pattern step 4 - final assembly and finishing

Switch Things Up

I love experimenting with different colors for this outfit: try pastel shades for a soft baby look or bold holiday colors for a festive version.

Change yarn weight and hook size if you want a larger or smaller outfitโ€”bulky yarn with a bigger hook makes a chunky playful hat.

I often swap the buckle color or embroider tiny motifs on the cardigan to personalize the set for the recipient.

You can replace the pompom with a crocheted flower or tiny tassel for variety and a different silhouette.

Try adding a thin wire inside the hat tip for a posable, whimsical point that can be bent into patterns.

For safety, omit small buttons for toys intended for small children and instead embroider button shapes onto the cardigan.

Use metallic or sparkly yarn for the belt or buckle if you want a dressy, eye-catching detail for holiday displays.

I sometimes make the hat brim wider or narrower by adjusting the number of rounds to change the overall look and how it sits on the toy.

Mixing texturesโ€”such as boucle or chenille for trimsโ€”can add visual interest and make the outfit feel more luxurious.

Donโ€™t be afraid to combine the pieces into sets with different color stories: a neutral cardigan with a bright hat can be very stylish and fun to mix and match.

Common Mistakes & How to Fix Them

โœ— Skipping stitch counts during increases and decreases can cause the brim or hat top to warp; count stitches every round to maintain shape and consistency. โœ— Not changing colors cleanly when switching to white trim will show loose ends; secure and weave in color joins neatly before continuing. โœ— Stuffing the pompom or hat too early can block your ability to shape the piece correctly; wait until shaping is finished then stuff lightly and close. โœ— Sewing parts without pinning first may misplace decorative elements; pin the band, buckle and pompom before sewing or gluing to check placement.

Bear Clothes Amigurumi Pattern

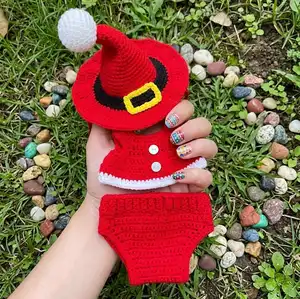
Make an adorable set of crochet clothes for a small amigurumi bear including a pointed hat with brim, decorative belt and buckle, cardigan, underpants and pompom. This pattern gives clear, step-by-step rounds and visual tips so you can customize colors and trims. Perfect for gifting or dressing up your handmade toys with seasonal flair and charming details.

Intermediate 5-7 Hours

Materials Needed for Bear Clothes Amigurumi Pattern

โ€” Main Fabric

  • 01
    YarnArt Jeans (recommended) - colors 01, 53, 35 (use small amounts of each for hat, cardigan, underpants and decorations)
  • 02
    White yarn for trims and pompom (small amount)
  • 03
    Yellow yarn for buckle detail (small amount)
  • 04
    Black yarn for hat band (small amount)
  • 05
    Polyester stuffing for pompom (small amount)

โ€” Tools Required

  • 01
    Crochet hook size 2.0 mm
  • 02
    Tapestry needle for sewing
  • 03
    Scissors
  • 04
    Buttons (4 pieces)
  • 05
    Glue (second glue for attaching decoration if desired)
  • 06
    Stitch markers (optional)
  • 07
    Pins for assembly (optional)
  • 08
    Polyester stuffing for pompom

Progress Tracker

0% Complete

โ€” Cap :

Round 1 :

1 th: 4 sc into the adjustable ring

Round 2 :

2 th: 3 sc, inc = 5 sc

Round 3 :

3 th: 1 sc, inc, 3 sc = 6 sc

Round 4 :

4 th: 4 sc, inc, 1 sc= 7 sc

Round 5 :

5 th: 1 sc, inc, 3 sc, inc, 1 sc = 9 sc

Round 6 :

6 th: (2 sc, inc) x 3 times = 12 sc

Round 7 :

7 th: 12 sc

Round 8 :

8 th: (2 sc, inc) x 4 times = 16 sc

Round 9 :

9 th: 16 sc

Round 10 :

10 th: (3 sc, inc) x 4 times = 20 sc

Round 11 :

11 th: 20 sc

Round 12 :

12 th: (4 sc, inc) x 4 times = 24 sc

Round 13 :

13 th: 24 sc

Round 14 :

14 th: (5 sc, inc) x 4 times = 28 sc

Round 15 :

15 th: 28 sc

Round 16 :

16 th: (6 sc, inc) x 4 times = 32 sc

Round 17 :

17 th: 32 sc

Round 18 :

18 th: (7 sc, inc) x 4 times = 36 sc

Round 19 :

19 th: 36 sc

Round 20 :

20 th: (8 sc, inc) x 4 times = 40 sc

Round 21 :

21 th: 40 sc

Round 22 :

22 th: (9 sc, inc) x 4 times = 44 sc

Round 23 :

23 th: (10 sc, inc) x 4 times = 48 sc

Round 24 :

24 th: (11 sc, inc) x 4 times = 52 sc

Round 25 :

25 th: (12 sc, inc) x 4 times = 56 sc

Round 26 :

26 th: (13 sc, inc) x 4 times = 60 sc

Round 27 :

27 th: (14 sc, inc) x 4 times = 64 sc

Round 28 :

28 th: (15 sc, inc) x 4 times = 68 sc

Round 29 :

29 th: (16 sc, inc) x 4 times = 72 sc

Round 30 :

30 th: (11 sc, inc) x 6 times = 78 sc

Round 31 :

31 th: (12 sc, inc) x 6 times = 84 sc

Round 32 :

32 th: (13 sc, inc) x 6 times = 90 sc

Round 33 :

33 th: (14 sc, inc) x 6 times = 96 sc

Round 34 :

34 th: 2 ch, (2 dc, inc) x 32 times = 128 sc

Round 35-36 :

35-36 th: 128 dc

Info :

Trim the thread, fix the loop.

Info :

Next, insert a hook with a black thread, from the wrong side of the hat in the 7th row from the end of the hat and crochet: 40 ch, cut the thread, fix the loop. We tie a small knot at the tip of the chain of ch.

Info :

Next, against this crochet chain, we also crochet 40 ch and tie a small knot at the end of the chain of ch:

โ€” Detail on the hat :

Round 1 :

1 th: 67 ch, 66 sc

Round 2-3 :

2-3 th: 1 ch, turning detail, 66 sc

Info :

Trim the thread, fix the loop.

โ€” Hat Decoration (P1) :

Item :

35 ch, 4 sc, (in one loop: 1 sc, ch, 1 sc), 10 sc, (in one loop: 1 sc, ch, 1 sc), 5 sc, (in one loop: 1 sc, ch, 1 sc), 10 sc, (in one loop: 1 sc, ch, 1 sc), 1 sc. We cut the thread, fix the loop. We connect the beginning and the end and sew.

โ€” Pompon :

Round 1 :

1 th: 6 sc into the adjustable ring

Round 2 :

2 th: (inc) x 6 times = 12 sc

Round 3 :

3 th: (1 sc, inc) x 6 times = 18 sc

Round 4 :

4 th: (2 sc, inc) x 6 times = 24 sc

Round 5-7 :

5-7 th: 24 sc

Round 8 :

8 th: (2 sc, dec) x 6 times = 18 sc

Round 9 :

9 th: (1 sc, dec) x 6 times = 12 sc

Info :

Stuff

Round 10 :

10 th: (dec) x 6 times = 6 sc

Info :

Trim the thread, fix the loop, leave the thread for sewing to the cap.

โ€” Cardigan :

Instruction :

45 ch: 10 dc, arch (hdc, ch, hdc), 5 dc (sleeve), arch, 10 dc, arch, 5 dc (sleeve), arch, 10 dc

Round :

round: 2 ch, turning detail, 11 dc, arch, 7 dc (sleeve), arch, 12 dc, arch, 7 dc (sleeve), arch, 11 dc

Round :

Row: 2 ch, turning detail, 12 dc, 3 ch, 10 loops skip and starting from 11 loops crochet 16 dc, 3 ch, 10 loops skip and starting from 11 loops crochet 12 dc = 46 loops

Round :

Row: 1 ch, turning detail, 9 sc, (inc, 2 sc) x 9 times, 10 sc = 55 sc

Round :

Row: 1 ch, turning detail, 10 sc, (inc, 3 sc) x 9 times, 9 sc = 64 sc

Round :

(1 ch, turning detail, 64 sc) x.5 rounds

Info :

We change the color of the thread to white

Round :

(1 ch, turning detail, 64 sc) x 2 rounds

Info :

Next, go to the side of the part and crochet button loops:

Instruction :

4 ch, 3 loops skip and starting with 4 crochet loops: 10 sc, 4 ch, 3 loops skip and in the last loop crochet sl st.

Info :

We cut the thread, fix the loop.

Info :

We sew buttons on the front and back.

โ€” Underpants, we use red thread :

Round 1 :

33 ch, 32 sc

Round 2 :

(1 ch, turning detail, 32 sc) x 2 rounds

Round 3 :

1 ch, turning detail, 1 sc, dec, 26 sc, dec, 1 sc = 30 sc

Round 4 :

1 ch, turning detail, 1 sc, dec, 24 sc, dec, 1 sc = 28 sc

Round 5 :

1 ch, turning detail, 1 sc, dec, 22 sc, dec, 1 sc = 26 sc

Round 6 :

1 ch, turning detail, 1 sc, dec, 20 sc, dec, 1 sc = 24 sc

Round 7 :

1 ch, turning detail, 1 sc, dec, 18 sc, dec, 1 sc = 22 sc

Round 8 :

1 ch, turning detail, 1 sc, dec, 16 sc, dec, 1 sc = 20 sc

Round 9 :

1 ch, turning detail, 1 sc, dec, 14 sc, dec, 1 sc = 18 sc

Round 10 :

1 ch, turning detail, 1 sc, dec, 12 sc, dec, 1 sc = 16 sc

Round 11 :

1 ch, turning detail, 1 sc, dec, 10 sc, dec, 1 sc = 14 sc

Round 12 :

(1 ch, turning detail, 14 sc) x 10 rounds

Round 13 :

1 ch, turning detail, 1 sc, inc, 10 sc, inc, 1 sc = 16 sc

Round 14 :

1 ch, turning detail, 1 sc, inc, 12 sc, inc, 1 sc = 18 sc

Round 15 :

1 ch, turning detail, 1 sc, inc, 14 sc, inc, 1 sc = 20 sc

Round 16 :

1 ch, turning detail, 1 sc, inc, 16 sc, inc, 1 sc = 22 sc

Round 17 :

1 ch, turning detail, 1 sc, inc, 18 sc, inc, 1 sc = 24 sc

Round 18 :

1 ch, turning detail, 1 sc, inc, 20 sc, inc, 1 sc = 26 sc

Round 19 :

1 ch, turning detail, 1 sc, inc, 22 sc, inc, 1 sc = 28 sc

Round 20 :

1 ch, turning detail, 1 sc, inc, 24 sc, inc, 1 sc = 30 sc

Round 21 :

1 ch, turning detail, 1 sc, inc, 26 sc, inc, 1 sc = 32 sc

Round 22 :

(1 ch, turning detail, 32 sc) x 3 rounds

Info :

We cut the thread, fix the loop.

Info :

We sew 3 rows on the sides:

โ€” Rubber band :

Instruction :

5 ch, 4 sc (1 ch, turning detail, 4 sc for the back of the loop) x 62 rounds

Info :

Use this band to finish the underpants waist as shown in photos.

Assembly Instructions

  • Sew or glue the black band decoration onto the hat at the 4th-5th row from the edge, then sew the yellow buckle on top of the band as shown in photos.
  • Attach the two braided chains (40 ch each) to the sides of the hat where indicated and secure knots; hide and sew ends to the inside.
  • Sew the pompom to the tip of the hat using the long tail left from the pompom, securing tightly with knots and weaving in the ends.
  • Sew buttons on the cardigan: position buttons on front and back as indicated, and fasten with matching thread through the button loops.
  • Sew three rows at the sides of the underpants to close the leg openings, then attach the rubber band around the waist to finish the fit.

Important Notes

  • ๐Ÿ’กCount stitches at the end of each round to ensure you have the correct stitch count, especially during increases and decreases.
  • ๐Ÿ’กChange colors neatly by fastening off and weaving ends securely to avoid loose tails that show on the finished edge.
  • ๐Ÿ’กPin or place parts temporarily before sewing so you can check symmetry and placement of band, buckle and buttons.
  • ๐Ÿ’กTrim threads and fix loops after finishing sections to keep edges tidy and avoid unraveling during assembly.

This sweet amigurumi clothing set adds personality to your toy with a playful pointed hat, cozy cardigan, and snug underpants. ๐ŸŽ It is written clearly in rounds with photos and finishing notes to help you pop on each piece with confidence. Your handmade bear will be ready for display or giftingโ€”stitched with love and ready to charm. ๐Ÿงถโœจ

You ask,

we answer.

FAQs

What size will the finished outfit fit?

The clothes are written to fit an approximately 18 cm amigurumi when using YarnArt Jeans and a 2.0 mm hook, matching the example photos.

Can I use different yarn or hook sizes?

Yes, you can change yarn weight and hook size but this will change the finished fit; adjust hook size and check gauge to fit a different sized toy.

Are the instructions suitable for beginners?

This pattern is rated intermediate because it uses shaping, increases/decreases and small assembly steps; beginners with patience can follow the rounds and photos.

How long does it take to crochet the full outfit?

Most crocheters complete the hat, cardigan and underpants in about 5-7 hours total, depending on experience and finishing time.