🧢 Beautiful ✨ Detailed πŸ’ Adorable

Baby Cthulhu Amigurumi Pattern

Baby Cthulhu Amigurumi Pattern
4.3β˜… Rating
5-7 Hours Time Needed
3.6K Made This
βœ‚οΈ

Intermediate Level

Ideal for those with basic crochet experience, featuring slightly more advanced stitches and techniques to expand your skills.

⏱️

Weekend Treat

Takes 5-7 hours, making it an enjoyable project to finish over a couple of days.

🧸

Cute Companion

An adorable friend to cherish, handcrafted with love to bring comfort and joy for years to come.

About This Baby Cthulhu Amigurumi Pattern

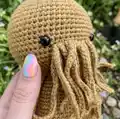
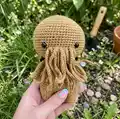
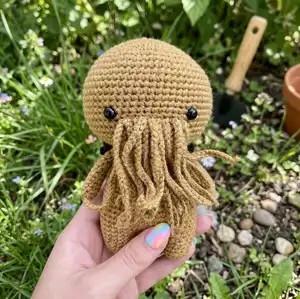
This pattern creates a small, charming Baby Cthulhu amigurumi complete with tentacles, tiny wings and a rounded body. The design uses magic rings, increases, decreases and back-loop rows to sculpt facial features and attach tentacles. You can customize yarn colors and tentacle length to create your own spooky-cute companion. The instructions include step-by-step rounds and assembly notes to guide you.

Baby Cthulhu Amigurumi Pattern crochet pattern - detailed view of completed project

Perfect for intermediate crocheters looking for a fun sculpting challenge. The finished toy makes a delightful gift or quirky decor piece.

Why You'll Love This Baby Cthulhu Amigurumi Pattern

I absolutely love this pattern because it brings a whimsical, slightly spooky character to life with simple stitches. I enjoy how back-loop rows and chained tentacles add personality without complicated techniques. The piece is compact and satisfying to make, giving a complete toy in a few focused sessions. I also love how easy it is to personalize by changing yarn colors or tentacle length to create different expressions.

Baby Cthulhu Amigurumi Pattern step 1 - construction progress Baby Cthulhu Amigurumi Pattern step 2 - assembly progress Baby Cthulhu Amigurumi Pattern step 3 - details and accessories Baby Cthulhu Amigurumi Pattern step 4 - final assembly and finishing

Switch Things Up

I love how easy it is to change the mood of this pattern by switching yarn color β€” try pastel shades for a softer, friendlier look or deep greens and blacks for an eerie vibe.

You can make the toy larger or smaller by changing the yarn weight and hook size; bulky yarn gives a plush chunky result while thinner yarn makes a tiny collectible.

I often alter tentacle length and number to create different personalities; fewer longer tentacles looks dramatic, many short ones looks playful.

Try embroidering a tiny smile or wrinkles to change expression β€” the placement of the eyes and the tentacles can radically alter the character.

If you want posable limbs, I add thin wire inside the arms and legs before finishing for flexible posing.

For a baby-safe version, replace safety eyes with embroidered eyes and ensure all yarn ends are securely woven in.

Add tiny accessories like a miniature scarf, hat, or a crochet trinket to personalize every piece and make a themed gift set.

I also like to use variegated or speckled yarn for subtle texture on the head and body without extra stitching.

Experiment with felting small details or using felt for wings to create a different texture contrast against the crocheted body.

Finally, assemble parts loosely and pin them in place first to try different positions before sewing β€” small adjustments can make a big difference in character.

Common Mistakes & How to Fix Them

βœ— Placing safety eyes too early can shift facial placement; attach eyes between rounds 18 and 19 and count 11 stitches between them to ensure even spacing. βœ— Skipping counting during increases or decreases leads to incorrect stitch totals; count after each shaping round and use stitch markers to mark the beginning of rounds. βœ— Overstuffing the head or body causes distortion and lumps; stuff gradually and shape as you go, adding small amounts until firm but not tight. βœ— Not working in the back loops for sculpting will flatten the face; follow the BLO instructions for rounds 20-21 to create the correct facial sculpting. βœ— Cutting the thread after the first leg too early can complicate joining; cut the first leg thread, but when making the second leg do not cut and continue to join to the body as instructed. βœ— Making tentacle chains uneven in length results in an unbalanced look; add 25 chains consistently to the BLO row and repeat the same along the row for even tentacles.

Baby Cthulhu Amigurumi Pattern

Make a delightful Baby Cthulhu amigurumi with clear, picture-guided instructions that walk you through each piece. You will crochet a rounded head, sculpted face, little body, legs, arms, wings and playful tentacles. This pattern uses simple shaping techniques and back-loop work to add cute character β€” perfect for a handmade gift or shelf buddy. Enjoy the process and customize colors to make your own adorable creature.

Intermediate 5-7 Hours

Materials Needed for Baby Cthulhu Amigurumi Pattern

β€” Main Fabric

  • 01
    Alize Cotton Gold 782 (yarn for main color)
  • 02
    Alize Cotton Gold 60 (yarn for accent or contrasting color)
  • 03
    Polyester Fiberfill (stuffing, amount as needed)
  • 04
    6 mm safety eyes (2 pieces)

β€” Tools Required

  • 01
    2.00 mm or a hook that fits your yarn
  • 02
    Polyester Fiberfill
  • 03
    6 mm safety eyes

Progress Tracker

0% Complete

β€” Head :

Round 1 :

6 sc in magic ring (6)

Round 2 :

(inc) x6 (12)

Round 3 :

(sc, inc) (18)

Round 4 :

(inc, 2 sc) x6 (24)

Round 5 :

(3 sc, inc) x6 (30)

Round 6 :

2 sc, inc, (4 sc, inc) x5, 2 sc (36)

Round 7 :

(5 sc, inc) (42)

Round 8 :

3 sc, inc, (6 sc, inc) x5, 3 sc (48)

Round 9 :

(7 sc, inc) x6 (54)

Round 10 :

4 sc, inc, (8 sc, inc) x5, 4 sc (60)

Round 11-19 :

sc around (60) (9 rnds)

Round 20 :

29 sc, BLO 9 sc, 22 sc (60)

Round 21 :

29 sc, BLO 9 sc, 22 sc (60)

Round 22-23 :

Sc around (60) (2 rnds)

Round 24 :

(3 sc, dec) x12 (48)

Round 25 :

(2 sc, dec) x12 (36)

Round 26 :

2 sc, dec, (4 sc, dec) x5, 2 sc (30)

Round 27 :

(3 sc, dec) x6 (24)

Round 28 :

sc around (24)

Infos :

Attach the safety eyes between rounds 18 and 19 with 11 st in-between. We'll work through the BLO row 20-21 to sculpt your face. Slst with 20 chains, 20 chains again. Do this in two rows for a total of 18 times. Add 25 chains to the BLO row for tentacles. Do the same along the row.

β€” Leg :

Round 1 :

7 sc in magic ring (7)

Round 2 :

(inc) x7 (14)

Round 3-5 :

sc around (14)

Info :

Make 2 pieces.

Info :

After making the first leg, cut the thread. When making the second leg, do not cut the thread and continue to the body.

β€” Body :

Round 6 :

ch4, join the first leg with the sc. Crochet on the first leg: 2 sc, (inc, 5 sc) x2, working on the chain: inc, 2 sc, inc, crochet on the second leg: (5 sc, inc) x2, 2 sc, working on the chain: 4 sc (42)

Round 7 :

(13 sc, inc) x3 (45)

Round 8-12 :

sc around (45) (5 rnds)

Round 13 :

(13 sc, dec) x3 (42)

Round 14-16 :

sc around (42) (3 rnds)

Round 17 :

(5 sc, dec) x6 (36)

Round 18-20 :

sc around (36) (3 rnds)

Round 21 :

(4 sc, dec) x6 (30)

Round 22-24 :

sc around (30)

Round 25 :

(3 sc, dec) x6, slst (24)

Info :

Fasten off and leaving a long tail for sewing. Stuff the body. Sew the Head with the Body.

β€” Arm :

Round 1 :

6 sc in magic ring (6)

Round 2 :

(sc, inc) x3 (9)

Round 3-11 :

sc around (9) (9 rnds)

Info :

I don't fill arms.

Info :

Add 25 chains to the BLO row for tentacles. Do the same along the row.

β€” Wing :

Round 1 :

Ch 21, 20 sc

Round 2 :

4 slst, ch 6, 12 sc, ch 6 turn

Round 3 :

12 sc, ch 6 turn

Round 4 :

12 sc

Info :

Your Baby Cthulhu is complete. I hope you like it. Happy Crotheting ☺

Assembly Instructions

  • Attach the safety eyes between rounds 18 and 19 with 11 stitches in-between to ensure symmetrical placement on the head.
  • Work through the BLO rows 20-21 to sculpt the face; use slip stitches with 20 chains in the technique described to create facial texture and tentacle attachment points.
  • Add 25 chains to the BLO row for each tentacle, repeating the same along the row to form multiple tentacles and secure them evenly across the front of the head.
  • After completing the first leg, cut the thread; when making the second leg do not cut the thread and continue to join legs to the body at round 6 as instructed.
  • Fasten off the body leaving a long tail for sewing, stuff the body firmly but evenly, then sew the head to the body securely using the long tail.
  • Position arms on the sides of the body and sew in place; add wings around the neck/back area as shown in photos and sew tentacles to the front BLO row.

Important Notes

  • πŸ’‘Attach safety eyes before stuffing and closing the head so you can position them exactly between rounds 18 and 19.
  • πŸ’‘Use back-loop-only rows (BLO) as directed to create the facial sculpting and mounting points for tentacles and embellishments.
  • πŸ’‘Stuff gradually and evenly to avoid lumps and to keep the head and body shapes smooth and proportionate.
  • πŸ’‘When joining legs and crocheting around chains, keep stitch counts accurate to prevent gaps or uneven joins.
  • πŸ’‘Leave long tails when fastening off parts that will be sewn together to make assembly easier and more secure.

This little Baby Cthulhu pattern is a playful mix of cute and creepy, perfect for collectors and gifts. Customize the colors and tentacle styles to make each one unique. Enjoy the slow, satisfying sculpting process and share your creations with pride. 🧢🧡✨

You ask,

we answer.

FAQs

What size will the finished piece be?

The finished amigurumi measures approximately 12 cm tall when using the recommended yarn and hook size, though size may vary slightly with tension and yarn choice.

Can I use different yarn weights for this pattern?

Yes, you can use different yarn weights, but final size and hook choice will change; choose an appropriate hook for the yarn and expect a larger or smaller finished toy.

Do I need prior crochet experience for this pattern?

This pattern is rated intermediate and uses increases, decreases, BLO, and joining techniques, so basic amigurumi experience is recommended for best results.

How long does this project typically take to complete?

Most crocheters complete this project in 5-7 hours, though time may vary based on experience level, customization, and assembly complexity.